
|
|
| Elliott Sound Products | Project 140 |
Many AC waveforms we need to measure are not nice friendly sinewaves, and there is a significant error if you measure the value using a standard AC voltmeter. These are typically average responding, but calibrated to show RMS. The only problem is that the reading is only accurate when the waveform is a sinewave. Other waveforms typically read much lower than the real value and give a false reading that isn't actually useful for anything. If you happen to be checking the current rating (vs. current drawn) of building wiring, you could make a very dangerous mistake if the waveform is other than a sinewave and you use an 'ordinary' meter.
RMS stands for 'root mean squared', which defines what an RMS converter does internally. The input signal is (precision) rectified to give a unipolar voltage. The signal is then squared and averaged, and the circuit finally takes the square root of the average (mean) value. As noted in Analog Devices' application notes and other material, the actual circuit is configured differently to limit the internal dynamic range and provide greater accuracy than would be possible if the squarer circuit had to operate over a range of around 10,000:1. The IC itself is basically an analogue computer. To gain a full understanding of the IC operation, I suggest the reader looks at the references.
This project is ideally suited to either of the current monitor projects presented (see Project 139 and/or Project 139a), but is equally suited for anywhere that true RMS metering will give improved performance. The accuracy and linearity of RMS converters are usually better than expected, and (at least in theory) you can rely on the IC to give you a good result, even without calibration. The device I used is a laser-trimmed true RMS converter, the AD737 [1]. It is claimed to be within 0.3% accurate, and will handle a crest factor of 5.
"Crest factor?" You may well ask. Crest factor is defined as the ratio between the peak and RMS value of a waveform. With a sinewave, this ratio is well known ... 1.414 (the square root of 2). This simply means that the peak value of a sinewave is 1.414 times the RMS value. With other waveforms, the crest factor varies widely. The following table is adapted from the AD737 datasheet.
| Waveform - 1 V Peak | Crest Factor VPEAK / VRMS | True RMS | Avg/RMS meter * | Error (%) |
| Undistorted Sine Wave | 1.414 | 0.707 | 0.707 | 0 |
| Symmetrical Square Wave | 1.00 | 1.00 | 1.11 | +11.0 |
| Undistorted Triangle Wave | 1.73 | 0.577 | 0.555 | -3.8 |
| Gaussian Noise (98% of Peaks <1 V) | 3 | 0.333 | 0.295 | -11.4 |
| Rectangular | 2 | 0.5 | 0.278 | -44 |
| Pulse Train | 10 | 0.1 | 0.011 | -89 |
| SCR Waveform - 50% Duty Cycle | 2 | 0.495 | 0.354 | -28 |
| SCR Waveform - 25% Duty Cycle | 4.7 | 0.212 | 0.150 | -30 |
* Reading of an Average Responding Circuit Calibrated to an RMS Sine Wave Value (V)
As you can see from the table, some waveforms have enormous errors, and the worst (a pulse train with a crest factor of 10) will continue to give a false reading, even with an RMS converter. Like any signal processing system (analogue or digital), there is a maximum level that can't be exceeded. When the input signal has a crest factor greater than 5, the internal circuitry of the AD737 will become non-linear and the RMS core within the IC is overloaded. For this reason, the maximum recommended input level is 200mV to ensure that there is always enough internal headroom.
Although the AD737 is claimed to be able to operate with up to ±15V, all application notes show it using ±5V, and that has been retained in this design. One of the less attractive features of the IC is that the output is negative. With 200mV RMS input, the output will be -200mV DC, and although you can connect a panel meter (or any other DC voltmeter) with the leads reversed, it's more sensible to use an inverter to get the correct polarity and to isolate the high impedance output from the outside world.
There are a few other RMS converter ICs available, but some are not suited to making normal AC voltage measurements. For example the THAT2252 might look suitable, but its output is logarithmic. This is fine for dB measurements but is of no use whatsoever for measuring AC voltage or current. We need dB measurements for audio levels, not for mains current! The 2252 is designed for use in audio compressors and expanders. It's not intended for test and measurement equipment, and it has a limited high frequency response.
There is something that has to be pointed out here, and it's also covered in the Meters, Multipliers And Shunts article. People use digital multimeters (DMMs)for just about everything these days, and there is a pitfall that you probably didn't know about. All digital multimeters (including 'True RMS' meters) have a limited upper frequency. They are mainly intended to measure mains and other low frequency waveforms where a true RMS value is needed. However, the limited frequency response means that you will not be able to measure the frequency response of an amplifier above perhaps 1kHz. Some are better, but very few (and I really do mean very few) can measure 20kHz with any confidence.
Even major brand-name meters will almost invariably show a reading that's considerably less than the actual voltage at over 10kHz. Some high quality bench meters are 'better' but not always by very much. I tested my bench meter (5½ digits), a handheld 'True RMS' meter, and a cheap multimeter that is very ordinary in most respects. The results are shown below.
| Frequency | Bench RMS | Handheld RMS | 'Ordinary' |
| 20 Hz | 4.9500 | 5.01 | 4.96 |
| 100 Hz | 5.0005 | 5.05 | 4.94 |
| 500 Hz | 5.0063 | 5.05 | 4.93 |
| 1 kHz | 5.0064 | 5.05 | 4.93 |
| 5 kHz | 5.0064 | 4.96 | 4.99 |
| 10 kHz | 5.0099 | 4.75 | 5.38 |
| 20 kHz | 5.0155 | 4.12 | 6.73 |
| 50 kHz | 5.0370 | 0.937 | 11.23 |
| 100 kHz | 5.2960 | 0.233 | 13.09 |
The absolute level was confirmed on my oscilloscope at each frequency, and it's apparent that only the bench multimeter can be trusted at anything above 5kHz. However, at 100kHz even that meter read almost 6% high, and at 20Hz the reading was 1% low (which surprised me, but it uses a DC blocking cap on AC volts ranges which probably accounts for the error). The 'ordinary' (i.e. not True RMS) meter went mental above 5kHz, reading high, and showing well over double the actual voltage at 100kHz. The handheld RMS meter was within 1% up to 5kHz, but the reading died horribly above that. The hand-held meters I used were simply the first to hand, but the bench meter is my 'go-to' meter for most measurements.
It's quite obvious that you need to verify that your preferred meter doesn't lie to you if you use it for response measurements. This is one of many reasons that the oscilloscope is always my preferred AC measurement device, because despite absolute accuracy being worse than a good meter, it tells you what you need to know, including waveform - something none of the digital multimeters can do. Even some of the best known brands do not specify their AC frequency range, only the accuracy figure. You can probably find it, but it may take some serious searching!
For example, I looked up one of the better known brands, and went through the specifications. Nothing. I downloaded the manual, and finally found the details on page 20 (of 24). AC voltage accuracy is specified as 1% (+3 counts) from 45Hz to 500Hz, and 2% (+3 counts) from 500Hz to 1kHz. Above 1kHz, you're on your own - nothing is specified.
There's surprisingly little on the Net that covers this aspect of digital meters. There are some discussions on forum sites, but sadly some of the comments are nonsensical, or give 'reasons' that are completely wrong. While many DMMs have frequency counters that extend to at least a few MHz, that does not imply that they can measure these frequencies. The uninitiated are unlikely to be aware of this limitation because it's not made easy to find in most cases. In general, I suggest that a 'True RMS' meter be used for AC measurements, as there will be significant errors if the waveform is not sinusoidal.
As described above, most AC meters are average-responding, but calibrated in RMS. It's worth knowing just what this means, and you certainly won't find the details in the manual that comes with the meter. No AC waveform can be measured with a digital meter or moving coil meter without being rectified. This involves using a precision rectifier (see Precision Rectifiers), followed by an averaging circuit - typically a simple resistor-capacitor integrator. The average value of a 1V peak sinewave (rectified) is 0.636V, and all that's done is to provide a small amount of amplification to make the meter read 0.707V instead. Unfortunately, this relationship only works with an undistorted sinewave, so measurements of all other waveforms are in error.
Even now, true RMS meters are typically far more expensive than 'standard' types. This is a shame because all AC readings on standard meters are wrong except with purely resistive loads and sinewave voltage and current waveforms. As a result, a vast number of AC measurements taken are invalid, regardless of how careful one might be. The only valid AC measurement is true RMS - anything else is probably in error. The error can be huge, as shown in Table 1.
True RMS measurements have been available for some time, but early versions were cumbersome and slow, relying on heating effect. The input waveform was applied to a heater, and the temperature monitored with a suitable sensor. This was compared to an identical unit supplied with DC. A 1V RMS signal has exactly the same heating ability as 1V DC, regardless of the AC waveform or frequency.
The normal application for this project is as an RMS converter/adaptor for a dedicated metering system, and it can drive a digital panel meter or a moving coil analogue meter. While having to use a buffer and inverter is a nuisance, it does allow you to change the gain to suit the meter you have. The AD737 has an output impedance of around 8k, and any load across the output will cause loss of accuracy. While any necessary scaling can be done around the IC, the range is limited and IMO it's not very useful.
The complete schematic is shown below. Because we are working with millivolt levels at DC, being able to adjust the DC zero point is important. Most common opamps are pretty good, having fairly low input offset voltage and current, and you can use a TL072 or an MC4558 (for example). While offset for both is typically only around 1mV, it does vary with temperature and worst case is shown in the datasheets as 6mV. That's a significant percentage of 200mV, so an offset null adjustment is required. The arrangement shown gives an adjustment range of ±11.5mV which should be plenty. If you need more, either try a different opamp or reduce the value of R4.

Figure 1 - Schematic Of The RMS Converter
The AD737 is not an inexpensive device, so I recommend that you use a socket. Don't insert the IC until you are certain that all voltages are correct and of the right polarity. The first opamp (U2A) following the converter is a buffer, with offset null circuitry added using VR1. The second stage (U2B) is an inverting amplifier, and the gain can be set to whatever you need via VR2 - range is 0.1 - 6 as shown. If the readout is a panel meter (LED or LCD), these have a normal full scale sensitivity of 200mV, so the second stage gain will be unity (or close to it). The feedback network around U2B can be tailored to suit your needs. If you need a gain of between (say) 3 to 12 (600mV - 2.4V), then simply increase VR2 to 100k and make R7 22k. You'll have some leeway, because the full range will provide gain of between 2.2 and 12.2
Should you be driving a moving coil analogue movement then a suitable scaling resistor has to be used in series with the movement (see Meters, Multipliers & Shunts for more information). Other than setting the DC offset to zero, calibration can be based on the selection of the series resistor (which can include a trimpot). There is no real need to calibrate the RMS converter itself in this case, provided it can supply a maximum output that's high enough to drive the meter movement.
The datasheet for the AD737 has a bewildering array of options for CAVG and CF (C2 and C3 respectively). Having experimented, I found that 100uF is the best compromise for both. I suggest that low-leakage electrolytic caps be used in both locations. If you need faster settling time, you can reduce either or both - see the datasheet for more info, but be prepared to see more options and compromises than you can poke a stick at (it really is a minefield).
The offset circuit arrangement shown has been tested thoroughly, using 4558 opamps in an opamp test board. With no shielding or even precision resistors, I was able to get the offset voltage down to less than 2µV fairly easily. I found that after power was applied, it would take about 5 minutes to stabilise, starting from around 25µV and gradually reducing towards zero. Once the opamps had reached operating temperature there was no further drift. Since the smallest useful resolution is several millivolts, having a worst case DC offset of 0.025mV is more than satisfactory. There is no reason to expect stability over time to cause problems, though you might need to re-calibrate the DC offset every few years.
If the output opamp (U2B) is operated with gain, offset will be amplified along with the signal. However, both will be amplified equally and the net percentage will remain the same. You will probably get some additional offset from U2B, but the trimpot should allow it to be zeroed out (reduce R4 to get more range if needed).
The first step is to set the DC offset to zero. Short the input to the RMS converter so it doesn't pick up any noise (use a very short link). Carefully adjust VR1 until the output is exactly zero. You may need to readjust VR1 after the gain is set (Calibrate). Calibration will be an iterative process - if the output gain is changed using VR2, you will almost certainly need to reset the zero offset (VR1). Allow the circuit to operate in its normal environment (usually room temperature) for at least 30 minutes and verify that the DC offset remain at zero. This tedious messing around can be eliminated by using opamps with highly specified and very low input offset voltage and current, but they will be hard to get and expensive. However, even budget opamps are surprisingly stable if set up properly.
For calibration, you will need an accurate standard (or true RMS) AC/DC meter and a source of undistorted sinewaves. Calibration is relatively straightforward. You need to use a frequency of around 100Hz or so, mainly because most digital meters have rather poor frequency response. If you apply an AC input voltage of 200mV RMS, you should see a DC output of 200mV at the output.
If you plan to use the RMS adaptor within an instrument (such as a distortion meter), the circuit needs to be arranged so that the normal full-scale voltage is around 200mV. You can extend that up to 1V if needs be, but be aware that the maximum allowable crest factor will be reduced. Output level is then set using VR2, and can range from 0.1 up to 10 times by adjusting resistor values. As shown, the output gain range is from 0.6 to 1.3 as set by VR2.
A perfect candidate for a true RMS meter is a distortion meter. The input waveform is always a sinewave (more or less), but the output waveform is anything but sinusoidal. Because of the distorted residual waveform, virtually all distortion meters read low - the displayed distortion is less than the real value, and could read low by as much as 20%. Where a true RMS reading meter accurately displays the value for high crest factors (which can be common with distortion waveforms), the typical average reading meter does not.
If you build a distortion meter, it's usually a fairly simple matter to include the facility for a millivoltmeter as well, since that's what's used to measure the output of the distortion meter. Alternatively, you can make a stand-alone millivoltmeter - this is covered in a bit more detail below. You can choose to use a moving coil analogue meter movement (preferred) or a digital panel meter as the display. The latter can be obtained quite cheaply these days, although some have very irritating power requirements that may demand a completely separate power supply.
As noted above, either of the current monitor projects will also benefit from using a true RMS metering system. Most common electronic devices draw a non-linear current, and a standard average reading (but RMS calibrated) meter will underestimate the current - often by a considerable degree. Bear in mind that some waveforms will have such a high crest factor that even the RMS chip will be unable to provide an accurate reading. A good example is a CFL (compact fluorescent lamp) when run from a TRIAC dimmer (see Dimmer + CFL Test Results).
Just measuring the mains will provide something of a challenge for an 'ordinary' meter, because the waveform is almost invariably distorted. Even a small amount of mains waveform 'flat-topping' will cause your standard meter to read high, because the crest factor has been reduced. Look at Table 1 again - errors are positive (over-reading) when the crest factor is less than 1.414, and negative (under-reading) when the crest factor is greater than 1.414. A standard meter can only ever be accurate when the waveform is an undistorted sinewave. Provided the distortion of the mains waveform is less than ~5%, the error is fairly small, so I don't suggest that you fret too much. 
Although some of the application data shows the use of an input attenuator, great care is needed to make sure that excessive voltage can never be applied to the input of the AD737. To keep errors due to stray capacitance low, an attenuator should use relatively low value resistors. You also need to be aware that the frequency response of the RMS converter is level dependent. At 200mV input, the -3dB bandwidth is claimed to extend to 190kHz, but is only 5kHz at 1mV input. The useful input range starts from 10mV (55kHz), which is in keeping with most measurements (accurate measurement is usually not possible when the reading is less than 5% of full scale with any meter). See the datasheet for all details of input level vs. bandwidth. In general, the input should be maintained at a minimum of 20mV if at all possible.
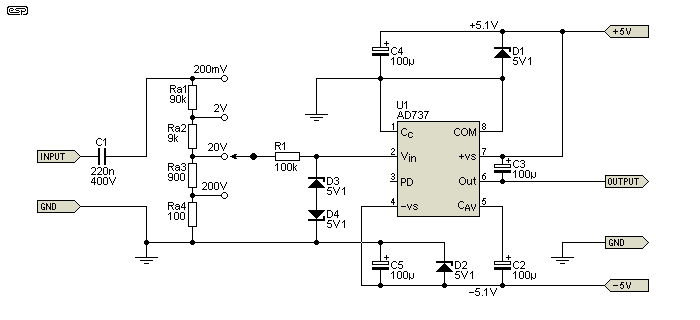
Figure 2 - Input Attenuator For RMS Converter
Note that the diagram in Figure 2 is part of the complete schematic shown in Figure 1. The point marked 'Output' connects to point 'A' in Figure 1 - the non-inverting input of U2A (pin 3).
You will also need to include input protection, as shown in the diagram above (D3+D4). The attenuator I recommend is 1/10th the impedance of that suggested in the data sheet, simply because of stray capacitance and bandwidth. For a wide range, wide bandwidth attenuator, have a look at the one used in the AC Millivoltmeter project. It may need to be adapted, because as shown it is based on 10dB steps which are not usable with a digital display, although it will work fine with an analogue movement having a proper dB scale.
Of course, if you are using a moving coil meter movement with 10dB steps (1V, 316mV etc.) Then you can use the attenuator shown in Project 16 without modification.
This project is actually easily adapted to become an audio millivoltmeter in its own right - all it needs is an input amplifier capable of enough gain to allow measurement down to a level of around 3mV. The circuit shown in Project 16 is fairly easily modified, and details will be provided if there is enough interest. Given the comparatively low bandwidth of the AD737 (55kHz at an input level of 10mV), it can never be quite as good as the standard arrangement for the AC millivoltmeter, but the fact that it measures true RMS does make it a better meter overall - just don't expect to be able to measure out to several hundred kHz, especially at low input levels.
Because this is intended as a building block rather than a complete project, it's not possible to provide any final assembly information, because each case will be different. When housed with other electronics, make sure that the circuit is shielded against noise pickup from other parts of your circuit, or low-level readings will be affected by noise. Also, make sure that the circuit board is kept away from heat sources. If the AD737 or the opamp are allowed to get hot from other parts, you'll suffer from DC drift around the zero point, increasing the inaccuracy that's inherent at very low signal levels.
It's also worthwhile to offer a general warning about AC measurements in general. Just because you have a true RMS meter (or the adaptor described here), this does not guarantee that all your AC measurements will be accurate. Some waveforms will have such a high crest factor that no RMS converter IC can handle it and give a true reading, and others may be at a frequency that's outside the allowable range.
Before relying on any meter, it's wise to know something about the waveform you are measuring, and the best possible way to find out is with an oscilloscope. This is (usually) not necessary when measuring mundane things like AC mains voltage, but suddenly becomes very important indeed when measuring mains current - especially with power supplies and other non-linear loads.
For what it's worth, modern digital oscilloscopes have extensive maths functions as well as the normal display. Mine can display RMS (among other things), and does so more accurately than a high quality (true RMS) bench multimeter when measuring pulse waveforms. Why? Because the 'scope calculates the RMS value, and as long as the waveform fits the display (therefore there's no overload) it can do an accurate calculation regardless of crest factor. Even the horrible spiky current waveform from a CFL (compact fluorescent lamp) causes the 'scope no problems, but the meter still gets it wrong (reading low) because the crest factor is too high.
 Main Index
Projects Index
Main Index
Projects Index