
|
|
| Elliott Sound Products | Meters, Multipliers & Shunts |
 Main Index
Articles Index Main Index
Articles Index
|

The moving coil meter movement (also known as a galvanometer) was invented by the French physicist and physician, Jacques-Arsène D' Arsonval in 1882. It is the basis for all modern meter movements, and the basic design principles remain the same after all this time. The actual construction can differ quite widely, but upon examination it is obvious that there are simply different ways to achieve the same outcome.
Meters are common in audio. They are sometimes used as 'eye candy' to impress - especially on power amplifiers, but they have many real uses as well. Meters are used to display the level from mixing desks, either as a VU (volume unit) or PPM (Peak Programme Meter) display, and while LED meters save space and can be very fast acting, they have neither the coolness of an analogue movement nor the retro appeal. To many people, an analogue movement provides a better sense of what is happening, even though they lack the immediacy of a LED display. In some cases, the two may even be combined to give the best of both worlds.
Meters are also used on power supplies and many other pieces of test equipment, and although it is assumed that digital is more accurate (you can see the exact voltage displayed), this is not always the case. Although digital meters appear accurate, this is often an illusion (read the specifications ... 1% ±1 digit is common, and that last digit can make a big difference sometimes).
In addition, there are some applications where digital is essentially useless. If a voltage (or current) is continually changing, the readout from a digital meter is impossible to interpret accurately. With analogue, you can see peaks and dips, and it is easy to see a trend (or average) just by looking at the pointer. Analogue is far from dead, and to this day I still use many analogue meters on millivolt meters, distortion analysers, power supplies, etc.
Although many of the techniques shown in this article are aimed at analogue applications, they are equally at home with digital meters - DPMs (Digital Panel Meters) are commonly available for about the same price as their analogue counterparts. This makes them very attractive for some applications - especially since good moving coil meter movements are now quite expensive and may be hard to get. Some applications are also shown for DPMs.
There is one thing that has to be pointed out here, largely because there's no other ESP article that covers the topic in detail. People use digital multimeters for just about everything these days, and there is a pitfall that you probably didn't know about. All digital multimeters (including 'True RMS' meters) have a limited upper frequency. They are mainly intended to measure mains and other low frequency waveforms where a true RMS value is needed. However, the limited frequency response means that you will not be able to measure the frequency response of an amplifier above perhaps 1kHz. Some are better, but very few (and I really do mean very few) can measure 20kHz with any confidence.
Even major brand-name meters will almost invariably show a reading that's considerably less than the actual voltage at 10kHz or more. Some high quality bench meters are 'better' but often not by very much. I tested my bench meter (5½ digits), a handheld 'True RMS' meter, and a cheap multimeter that is very ordinary in most respects. The results are shown below.
| Frequency | Bench RMS | Handheld RMS | 'Ordinary' |
| 20 Hz | 4.9500 | 5.01 | 4.96 |
| 100 Hz | 5.0005 | 5.05 | 4.94 |
| 500 Hz | 5.0063 | 5.05 | 4.93 |
| 1 kHz | 5.0064 | 5.05 | 4.93 |
| 5 kHz | 5.0064 | 4.96 | 4.99 |
| 10 kHz | 5.0099 | 4.75 | 5.38 |
| 20 kHz | 5.0155 | 4.12 | 6.73 |
| 50 kHz | 5.0370 | 0.937 | 11.23 |
| 100 kHz | 5.2960 | 0.233 | 13.09 |
The absolute level was confirmed on my oscilloscope at each frequency, and it's apparent that only the bench multimeter can be trusted at anything above 5kHz. However, at 100kHz even that meter read almost 6% high, and at 20Hz the reading was 1% low (which surprised me, but it uses a DC blocking cap on AC volts ranges which probably accounts for the error). The 'ordinary' (i.e. not True RMS) meter went mental above 5kHz, reading high, and showing well over double the actual voltage at 100kHz. The UNI-T RMS meter was within 1% up to 5kHz, but the reading died horribly above that. The hand-held meters I used were simply the first to hand, but the bench meter is my 'go-to' meter for most measurements.
It's quite obvious that you need to verify that your preferred meter doesn't lie to you if you use it for response measurements. This is one of many reasons that the oscilloscope is always my preferred AC measurement device, because despite absolute accuracy being worse than a good meter, it tells you what you need to know, including waveform - something none of the digital multimeters can do. Even some of the best known brands do not specify their AC frequency range, only the accuracy figure. You can probably find it, but it may take some serious searching!
For example, I looked up one of the better known brands, and went through the specifications. Nothing. I downloaded the manual, and finally found the details on page 20 (of 24). AC voltage accuracy is specified as 1% (+3 counts) from 45Hz to 500Hz, and 2% (+3 counts) from 500Hz to 1kHz. Above 1kHz, you're on your own - nothing is specified.
There's surprisingly little on the Net that covers this aspect of digital meters. While many have frequency counters that extend to at least a few MHz, that does not imply that they can accurately measure the voltage at these frequencies. The uninitiated are unlikely to be aware of this limitation because it's not made easy to find in most cases. In general, I suggest that a 'True RMS' meter be used for AC measurements, as there will be significant errors if the waveform is not sinusoidal.
The basic analogue meter movement is the moving coil type. These have been the mainstay of most metering applications for a very long time, but there are others that are common in other industries. Moving iron meters are often used for mains applications (especially in switchboards and the like), and although they are non-linear this is not a limitation for the intended applications. The latter are interesting, but will not be covered because of limited availability and lack of usefulness for audio applications. Another interesting meter uses electrostatics to display the voltage. These are restricted to very high voltage applications and apply virtually no circuit loading. Like the moving iron movements, they are not useful for general workshop use because they are too specialised. A photo of a very ordinary moving coil meter movement is shown in Figure 1.

Figure 1.0.2 shows the essential sections - yes, it is different from Figure 1.0.1. The drawing shows the way that moving coil movements were commonly constructed many years ago, which is somewhat easier to draw than more modern types. The essential parts are labelled so you get an idea of the construction of these meters. Nearly all moving coil meters are low voltage, low current devices, and the multipliers and shunts referred to in the title are used to convert the movement to read higher voltages and currents than it was designed for. This versatility is the reason that moving coil meters have stayed with us for so long. They can be made to read up to thousands of volts (or amps), AC voltage and current (with the addition of rectifiers), audio levels, or anything else where a physical quantity can be converted to an electric current.
The beauty of the analogue scale is that a plant operator (for example) can tell at a glance if the reading is normal, whereas it is necessary to actually read the displayed value of a digital meter. You don't need to read a value on an analogue meter to see if it is normal. Look at the meter on a battery tester - it is simply labelled 'Replace' and 'Good' or similar - the exact value is unimportant, but you still see a linear scale so you can estimate 'Marginal' without even thinking about it.

The moving coil movement uses a coil former of aluminium, around a centre pole and 'immersed' in a strong magnetic field. The coil is most commonly supported by jewelled bearings (although taut-band suspension is a much better arrangement, IMO). The coil is maintained at the zero position by the tension of the hairsprings, and one of these (almost always the top) is made adjustable from outside the meter case. This allows the user to zero the pointer. Current to the coil is carried by the hairsprings.
Taut band suspension uses no bearings, but supports the coil on a tiny flat spring (a flat wire) at each end. The flat spring acts as both suspension and restoring force, as well as providing current to the coil itself. Unfortunately, taut band movements are not very common, possibly because they are sometimes not as mechanically rugged as the traditional jewelled pivot suspension, and are very difficult to repair if the suspension breaks (personal experience!). A major advantage is that they have very low (virtually zero) hysteresis - this is caused in jewelled movements if the pivot sticks slightly because of wear, contamination or damage.
The aluminium former is almost invariably made so that it forms a shorted turn around the centre pole. This provides electrical damping, preventing excessive pointer velocity. There is a lot more to the analogue meter movement than meets the eye, but we shall leave the topic now, so that the usage of these devices can be covered.
All moving coil meters have a rated current for FSD (Full Scale Deflection), and this parameter is of primary importance. The FSD current determines how much load the meter will place on any drive circuitry, or for a voltmeter, how much current it will draw from the voltage source. This may or may not be important, depending on application.
Most commonly available meters are readily available with a sensitivity of between 50µA and 1mA FSD. More sensitive meters are available, but the cost goes up with increasing sensitivity. The most sensitive meter I have heard of was used by Sanwa in an analogue multimeter - 2µA FSD, taut band movement!
All meter movements have resistance, because the coil uses many turns of fine wire. The resistance varies from perhaps 200Ω or so (1mA movement) up to around 3.5k for a 50µA movement. These figures can vary quite widely though, depending on the exact technique used by the manufacturer.
Normally, moving coil meter movements are suitable for DC only. Some (such as VU meters for audio) have an internal rectifier so that AC may be measured, but accuracy is generally rather poor, especially with low voltages.
To obtain good AC performance requires the use of external circuitry. The project pages have a design for an AC millivoltmeter, and there is an interesting array of precision rectifier circuits in the application notes section of the ESP site.
Some movements have a mirrored scale, where a band of highly polished metal is just behind the scale itself and visible through a window cut out of the scale. This is used to eliminate parallax errors as you read the meter, and can improve reading accuracy dramatically. When the pointer and its reflection in the mirrored scale are seen as one, the viewer is looking directly at the pointer and there is no parallax error. If you can see the reflection of the pointer then you must be looking at it at an angle.
None of this is useful if the meter is poorly calibrated or non-linear. Moving coil meters can be non-linear if the magnetic path is not adjusted correctly - such adjustments are not recommended for anyone not trained or used to working on very delicate equipment. It also helps if you know exactly what to do, a topic that is well outside the scope of this article.
When a meter is to be used as a voltmeter, a series resistor is used to limit the current to the specified FSD with the maximum applied voltage that you want to measure. This is a very easy calculation to make, since it involves nothing more advanced than Ohm's law.

For example, we want to measure the voltage from a power supply, and have a 1mA meter movement available, with a coil resistance of 200Ω. If the maximum supply voltage is 50V, then the meter should read from 0-50V. The total resistance needed will limit the current through the meter to 1mA with 50V applied, so ...
R total = V / I = 50 / 1mA = 50kΩ
Since the meter has 200Ω resistance, the series resistor will be ...
R mult = 50k - 200Ω = 49,800Ω
This is not a standard value, so will need to be made up using series / parallel resistors. Of course, one can always cheat and use a 47k resistor in series with a 5k pot, thus enabling the meter to be calibrated to a high accuracy. We do need to check the resistor power rating, because it is easy to forget that the multiplier resistor can dissipate a significant power - especially at high voltages. The resistor power is given by ...
P = I² × R = 1mA² × 47000 = 53mW
The power dissipation is well within limits for even the lowest power resistor. Be very careful when determining the multiplier resistance for high voltages. Although the power rating may be quite low, the gradient voltage across the resistor may exceed its ratings. It is imperative that resistors are not operated above the maximum rated voltage for the particular type of resistor. This specification is not often given, so it is best to assume the worst case, and limit the voltage across any 0.5W resistor to no more than around 150V - less for 0.25W resistors.
It is generally preferable to use the most sensitive meter you can get within your price range, so in this case, a 50µA movement would be a far better proposition. Less current is drawn from the measured voltage source, so there is less loading on potentially sensitive circuits. This was always a problem when measuring voltages in valve amplifiers, because typical cheap analogue multimeters often used relatively high current movements, and this loaded the voltage under test giving incorrect readings. Analogue multimeters usually had a rating of 'Ohms/Volt' - the 1mA movement described above uses 50k total resistance to measure up to 50V, so that would be rated at 1kΩ/ Volt.
The better multimeters of yesteryear were rated at a minimum of 20kΩ/V up to 100kΩ/ Volt (the Sanwa meter mentioned above was 500kΩ/Volt!). To obtain even higher measurement impedance, the better equipped workshops and laboratories back then used a VTVM (Vacuum Tube Volt Meter), offering an input impedance of around 10MΩ. These were followed by FET input transistorised units, and finally displaced by digital multimeters. Despite their popularity, digital multimeters are still very bad at some measurements, and are often not as accurate as we tend to think they are.
Using a 50µA movement, the multiplier resistor needs to be ...
R mult = V / I = 50 / 50µA = 1MΩ - 3500 (meter resistance) = 996,500Ω
... which works out to be 20kΩ/ Volt. Again, this resistance can be made up by series connection of different values, but a 1MΩ resistor is perfectly ok. The error is much smaller than the tolerance of the resistor or the meter movement, at 0.35%. If you need greater accuracy you will need to use a trimpot with a series resistor as described above for the 1mA movement.
That's all there is to multipliers - as stated in the beginning of this section, they are very easy to work out.
The situation is a little more complex when calculating a shunt for current measurement. Not so much because the calculations are difficult, but because you will be working with very low resistance values. It is also important to ensure that the meter is connected directly to the shunt - even a small length of wire in series may make readings uselessly inaccurate. The schematic diagram below shows not only the electrical connection, but also the physical connection to the shunt.
In most cases, it is easier to calculate (or measure) the voltage across the meter movement for FSD. If you don't know the resistance, it can be measured with a digital multimeter. The current from most digital multimeters is low enough not to cause damage to the meter, but the pointer may swing rather violently. Connect with reverse polarity to minimise the risk of bending the pointer.
Unless you are measuring low currents (less than 1A or so), the shunt resistance can be worked out using Ohm's law, and will be accurate enough for most purposes. This is covered below.
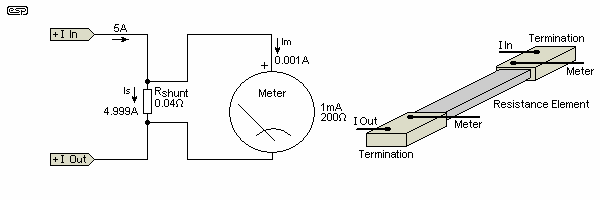
Assuming a 1mA movement with an internal resistance of 200Ω, as an example we wish to measure 5A. This means that 4.999A must pass through the shunt, with the remaining 1mA passed by the meter movement. The shunt resistance can be found with the following formula ...
Rs = Rm / ( Is / Im) where Rs is the shunt resistance, Rm is the meter resistance, Is = shunt current, Im = meter current
So for our example,
Rs = 200 / ( 5A / 1mA ) = 0.04ΩIf we use only Ohm's law (having determined that there will be 200mV across the movement - 1mA and 200Ω), the shunt can be calculated as ...
Rs = Vm / I where Rs is shunt resistance, Vm is meter voltage at FSD, and I is the current
Rs = 0.2 / 5 = 0.04Ω
This method will work to within 1% accuracy provided the measured maximum current is more than 100 times the meter current. One thing we have to be careful of with shunts is that the voltage 'lost' across them (known as the 'burden' is not excessive. This will reduce the voltage supplied to the load, and can result in significant errors, especially at low currents. For example, if we only need to measure 1mA, we can use the meter directly, but we lose 200mV across the meter. In the case of the 0.04Ω shunt calculated above, we lose ...
V = R × I = 0.04 × 5A = 200mV
... exactly the same voltage loss! It's not a great deal, but can be critical in some exacting tests or at very low voltages. 200mV is almost nothing with a 50V supply (0.4%), but is very significant if the applied voltage is only 1V (a full 20% loss). The voltage drop can be reduced slightly by using a more sensitive movement. For a 50µA movement with 3,500Ω resistance, the loss is ...
V = R × I = 3500 × 50µA = 175mV
There's not much of a gain, but there are also not many alternatives. DC current measurement will always lose some voltage, so it is important that the voltmeter is always connected after the ammeter, so that the 'lost' voltage is taken into consideration. Where extremely low voltage drop is important, one must resort to amplification. An opamp can be used to amplify the voltage across a much smaller value shunt, but at the expense of circuit complexity and temperature drift. Digital panel meters are often (but not always) better than analogue movements for current measurements. Note that for AC current measurements, a current transformer is the best solution - see Transformers - Part 2 for more.
The idea of a shunt is all well and good, but where does one obtain an 0.04Ω resistor? It can be made up of a number of wirewound or metal film resistors in parallel, or a dedicated shunt may be available. Obtaining high accuracy at such low resistances is very difficult though, and shunts are generally cut, machined or filed to remove small amounts of metal until the exact value needed is achieved. The shunt must be made from metal having a low temperature coefficient of resistance to prevent the reading being affected by changes in temperature - either ambient, or caused by the load current heating the shunt. Common shunt materials are Constantan (copper-nickel, aka Eureka), manganin (copper, manganese, nickel) and nichrome (nickel-chrome).
There is an easier way to calibrate a shunt, as shown in Figure 5. The voltage drop will be a bit higher than it should be, but you only need a few millivolts extra to be able to use the technique.

Now it is possible to use 2 × 0.1Ω resistors in parallel, giving 0.05Ω. The voltage drop at 5A will be 250mV, but you have the advantage of being able to use standard tolerance resistors, which can represent a significant saving. The power is only 1.25W at full current, so a pair of 5W resistors will barely get warm. The trimpot can be adjusted to give an accurate reading, without having to resort to close tolerance resistors with impossible values. As an example for the above 5A meter, we could use a 100Ω trimpot in series with the meter. The value is not particularly important, but needs to be within a sensible range.
What is 'sensible' in this context? Easy. We already know that the meter needs 200mV for full scale and that we will get 250mV across a 0.05Ω shunt, so we need a resistance that will drop 50mV at 1mA.
R = V / I = 0.05 / 0.001 = 50Ω
Since we are using a pot, it is advisable to centre the wiper under ideal conditions to give maximum adjustment range (to allow for worst case tolerance), so a 100Ω pot is ideal.
For AC measurements, a current transformer is better than a shunt, as it imposes no restriction on the load current. These are covered in detail in the article Transformers - Part II. The link takes you straight to the section that covers current transformers. They are also discussed (briefly) below.
There is an alternative method for measuring DC (or AC) current with almost no loss at all. ICs are available that use a thick conductor and a fully isolated Hall-effect sensor to measure the magnetic field generated as current passes through the conductor. An example is the Allegro Microsystems ACS770LCB-050B, a bidirectional Hall-effect sensor that can handle up to ±50A, providing ±40mV/A output, centred on the quiescent output voltage of 2.5V. A unidirectional (DC only) version is also available.
With an output voltage of ±2V (referred to 2.5V), the output voltage range is from 500mV to 4.5V over the full range. While these are very useful devices, they are not inexpensive, and require additional electronics to obtain a usable output. If you need to sense low current, then be prepared for a fairly noisy output signal. Some of the noise can be removed with a filter, but that further increases complexity.
The device mentioned is not the only one of its type, but is representative of those you can use. Another is the Honeywell CSLA2CD as described in Project 139. This is a more versatile device (which is also likely to be quieter), but they are not inexpensive, at around AU$40-50 each depending on supplier. Even the Allegro IC costs a bit more than you might expect, at around AU$13.00 each (one off price). There are many other current sensor ICs available, but this is not the place to go into great detail.
You may have seen expanded scale voltmeters used in cars to monitor the battery voltage. Since no-one is interested if the battery measures less than 10V (it's dead flat!), and it should never exceed 15V, a meter that measures from 10V to 15V is nice to have. This is surprisingly easy to do, and although absolute accuracy is not wonderful in a simple application, it is more than acceptable for the purpose.

By using a zener diode, a base reference is established, and the meter only measures between the reference and actual battery voltage. We will use a 1mA movement again (as shown above). This scheme can be adapted for any desired voltage. The voltmeter only needs to measure the voltage drop across the zener feed resistor, which is needed to ensure that an acceptable current flows in the zener diode. The 1mA drawn by the meter is not enough to obtain a stable voltage.
The multiplier is worked out in the same way as before ...
R total = V / I = 5 / 1mA = 5kΩ
Because the multiplier resistance is much smaller than before, we must take the meter resistance of 200Ω into consideration.
R mult = R total - R meter = 5000 - 200 = 4800Ω
A 4.7k resistor will introduce a small error, but a 3.9k resistor in series with a 2k trimpot will allow the meter to be set very accurately. The zener feed resistor value is not critical, but should ensure that the zener current is between 10% and 50% of the maximum for the device (around 10% will usually give the best result). Assuming a 10V 1W zener, the maximum current is ...
Iz max = P / V = 1 / 10 = 0.1 = 100mA (Max.)
Using Ohm's law, we get a resistance value of 470Ω for a zener current of about 10mA at 15V. This will fall as the voltage is reduced, and extreme accuracy with a zener diode is not possible. This arrangement should work fine as a 'utility' meter. Depending on the zener diode's characteristics, it can be advantageous to run it at a higher or lower maximum current. If Rz is less than 270Ω the accuracy may suffer. This basic idea has been around for as long as I can remember, and has been used in countless car (or boat, etc.) battery voltage monitors.
If you are fussy (and want it to be accurate, what a nerve!  ) you can use a voltage reference IC instead of the zener diode. The LM4040-N-10.0 could be used instead (the 10V version). The series resistance (Rz) may need to be changed to limit the current to a bit less than the rated maximum 15mA (390Ω will be fine), and you can expect it to work very well indeed. The calculations don't change, but you must ensure that the maximum reference IC's current is not exceeded. Rmult is not changed if you use the same meter (or you can use a trimpot so it can be adjusted).
My thanks to 'Roger' who wasn't happy with the zener, and tested using the LM4040. This worked much better, giving a very accurate reading.
Note that you can also use a TL431 or equivalent as a reference, but these need to be programmed (with a pair of resistors) to the voltage required. The 'worst case' adjust pin current is 4µA, so the divider won't affect the reading much (if at all). These ICs are probably easier to find than the suggested LM4040, many of which are only available in an SMD package.
DPMs (Digital Panel Meters) are often very attractive, not just for their perceived accuracy, but because they can often be obtained for the same or less than a good analogue meter movement. They also have better linearity than most of the cheap movements, so there are some real benefits. Most are available with a quoted sensitivity of 200mV (199.9mV full scale), so are comparable to analogue meters in terms of voltage drop for current measurement. They have the great advantage of a (typical) 100MΩ input impedance, so voltage loading is extremely low. In addition, they will measure positive and negative voltage or current - this is available with a centre zero analogue meter, but they are hard to find.
Most DPMs are classified as 3½ digit, meaning that they display up to a maximum of 199.9mV. The most significant digit can only be blank or 1, and the other 'half' is used to display a negative sign to indicate that the input is negative with respect to the common or ground terminal. This often means that much of the range is wasted if you want to display a range other than 0-1999. Note that most DPMs do not automatically select the decimal point, and there are extra pins to allow the user to select the position of the decimal point (or to ignore it completely). Analogue meters have no such limitation, because the scale can be calibrated with any units you wish, and covering any range.
Measuring voltage with a DPM is easy - most even come with instructions that show you how to do it. You do need to be careful to ensure that possibly destructive voltages cannot be coupled to the inputs. Like all ICs, the ADC (Analogue to Digital Converter) used is sensitive to excess voltage, and the IC can be destroyed. Although the following circuit uses a ½-wave rectifier, full-wave rectification is better (using a diode bridge). However, this may mean that a simple 'off-line' power supply cannot be used for the meter IC. The voltage divider should be re-calculated if a full wave bridge is used, because the ratio of peak to average is 1.58 (full-wave rectified 230V has an average value of 205.7V).

Figure 5.1.1 shows the circuit of a DPM voltmeter I built recently. This is designed to monitor the output from my workshop Variac (variable transformer). To ensure an adequate voltage rating for R div1 4 × 100k 1W resistors were used in series parallel, maintaining the peak voltage across each to 163V (the peak of 230V AC is 325V). 1W resistors were not used for their power rating, but to have a large resistance section, maintaining a relatively low voltage gradient across the resistor surface. Because the Variac can deliver 0-260V, the voltage to the DPM will be 0-26mV, and this is a half-wave rectified signal. The meter averages the applied voltage. Note that the 5V supply must be isolated, because it could have the full mains potential on all terminals if the active (live) and neutral conductors are ever swapped around. This is critically important - the entire circuit (including power supply) must be considered as being at mains potential.
To obtain the (approximate) average value of ½ wave rectified AC, you divide the peak voltage by 3.12. Based on this and for an average signal of 23mV, the average input voltage is 104V (325 / 3.12), so the voltage divider needs a ratio of ...
Vdiv = Vin / Vout = 104 / 23mV = 4522
For all reasonably high voltages, the division ratio is so high as to cause significant errors even with 1% resistors, and the use of a trimpot to adjust the value is strongly recommended. Since I used 100k for Rdiv1 (because I had 100k/1W resistors handy), the parallel combination of Rdiv2 and VR1 needs to be slightly more than ...
Rdiv2 = Rdiv1 / ( Vdiv - 1 ) ≈ 22Ω (actually 22.12Ω, but all values are approximate because using fixed resistors is not sensible)
50Ω (as used) allows VR1 to be roughly centred, and there is plenty of adjustment range. Needless to say, exactly the same technique can be applied to an analogue meter as well, but you need to allow for the much lower input impedance (perhaps 100Ω rather than 100M for the DPM that I used). As it turns out, with an average voltage of 104V and a resistance of 100k, the current is 1.04mA, so the meter can be driven directly (leaving out Rdiv2 and VR1). You will need to readjust the resistance though, because the (in)accuracy is 4% - much better results can be obtained, but most analogue meter movements will have a greater error than that built-in. A pot is highly recommended because the AC waveform is not very predictable, and large errors may result from waveform distortion. This also applies if the mains is full-wave rectified. The divider network is still usable as shown, but Rdiv2 should be reduced to 39Ω.

For a more conventional application, Figure 5.1.2 shows a basic 0-50V digital meter. The resistor values are fixed in this case. Because of the high input impedance of the DPM, we can use 1M for the upper divider resistor. The division ratio is determined the same way as before ...
Vdiv = Vin / Vout = 50 / 50mV = 1000
Rdiv2 = Rdiv1 / Vdiv = 1M / ( 1000 - 1 ) = 999Ω (Use 1k)
Using a 1k resistor is not an issue, because the resistor tolerance is much greater than the 1Ω difference in the calculated values. The same result can be achieved using 10k and 10Ω (or 100k and 100Ω), but there is not normally any need to aim for very low impedances. You may find that the meter displays 'rubbish' values in the least significant digit - this means that noise is being picked up. Use of a lower impedance divider may reduce that, or you can place a cap (100nF or so) in parallel with RDiv2. If you need the circuit to be particularly accurate, then you will need to use 0.1% resistors or add a pot so it can be adjusted. A pot is a lot cheaper and easier to get than 0.1% resistors, especially if you end up with odd values.
DPMs have a benefit as ammeters, but usually only if you don't need the full scale. Since the typical sensitivity is 200mV, by using only a part of the maximum reading, you can use lower shunt resistances than with analogue movements. You can also use IC current monitors instead of a shunt if preferred (see Section 4.1 for details).

The procedure for calculating the shunt is exactly the same as for an analogue meter, except that there is no meter current. You simply need to calculate the shunt based on the meter voltage for the desired current reading ...
Rs = Vs / I = 50mV / 5A = 0.01Ω
This gives a much lower shunt resistance, because only 50mV is needed at the meter input. The circuit shown will work up to 20A (19.99A to be exact) with the same 0.01Ω shunt resistor. Note that the input is shown on the negative supply, with the +ve input going to the positive supply via the load. If the input and power supply -ve terminals are not at the same potential, then the supply for the meter must be floating - it cannot be grounded. If you wanted to monitor the current in the positive supply lead for example, you need a floating auxiliary supply.
There are AC ammeters available that are supplied with a current transformer. These are often part of a 'combination' module that displays voltage, current and power. Some include cumulative power (kWh) and/or power factor. A simple digital DC meter can be used if a rectifier is added, and it needs to be an active circuit (using opamps) for a good result. Current transformers impose no limit on the current (they only have the resistance of the current-carrying cable), but have a low output - typically 100mV/A (1,000:1 ratio transformer). The secondary must be fitted with a 'burden' resistor (usually 100Ω for small transformers) that converts the output current to a voltage. A 1,000:1 transformer outputs 1mA/A.

You need to use an 'active' rectifier if you expect accurate readings, and perhaps amplification to measure the current properly. The output of the CT (current transformer) is 1mA/A or 100mV/A with the 100Ω burden, so a 5A load gives 500mV average rectified output. Measuring down to less than 100mA is easy with amplification. The nice thing about a CT is that the meter, rectifier and power supply are totally isolated from the mains. This provides far greater safety than a directly connected circuit, and the losses are low. Current transformers are available for currents ranging from ~5A to 500A or more (they tend to become large and expensive for higher current versions).
In general, this would have to be considered a silly topic. After all, one can buy a multimeter quite cheaply, and the switching is a nightmare. For specialised applications though, there may be perfectly good reasons for making a multi-range meter. Bear in mind that the circuit shown below does not include protection for the DPM, so if 2kV were applied when the 200mV range was selected, the meter will be destroyed. The attenuator values assume that the input resistance of the DPM is much greater than 10MΩ - preferably by a factor of at least ten!

You need a 2-pole 5-position rotary switch, and the insulation must be sufficient for the maximum voltage. Any protection circuit that you add must not load the external circuit, otherwise the meter may appear as a short circuit to high voltages. As noted, this is basically a silly idea, but it may be useful (even essential) for some applications where a conventional multimeter would be inappropriate. No, I can't think of such a situation either .

Similar comments apply to the ammeter. In this case, the resistors and switch must be capable of handling the current, although this only becomes an issue on the highest current range. Like the multi-range voltmeter, the usefulness of Figure 11 is somewhat dubious, although it would be nice on a laboratory power supply. The ranges can be expanded or moved - for example you may find that ranges from 2mA to 20A suit your needs. Simply reduce all resistance values by a factor of 10, and that's what you have. I don't fancy your chances of getting a rotary switch that can handle 20A though, and that's why almost all meters with a high current range use a separate input connector.
These are needed for all multimeter circuits, as well as dedicated meters that have a number of different ranges. The calculations are based on a number of different requirements, but the thing that's most important is the current drawn by the meter movement. For digital panel meters, this is negligible, but you must know the input impedance/ resistance of the meter. Assuming 1MΩ is 'reasonable' as a first guess, but you need to know the actual impedance or the switched attenuator will not be accurate.
We'll use a 50µA moving coil meter as an example, as these provide an input resistance of 20kΩ/ volt. Anything less sensitive is not very useful, as it causes loading on the circuit being measured, leading to errors. Cheap multimeters use 500µA movements, resulting in an input resistance of 2kΩ/ volt. This terminology may be strange to newcomers, but all it means is that if the voltage range switch is set to 1V, the meter load will be 20k (or 2k). When set for 10V, this will become 200k (or 20k). It's not relevant to digital meters, as most have a constant input resistance of (usually) 10MΩ (or 11MΩ).
Each resistor in the attenuator is determined by the voltage range and meter current. Look at the attenuator shown in Figure 11, and you'll see a progression of values, ranging from 9MΩ down to 1k. This assumes that the input resistance of the DPM is much greater than the total attenuator resistance (10MΩ), which may or may not be the case in reality. The values for a moving coil meter are harder to calculate, as more ranges are required. The most common is a 1-2-5 sequence, as this allows you to select a range where the meter's pointer is within the 20-80% range.

The resistors are all in a series string, and on any given range they limit the meter current to 50µA at the maximum voltage. R9 is always in circuit, and it includes the resistance of the meter's coil. If the coil is 1,200Ω, R9 will be 18.8kΩ (and most likely a fixed resistor in series with a trimpot for calibration). As an example, on the 10V range, R1, R2, R3 and R9 are all in series, so a total resistance of 200k is in series with the meter. 10V divided by 50µA is (not unexpectedly) 200k, so with 10V applied on the 10V range, 50µA flows through the meter and will show '10' on the scale.
Feel free to work out the current for any range with the full voltage applied, and it will always come to 50µA meter current. This is how 99.9% of all analogue meters are wired. The resistances change with the meter's FSD sensitivity, so for a 500µA meter, all resistances will be divided by ten. With other meter types (in particular VTVMs and their 'solid-state' equivalents), the attenuator is designed to provide a voltage to the measuring circuit, be it valves (vacuum tubes), JFETs or based on an opamp. This allows the attenuator to be a higher impedance, with a constant 10MΩ being common.
The more 'advanced' techniques aren't shown here, as the number of different circuits and calculations would rapidly make this article far too long. You may also have noticed that AC voltage measurements aren't included. These almost always use a separate attenuator, which will use lower resistances, and include a (usually crude) rectifier. The AC ranges on cheap meters measure the average value of the AC, and the meter is calibrated to show RMS. However, the measurement is only accurate with a low-frequency sinewave (such as 50-60Hz mains).
It almost looks like this section is pretty useless, but the final application allows you to do things that no normal multimeter will - measure very low resistances. 'Normal' analogue meters use a voltage source (most often a 1.5V cell) with a series resistance to suit the resistance range. The meter reads the voltage across the external resistor, so the scale is non-linear. This approach works, but not very well, as higher values are all cramped up at the lower end of the scale. Digital multimeters use a constant current, so the voltage across the DUT is directly proportional to its resistance.
There are many reasons one may want to measure very low resistance values. Transformer windings, loudspeaker crossover inductors (assuming you are actually interested in passive crossovers), or perhaps you need to be able to measure current shunts.
For very low resistance values you have two choices - either use a very sensitive voltmeter, or a high measurement current. Both methods have disadvantages. High sensitivity is difficult for DC amplifiers because of drift. Changes in temperature cause opamp offset voltage and current to change, and that affects the readings. While there are methods to (almost) eliminate drift, they are beyond the scope of this article.
High measurement current can cause the device under test (DUT) to heat, and that may (will) affect the resistance. Some things that have low resistance may not be able to even tolerate the kind of current that you may need to be able to measure them. In general, a maximum current of around 1A will allow most low resistance measurements without too many risks, but naturally the current source can be made variable, with switched ranges to provide a wide measurement range.
With a measurement current of 1A you will get a meter that can measure 0.2Ω full scale, so very low resistances can be measured. Needless to say, battery operation is not recommended if you aim to make a resistance meter that will provide 1A or more (although Li-Ion cells can be used). The meter is shown using a 4-wire system (aka Kelvin) so the lead resistance doesn't cause an error.

The use of the 4-wire system is essential for very low resistances. Two wires carry the current to the DUT, and the two measurement leads are then connected as close as possible to the device itself, with a component lead length equal to what will be used when the component is installed. This technique avoids errors caused by lead and connection resistances. While it is possible to null out the lead resistance, connection resistance tends to be variable, and can cause substantial measurement errors. This method is very common for this type of instrument. R1 is used to prevent possible damage to the DPM if it is subjected to an over-voltage condition.

The adjustable current source requires accurate calibration, and will be as good as your construction and choice of components allows. Temperature drift is always a problem with precision circuits like this one, but the circuit as shown will be quite accurate within the normal ambient temperature range. The current setting resistors (those connected to SW1b) need to be as accurate as possible. The zener diode can be replaced with a 3-terminal (adjustable) voltage reference, such as the TL431 or equivalent. These are more stable than a zener diode. The TL431 has a nominal voltage of 2.5V without adjustment, which is fine in this role.
The greatest difficulty is the switch used to select current ranges. Even the smallest amount of resistance will cause large errors. By switching both the resistor and the measurement point (the opamp's inverting input), the error is minimised because the switch resistance does not form part of the measurement circuit. R3 is included to ensure that the current source is switched off as you change ranges.
VR1 is adjusted so there is exactly 1V between the opamp's positive input and the 5V supply. When exactly the same voltage (1V) is developed across any of the current setting resistors, the current through it must be as specified. A tiny error is introduced because the base current of Q1 is added to the total, but this should amount to less than 0.1%. The 5V supply needs to be well regulated, and capable of at least 1.5A without any appreciable change of voltage. If the 0.2Ω range is not needed, you can leave out the 1Ω resistor and simplify the switching accordingly. Q2 can then be changed to a BD140.
Although a zener is not the most ideal voltage reference, they are easy to obtain. Precision voltage reference diodes are available, but they are relatively expensive and only stocked by a few major parts suppliers. The zener is deliberately operated at a relatively high current (about 100mA) so that it will get reasonably hot. This helps to stabilise it against ambient temperature variations, so the circuit will take a few minutes to settle down after power is applied.
This circuit can also be used as a stand-alone low ohms adaptor. It obviously needs the power supplies, but you can use your multimeter to measure the voltage across the DUT. The resistance is read as a voltage (the same way that your meter does it internally), with the appropriate conversion based on the current source setting.
The second section of the low ohm meter circuit can be used in conjunction with an analogue movement if you prefer. You will need to apply your own multiplier to the scale and add any necessary extra resistance for calibration, but it will work just as well. You will have to make your own scale - see conclusion, below.
The metering systems described here should be considered a guideline, rather than usable circuits in their own right. By following the information shown, you will be able to create a meter for almost any measurement for which meters can be used. If AC metering is needed, then I suggest that you look at the various meter circuits in the Projects pages.
Although it may seem unlikely, this article has only covered the basics. Metering is widely used for many different applications, and it is impossible to cover every possibility in a short article. It is hoped that the information proves useful to anyone who has been wondering exactly how to go about adding a meter to their latest power supply project, or who has a real need to measure low resistances.
It should be noted that for AC voltage or current measurements, the addition of a true RMS converter IC is highly recommended. AC measurements that are not RMS are misleading, and cause errors in calculations. This adds another layer of complexity, but it's worth every cent. Suitable examples are shown in Project 140, and while they are fairly expensive ICs, the extra cost is well worthwhile. IMO, any complex waveform AC voltage or current measurement that isn't true RMS is pretty much worthless.
One final point - scales. It is often difficult (or impossible) to get a meter scale that is calibrated with the units you want. The resolution of modern printers is more than acceptable to allow you to create your own scale, which can then be printed. Ink-jet photo printing paper gives an excellent finish, and after you have cut the scale to fit, it can be attached over the existing scale with spray adhesive. Make sure that there is sufficient clearance for the pointer, and avoid 'whiskers' of paper that can cause the pointer to stick. While the meter is dismantled, be careful to ensure that no magnetic materials (iron filings, etc.) are allowed to enter the gap, as these will cause the meter to stick and are a real pain to remove (personal experience - I once worked in an instrument repair lab).
| Main Index
Articles Index
|