
|
|
| Elliott Sound Products | Audio Designs With Opamps - 2 |
 Main Index
Articles Index
Main Index
Articles Index
The next set of circuits are pure audio, and include tone controls, equalisers and filters. Note that just because a circuit is described as 'audio', this does not mean that it can only be used for things we listen to. The audio range simply means that the circuits are designed to operate from 20Hz or less, up to 20kHz or more (but below 100kHz). DC isn't 'audio', but it is considered to be within the audio range for instrumentation or process control (industrial). A vast number of industrial controllers operate within the ;audio' band.
When we speak of audio (that we listen to), the commonly accepted range is from 20Hz to 20kHz, and at some point someone decided that the centre frequency is 1kHz. If we look at the audible range with 1kHz as the key frequency, we get something along the lines of the following ...
| 31.25 | 62.5 | 125 | 250 | 500 | 1 k | 2 k | 4 k | 8 k | 16 k |
That doesn't look even remotely centred to me. I have never known why 1kHz was chosen, since if you look at the octaves actually covered by the '20-20k' audio range we have a sequence more like this ...
| 20 | 40 | 80 | 160 | 320 | 640 | 1.28 k | 2.56 k | 5.12 k | 10.24 k | 20.48 k |
This is a total of 10 octaves, and the centre frequency must actually be 640Hz, and indeed this is much closer to reality than 1kHz. If we were to divide the musical spectrum based on energy content, the centre frequency is about an octave lower, or 320Hz (approximately - it depends to a large degree on the style of music).
I am not going to break with tradition (at least up to a point), and note that this has nothing to do with the reference frequency (1kHz) as used for calibrating sound level meters and/or other test instruments. I do suggest that the 640Hz frequency is the 'real' mid frequency that should be applied to tone controls, and not 1kHz as is so commonly found in published circuits. In reality it makes little difference either way. The use of 1kHz as the 'centre frequency' has become so entrenched that no-one will be able to change it. Indeed, the octave frequencies shown based on 1kHz are set in legislation for octave band sound level measurements.
The limitations of opamps in audio circuits must be fully understood. It's informative to look at the compensation curves typical of standard and high quality opamps, and examine the alternatives for very wide bandwidth. These graphs are available in almost all opamp datasheets. Maximum open loop gain (i.e. before feedback is applied) is only available at low frequencies - typically up to 10-100Hz, rolling off at 6dB/ octave as frequency in increased. This means that less feedback is available at 20kHz than at 20Hz. It's usually not a problem unless you expect a lot of gain and a wide bandwidth.
Based on some of the questions I've seen in forum sites (amongst others), this seems to cause people far more problems than it should. Being able to select suitable values is largely something learned from experience, but there are a few simple guidelines. Resistors used in the feedback network must (by definition) impose a load on the opamp's output stage. Therefore, it would not be sensible to design a simple opamp gain circuit using a 100 ohm feedback resistor, because that will (attempt to) draw up to ±135mA from the output, should the output voltage ever manage to reach ±13.5V (hint - it won't). This is clearly far more current than most opamps can supply.
As a general rule, the feedback network should draw around 1/10th of the available output current. Most opamps will be linear with up to ±20mA output, so the feedback current should be no more than 2mA. If we assume the use of ±15V supplies, the opamp's output will reach around ±13.5V - some more, others less. 13.5V at 2mA is 6.75k, so a resistance of no less (and preferably a little more) is indicated. I generally aim for a value between 10k and 100k, with the lower value preferred as it contributes less noise. It's not always possible to use low values of course, because some circuit topologies demand values that are higher than we might like.
Likewise, very high values cause problems too, and not only for their noise contribution. While a 10Meg feedback resistor may meet other requirements, it will cause serious offset problems with any opamp using BJT (bipolar junction transistors) at the input stage. For example, an NE5532 may draw up to 800nA (0.8µA) of input current. If we apply Ohm's law, that means the voltage across the 10Meg feedback resistor could be up to 8V across the resistor. This is clearly unacceptable.
The above also apply to input resistances (i.e. from the non-inverting input to ground). Never attempt to 'match' the input impedance of a circuit to the output impedance of the preceding stage. For example, if your CD player has an output impedance of 100 ohms, your input impedance should be at least ten times that value (i.e. 1k), and preferably close to one hundred time the output impedance (10k). Impedance matching is important for RF (radio frequency) circuits, where the cable is a transmission line. This never happens in audio, with the one exception being old land-line telephones. This is a complex topic, and is irrelevant here.
Where very high impedances are called for, you should use a FET input opamp. A TL071 has a worst case input current of 200pA, so a 10Meg resistor will only have 2mV across it. The additional noise (both from the opamp and the feedback resistance) is unavoidable, and is the price we must pay for very high impedances.
In all cases, the selection of feedback and input resistors depends on the application. There is no 'one size fits all' answer, and the ability to just come up with a suitable value without maths or even simulations is something that comes with experience. It's often assumed (by the uninitiated at least) that if an opamp has an output impedance of (say) 2 ohms, that it should be able to drive a speaker. The fact is that it can - provided the speaker has an impedance of more than 2kΩ or so. Since the output current is limited to (usually) no more than around 25mA, it should be apparent that this isn't enough current to drive a loudspeaker.
The output impedance and current drive capability are not related. It's perfectly fine to have a very low output impedance but a low output current, just as it's also fine to have a very high output impedance, but with the ability to drive significant current (such a circuit will also have much higher supply voltages than most opamps can accept without letting out their 'magic smoke'). There are many different possibilities, but this article is based on 'normal' audio frequency circuits. Note that 'audio frequency' doesn't always mean 'audio' per sé, but covers the frequency range from DC up to around 100kHz or so.
None of this is actually difficult once you get your head around the basic concepts. It may seem so at first, but it doesn't take long before you will understand the principles. Datasheets are your best friend, along with Ohm's law. You may be surprised at how much you can do armed only with these two fundamentals.
This is the most common of all modern tone control circuits, and was named after PJ Baxandall who came up with the idea many years ago. The original design article was entitled 'Negative Feedback Tone Control - Independent Variation of Bass and Treble Without Switches', and was published in Wireless World (now Electronics World) in 1952. This type of control is fully symmetrical, and there is very little interaction between the controls, unlike the older passive controls. When centred, there is neither loss nor gain, and the opamp acts as a buffer. Frequency response is absolutely flat, provided the pots centre precisely.
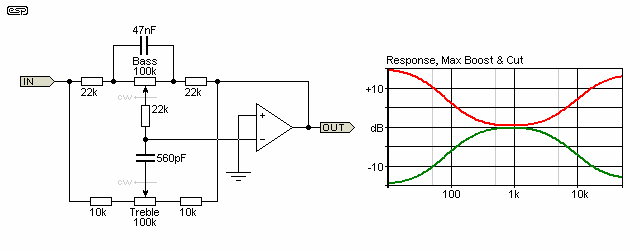
Figure 12 - Modified Baxandall Tone Controls
The circuit is a frequency dependent feedback arrangement, and provides boost and cut for high and low frequencies. It is common for designers to make the turnover frequency for both treble and bass centred around 1kHz, but this is essentially a bad idea (IMO). Ideally, bass boost/cut should start from no higher than about 200Hz, and treble boost/cut should start at no lower than around 2.5kHz. In practice it will be found that this is more natural, and provides the boost where it will do the most good (or harm, for the purists!). 640Hz was used as the 'centre' frequency rather than 1kHz, which is too high. (640Hz is 5 octaves from 20Hz, and 5 octaves (close enough) from 20kHz.)
Figure 12 shows a more or less conventional circuit, with the ±3dB frequencies set to my preferred values. This has the effect of limiting the maximum boost and cut within the audible spectrum to somewhat less than the 20dB often quoted. 20dB is an outrageous amount of control, and far exceeds what is needed for normal system balancing. If 20dB of anything is needed, then I suggest that the system is grossly inadequate, and should be replaced!
The maximum boost is about 14dB, which is still far more than necessary, the lower ±3dB frequency is about 150Hz, and the upper ±3dB frequency is about 2.5kHz. These can be changed by modifying the values of the bass and treble capacitors, and the amount of boost and cut is varied by changing the series resistors for each pot.
This circuit must be driven from a low impedance, so connecting it after the volume control (for example) is a no-no. Ideally, the output of an opamp will be the source, thus ensuring the required low impedance.
Calculation of all frequency characteristics is complex, repetitive and tedious. Fortunately it's not necessary because this is a tone control, not a precision equaliser. The formulae shown here for working out the values for these active tone control circuits are fairly simple, but can be quite inaccurate under some circumstances. At least it will give you a starting point, so the formulae for the bass control lower turnover frequency (fb0 - the frequency where boost or cut starts to level out) and ±3dB frequency (fb3) are (respectively) ....
fb0 = 1 / ( 2π × C × Rv ) ... where C is the cap across the pot, and Rv is the pot value
fb3 = 1 / ( 2π × C × Rs ) ... where C is the cap, and Rs is the series resistance to the pot
These give (again, respectively) ...
fb0 = 1 / ( 2π × 47nF × 100k ) = 33 Hz
fb3 = 1 / ( 2π × 47nF × 22k ) = 154 Hz
The treble is a little trickier, since there is a slight interaction with the bass control, due to the bass feed resistance from the bass pot wiper. In theory (ha ha) the frequency is determined by ...
ft = 1 / ( 2π × C × Rb ) ... where C is the treble cap (560pF above) and Rb is the bass feed resistor from the pot wiper.
While this seems reasonable, the formula comes up with a frequency of nearly 13kHz, which is obviously wrong. There are series resistances in the entire treble control network, and the interactions are interesting to say the least. In fact, the ±3dB frequency for the treble control changes with the pot setting. For example, at 80% of rotation, treble boost is +3dB at just over 3.5kHz, with a maximum boost of 6.3dB at 20kHz. This may seem to be a bad thing, having the frequency shifting about as the pot is varied, but in practice it works very well. To obtain the results you want, I suggest that experimentation is in order !
A final word about the tone control circuit. Note that it is a 'virtual earth' circuit, so the feedback at all times will maintain the -ve input at zero volts. The bass and treble content of the input waveform will force the amplifier to provide just the amount of boost or cut at any frequency to maintain the 0V condition on -in. You will find this useful as you work towards an understanding of the complete circuit.
The active filter is one of the most common opamp applications after basic amplifiers. There are essentially four different types of filter, but each can be constructed using a myriad of different techniques. I shall only use the most common arrangements, since the complete array is truly mind-boggling. The area of filters is the subject of complete books (from a number of authors) and I cannot hope to cover any but the most common. If you want more on this topic, see the ESP Active Filters article.
Firstly, there are many different possibilities for filters. We shall look at each of the different responses, orders and types before anything else. The filter 'order' gives us essential information about how well (or otherwise) a given filter will reject unwanted frequencies. The standard ones are:
| Order | Sections | Nominal Rolloff |
| First | 1 | 6 dB / Octave |
| Second | 2 | 12 dB / Octave |
| Third | 3 | 18 dB / Octave |
| Fourth | 4 | 24 dB / Octave |
| "n" | Where n > 4 | 6 dB / Octave / section |
In audio work, the first four are most commonly used, since as the filter order increases, the transient response becomes worse and greater phase disturbances become evident. All filters affect the phase of the signal, and all filters have some effect on transient response. These are unavoidable, regardless of whether the filter uses valves, transistors or opamps, or is completely passive, using only capacitors, resistors and/or inductors.
There are 4 main responses that are obtainable from filters. Some are - or can be - derived from others, so the base types are given first. In particular, band pass and band stop filters can be simple filters with a narrow response (typically used for equalisation circuits), or band pass filters made from a combination of a low frequency high pass filter, followed by a higher frequency low pass section. These are commonly used in crossover networks.
| Response | Passes ... | Blocks ... |
| Low Pass | Low frequencies | High frequencies |
| High Pass | High frequencies | Low frequencies |
| Band Pass | Selected frequency | All other frequencies |
| Band Stop | All other frequencies | Selected frequency |
Low and high pass filters are usually conventional enough, but band pass and band stop filters can be made in many different ways.
Essentially, there are also a few basic filter alignments, which are as follows (not all are included, and many are applicable to filters of more than one section, or more complex arrangements):
| Filter Type | Q (Typ) | Characteristics |
| Bessel | 0.57 | Best time delay |
| Butterworth | 0.707 | Flattest amplitude |
| Chebyshev | 0.8 - 1.3 | Fast initial rolloff |
| Cauer / Elliptical | 0.7 - 1.3 | Very fast initial rolloff |
Of the above, the Butterworth is the most common in audio. Although some filter's responses may be closer to Chebyshev, this is commonly more by accident than design. A Chebyshev alignment is very common in acoustical filters (a loudspeaker - box - port combination, for example), but is not generally considered desirable in electronic filters for crossovers or other purposes.
You may have noticed that the Linkwitz-Riley filter was not mentioned in the above table. This is because it is an alignment between filters, and not an alignment type itself. The Linkwitz-Riley filter is a rearrangement of two cascaded 2nd order Butterworth filters, and relies on the characteristics of the two sections (high pass and low pass) to provide the total amplitude and phase response. For example, a 12dB/octave Linkwitz-Riley filter has a Q of 0.5 (sub-Bessel), and the crossover frequencies align at the -6dB frequency rather than the -3dB frequency found with Butterworth filters.
Finally, there are different circuit arrangements that are commonly used in audio to create the filters described above. As you can see by now, the combinations and permutations of all of these different possibilities is immense.
| Circuit Type | Gain | Characteristics |
| Sallen-Key | Unity | Simple design |
| Equal component value | Depends on Q | Simpler design |
| Multiple feedback | Depends on Q | Relatively complex |
| State Variable | Depends on Q | Relatively complex |
| Biquadratic | Depends on Q | Relatively complex |
| Passive | < unity | Simple or complex |
This is a condensed listing, and there is some overlap between the topologies in some cases. Indeed, in some cases it is difficult to see any appreciable difference at all. For the sake of simplicity (and to keep this section to a readable length), I shall concentrate on the Sallen-Key filter type, using Butterworth alignment.
Before we go there, we need to define some of the terms you will see. Again, I have kept this list to the minimum for the sake of simplicity, but armed with this knowledge you will be able to understand the circuits and descriptions that follow. Note that simple filters can be made with one (or no) active devices.
Terms and Definitions
Cascading: As filter orders become greater, simple filters are no longer feasible, so filters use opamps and are joined together in series to obtain the desired response. This complicates the design (often dramatically). Cutoff Frequency: Also shown as fo, this is the -3dB frequency of the filter, relative to the highest peak (if any exist) in the passband. Decade: A 10:1 (or 1:10) ratio of frequency. For example 100Hz to 1000Hz is one decade. One decade is approximately 3.16 octaves. Decibel (dB): The most common way to describe amplitude in audio. The dB scale is logarithmic, and describes the amplitude as we hear it. A 3dB drop in gain equates to half the power in an amplifier. Quality Factor: Commonly known as Q, this is the inverse of the filter's damping. For example, a Butterworth filter has a Q of 0.707, which equals a damping of 1.414. Higher Q gives more ripple for low and high pass filters, or makes a bandpass or band stop filter more selective. Octave: A 2:1 (or 1:2) ratio of frequency. For example, 440Hz to 880Hz is one octave (A440 means concert pitch 'A' musical note). Order: The order of any filter determines its rolloff frequency response. First order filters roll of at 6dB per octave (20dB/ decade), and as the order increases, so too does the rolloff rate. An additional 6dB / octave is gained for each additional order, starting from first. A 3rd order filter will therefore roll off at 18dB /octave, for example.
In addition to the above, you'll often see filters described as (for example) 4-pole, which means that the filter has 4 effective 'sections' that create the rolloff slope. A 4-pole filter is the same as a 4th order filter. Some filters include one or more 'zeros' in the response. A zero is effectively the opposite of a pole, and is used to limit the ultimate boost or attenuation provided by a filter. For example, including a resistor in series with the capacitor in Figure 13 or in parallel with the cap in Figure 14 will introduce a zero and limits the maximum attenuation. As this is not easy to get your head around initially, I won't take it any further here.
The first active filter must be the first order low pass. By simply reversing the filter components, this becomes a first order high pass. In each case, the filter only consists of the resistance and capacitance, with the opamp simply isolating the filter from the following stages. Q is not variable in a first order filter, and the only options are high pass and low pass. A bandpass filter can only be created by cascading a high and low pass filter. Although the least useful of all filters, they are easy to understand, so make a good starting point.
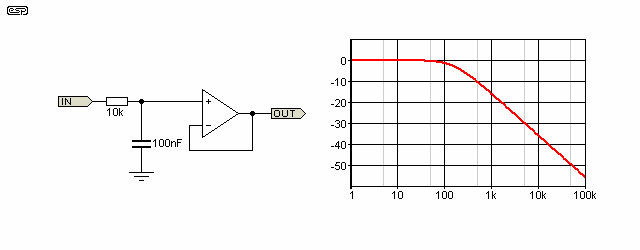
Figure 13 - 1st Order Low Pass Filter
As you can see, at low frequencies, the capacitor has little effect on the signal, which is simply passed through the resistance and buffered by the opamp. As the frequency increases, the capacitor will shunt more and more of the signal to earth, until at very high frequencies, no appreciable amount of the signal is passed. As the capacitor's reactance becomes significant with respect to the resistance, the signal will be subjected to a phase shift as well as reduction in amplitude. When the capacitive reactance is equal to the resistance, the amplitude will be 3dB lower than at low frequencies.
Rc = 1 / ( 2π × f × C ) ... where Rc is capacitive reactance
This is the cutoff frequency of the filter, and is determined with the formula ...
fo = 1 / ( 2π × R × C ) commonly shown simply as ...
fo = 1 / ( 2π R C )
Note that the input of this filter must have a low impedance return to earth at the input, or the opamp will not have any bias current or voltage, and will not work. This rule applies to low pass filters in all cases without exception. Any appreciable source impedance will also change the frequency, as the impedance is effectively in series with R1. This also applies to the high pass version shown next. In this context, 'appreciable' means any impedance of equal to or greater than 1/10th of the filter's impedance. For example, with a 10k resistor, 1k is 'appreciable'. Even a source impedance of 100 ohms will change the frequency slightly.
For the filter in Figure 13, the frequency is determined by ...
fo = 1 / ( 2π × 10k × 100nF ) = 159 Hz
Rc = 1 / ( 2π × 159 × 100nF ) = 10k ohms
By reversing the positions of R and C, we obtain a high pass filter. The formula remains the same, and the two filters will have a complementary response centred at the 159Hz frequency. There is no need for an earth return at the input for a high pass section, as this is provided by the resistor.
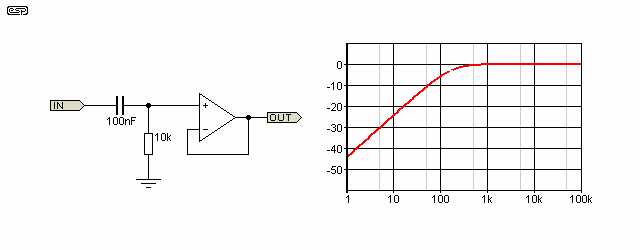
Figure 14 - 1st Order High Pass Filter
In their simplest forms, these two filter sections are also known as integrators (low pass) and differentiators (high pass). This is of some consequence, as these terms are commonly used in electronics.
A bandpass filter is created by cascading a high pass and a low pass, as shown in Figure 15. An opamp may be used in between the two sections to prevent any interaction. As shown, it is also possible to scale the first filter so that interaction is minimised. This works well enough in practice to be a useful technique. Scaling merely means that the ratio of values remains the same, but the resistance is reduced and the capacitance increased to make a lower impedance filter with the same characteristics. The generally accepted scaling factor is one decade (an 'order of magnitude', or a 1:10 ratio). For Figure 15, I simply selected the lowest sensible resistor value of 1k, and the capacitor was chosen more or less at random to give an acceptable graph of the response.
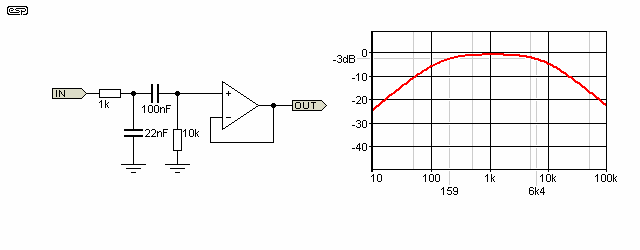
Figure 15 - Scaled Cascaded Bandpass Filter Saves One Opamp
In reality, it may be found that the value of capacitance becomes so great that the capacitor will be more expensive than a section of an opamp. Alternatively, the resistance may become so low that no opamp can drive the load. It is essential to ensure that impedances are within the acceptable range for the opamps used. Generally, impedances of less than 1k at any frequency are not recommended. For noise considerations, very high resistance values are also not recommended, and I suggest that 100k is a reasonable compromise. There will be occasions where this is not practicable and higher values may be the only sensible solution, but these should be few and far between.
If the high pass section of Figure 15 is verified by calculation, it is discovered that the cutoff frequency (Fo) should be 7234Hz, and not 6400Hz as shown. The difference is caused because the second filter loads the first, shifting the frequency. This is a very good reason to isolate the sections using an opamp.
All following filter sections will use resistance within the range of 1k to 100k. This gives two decades of freedom, and this is more than enough to allow capacitors of sensible sizes to be used. Very low capacitance values are to be avoided, since the capacitance of wiring (PCB tracks etc.) will modify the filter characteristics to a possibly unacceptable degree. I generally try to keep capacitance above 1nF wherever possible, and this may save you some grief as we progress. Likewise, any capacitance above 1µF becomes large and relatively expensive, but within this range we also have two decades of freedom, and there is virtually no audio filter that cannot be designed within these constraints.
Generally, it is sensible to select the capacitor value first, as these have less available values within a decade than resistors. Capacitors have 12 values per decade (the E12 series), while resistors have up to 96 values per decade (E96 series). The latter are not usually easy to get, but the E24 series is now very common, and has (surprise!) 24 values per decade. The E12 and E24 series are shown in Table 5.
| E12 | 1.0 | 1.2 | 1.5 | 1.8 | 2.2 | 2.7 | 3.3 | 3.9 | 4.7 | 5.6 | 6.8 | 8.2 | ||||||||||||
| E24 | 1.0 | 1.1 | 1.2 | 1.3 | 1.5 | 1.6 | 1.8 | 2.0 | 2.2 | 2.4 | 2.7 | 3.0 | 3.3 | 3.6 | 3.9 | 4.3 | 4.7 | 5.1 | 5.6 | 6.2 | 6.8 | 7.5 | 8.2 | 9.1 |
These values are multiplied or divided as needed for any decade range from 0.1 Ohm up to 10M Ohms, and from 10pF up to 10µF. Generally it will be found that at the extremes of the ranges (such as from 10pF to 100pF), most stockists do not have the full range of values. This is another good reason to stay within reasonable limits for all component values wherever possible - not just for filter designs.
Note that all response graphs shown in this section cover the frequency range from 10Hz to 10kHz, and all but the Chebyshev response are from 0dB to -20dB (the Chebyshev is from +10dB to -20dB). The reference input voltage is 1V RMS, or 0dBU.
By using multiple feedback paths, a second order filter can now be designed. These are the first genuinely useful filters for crossovers and the like, and are the most commonly used in both electronic and passive crossover networks. There are some unpleasant side effects to the second order high and low pass filters, but this has never stopped anyone from using them. As we shall see, these effects can be cancelled to some extent, but unless exotic configurations are used you can never get phase coherency.
A phase coherent filter gives the design some special characteristics that are extremely useful in audio. This simply means that at any frequency within the pass band or stop band of either filter, the output signal from each is in phase, preventing any peaks or dips in the combined response. These will be covered in more detail a little later.
Of all the topologies available, I will concentrate on the Sallen-Key (also known as unity gain) Butterworth filter. The equal component value filter is useful in some areas, but is a nuisance because of the gain that each section adds. This is sometimes useful, but mostly is not necessary, and the filter section needs more components. They are easier to design, but the difference is slight, and often the resistor needed to set the gain precisely will work out to be impossible to obtain. For the values I am using, a 14.414k resistor would be needed, which as you can see from Table 5 is not a standard value.
Figure 16 - Second Order Unity Gain Low Pass Filter
As you can see, the opamp is used only as a buffer, contributing no gain. For Butterworth alignment, the component values are as shown. The filter can be made into anything from Bessel to Chebyshev by changing the component values about, but these other alignments are not generally as useful in audio work.
If R has been selected first, the capacitor values for C1 and C2 are chosen from the equations ...
C1 = 4 / d² × C2 = 2 × C2 ... where d = 1 / Q
C2 = 0.707 / ( 2π × F × R )
The formula for calculating the value of C1 only applies to a Butterworth filter. Of course if you were to follow my advice from above and select the capacitance first, you need a different formula ...
R1 = 0.707 / ( 2π × F × C2 )
Again, the equation for resistance or capacitance for each example only works for Butterworth filters! For a Q of 0.707 or damping of 1.414 (Butterworth) it works out that C1 is exactly double the value of C2. R1 and R2 must be equal in value, or the filter's response will be something other than that desired.
| Note: Any change of Q by varying the resistance ratio or capacitor ratio also changes the frequency. The formulae become quite complex, and I am not going into further detail. |
For example, if the C1 is four times as great as C2, this creates a Chebyshev filter with a Q of 1, as shown in Figure 17 for the sake of example. Equal capacitor values would be used for a 'sub-Bessel' alignment with a Q of 0.5 - the possibilities are endless, as I am sure you can now appreciate.
Figure 17 - Second Order Chebyshev Filter
The filter of Figure 17 clearly shows the peaking obtained from a Chebyshev filter. The peak amplitude is +1.25dB from the nominal 0dB value, and the cutoff frequency is determined to be 3dB below this maximum. I remain unconvinced that this is the right way to measure the cutoff frequency - I think I prefer to use the 'genuine' -3dB point. Either way, the cutoff frequency is not easy to calculate, and although it would be no great strain for me to give you all the equations, I doubt that you would want to know!
The high pass equivalent of the Butterworth low pass filter is shown in Figure 18, and as you can see is a re-arrangement of the other design. Frequency is the same as for the low pass filter, but note that now C1 and C2 are the same value, and R2 is double the value of R1. Frequency is calculated on C1 and R1, and it is easy to become confused when designing the circuits just which values determine the frequency.
In both cases it is nearly always easier to use paralleled capacitors and series resistors as I have shown, since these will be more accurate than simply doubling (or halving) the values - especially so since the standard values do not always have exact double or half values. Any variation of these values will shift the response away from Butterworth and towards either Bessel or Chebyshev responses, and will change the frequency.

Figure 18 - Second Order Unity Gain High Pass Filter
Second order filters can also be used for bandpass and band stop, but are generally of limited use in audio circuits. They are sometimes used as equalisation circuits, and indeed the simple inductor / capacitor (LC) filters shown in Figure 8 are 2nd order types. A second order filter requires that there are two reactive elements, with an filter LC there is the capacitance and the inductance, and with an active filter there are two capacitors.
When combined, high pass and low pass filters are commonly used to create electronic crossover networks. There are many different ways to do this, but the most common is still the second order Butterworth filter. Although these are essentially at least as good as the passive speaker level counterpart (but not all that much better), the results are often vastly superior. The reasons for this are discussed at great length in my article Bi-Amplification - Not Quite Magic (but Close) and I shall not repeat them here.
In a nutshell, using an electronic crossover eliminates many of the problems that beset loudspeaker designers when they have to design and build the crossover network. The passive crossover is influenced by any aberration in the driver's impedance, especially at or near the crossover frequency. Since the electronic crossover supplies the signal to a separate amplifier for each frequency band, there is no interaction and each amp only needs to be concerned with a much smaller bandwidth.
All crossover networks are a combination of high pass and low pass filters, although this is not always achieved in the same way. Some crossovers use an opamp as a subtracting amplifier, so rather than using a separate filter, the bass (for example) is subtracted from the main signal to provide the midrange and high frequency. Alternatively, the mid+high output from the filter is subtracted from the main signal to separate the bass, and this configuration is shown below. These crossovers are phase coherent (both outputs are always in phase at any frequency), but are asymmetrical. A typical design is shown in Figure 19, and the response clearly shows that the high pass rolloff is 12dB/octave, but the low pass is only 6dB/octave.
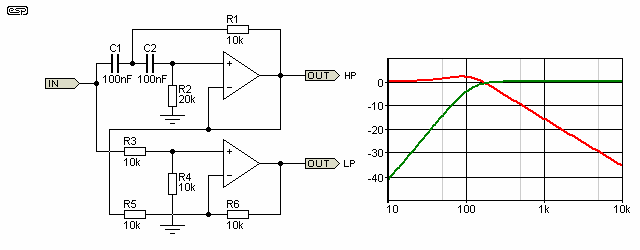
Figure 19 - Subtractive Electronic Crossover
Although these networks can be capable of acceptable results for non-critical applications, great care is needed to ensure that the driver getting the 6dB/octave rolloff can handle the increased power levels created by such a low rolloff rate. Notice that the LF rolloff peaks, and that the crossover frequency does not coincide with the actual -3dB frequency of the high pass section. Although this looks really bad, because of the phase differences the combined frequency response is completely flat. With loudspeaker drivers this will often not be the case, especially when listening off axis. Because of this, the subtracting crossover is really only useful where the system is not used for 'critical listening'. I have never been a fan of this type of crossover, but the circuit is interesting and shows the versatility of opamps. Basically, I do not suggest or recommend subtractive crossovers for anything other than experimentation.
Rather than show a multitude of crossover designs here, you can look at the Projects Pages to see a suitable sampling of crossover networks. Of these, the 24dB/octave Linkwitz-Riley is by far the best, and is highly recommended.
Notice the cunning way I introduced a new opamp configuration - the subtracting (or difference) amplifier. This (and other useful topologies) will be discussed in greater detail a little later.
The band pass filter (as a single filter) is not normally very useful in audio reproduction. The frequency range passed is too narrow to be useful for anything other than equalisation circuits, or for test and analysis equipment. Having said this, there are many uses for bandpass filters that are very common in the production of music - the synthesiser, guitar wah-wah pedals, Vocoder, etc.
The range is far too great to cover in any real detail, but we can at least look at the fundamental principles, as these are common to all of the applications. The two most common parameters quoted for bandpass filters are frequency (fo) and Q (quality factor). The latter may be inverted and referred to as damping.
A simple bandpass filter consisting of two reactive elements has an ultimate rolloff of 6dB/octave. When one looks at resonance, the slope may appear to be much greater than this, which is fair and reasonable, since it often is. Eventually, the high slope due to resonance effects cannot be maintained, and the final slope is at 6dB/octave, as shown in Figure 20. But wait! This is an article about opamp designs, and there is no opamp there, just a stupid inductor and capacitor. True, but we need to be able to understand the concept of resonance before delving into the opamp version of the circuit.
Active (using opamps or transistor circuits) bandpass and band-stop filters can be created easily, and are covered the ESP Active Filters article. As this is an introduction, only the basics are shown here.
Parallel resonance is shown first, and it will be apparent that the series resistor is 1k, but only 100 ohms for the series circuit shown further below. This was done so that the two response graphs could show the full effect. The way any resonant circuit is configured depends on what you are trying to achieve, and these are only examples, not 'real world' circuits.
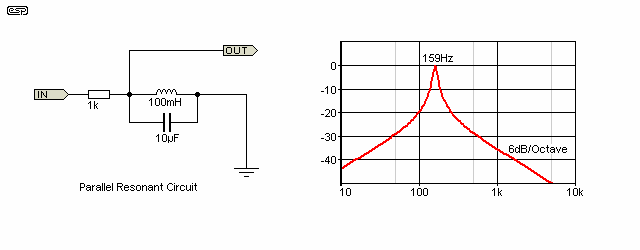
Figure 20 - Parallel Resonant Circuit
There are essentially two forms of resonant circuit - series and parallel. When only passive components are used (resistor, inductor and capacitor), the series resonant circuit has minimum impedance at resonance, and the parallel resonant circuit has maximum impedance. The formula is actually slightly different for each (the resistance of the coil changes the resonant frequency slightly in a parallel resonant circuit), but for all intents and purposes the following formula can be used with little error ...
fo = 1 / ( 2π × √LC )
Where fo is resonant frequency, L is inductance in Henrys and C is capacitance in Farads. Any error caused by the series resistance of the coil will generally be less than that caused by component tolerance. For example, if the coil shown in Figure 20 has a winding resistance of 10 ohms, the resonant frequency in increased by less than 1Hz.
The resonant frequency is that where the capacitive and inductive reactances are equal. In the example of Figure 20, only when Xc (capacitive reactance) and Xl (inductive reactance) are the same will the circuit be at resonance. Below resonance, the inductive reactance decreases, and shunts more of the signal to earth. Above resonance, the capacitor will be responsible for shunting the signal to earth. Since in each case there is the resistance and a single capacitor or inductor to bypass the signal, this is a single pole filter and will have 6dB/octave rolloff. As shown, the reactances at resonance are one tenth of the series resistance, so the filter has a Q of 10, but the final rolloff slope is 6dB/octave. The initial slope is increased by increasing the series resistance (and thus the Q of the circuit), but eventually the rolloff will go back to 6dB/octave.
Series resonance is especially interesting. At resonance, the circuit is almost a short circuit, so the input signal will be heavily loaded. At the junction of the inductor and capacitor there may be a voltage that is many times that at the input. This effect is described below. If enough current is available, incredibly high voltages may be obtained, and great care is needed to ensure that the voltage rating of the components is sufficiently high to withstand the voltage. Since the laws of physics and the taxman dictate that we cannot get something for nothing, the available current is very limited at the high voltage point. A circuit with a very high Q will generate much greater voltages than a circuit with low Q. The voltage magnification is equal to the Q of the circuit.
With the component values as shown in Figure 21, the voltage at the output will be about 0.5 mV at resonance, but there will be 1V across both the inductor and capacitor. At resonance, the reactance of the capacitor and inductor are equal and opposite, so the circuit will appear to be almost a short circuit - input current is limited only by the wiring resistances and source impedance. Series resonance is a somewhat 'special' case, and it may take some time before it makes sense to you.
The maximum possible Q of an LC filter is dictated by the series resistance of the inductor. The Q may be reduced by adding resistance, but cannot be increased. The circuit Q is determined by the reactance of the cap or coil at resonance and the series resistance. Q of a parallel resonant circuit is increased by increasing the series resistance, and the Q of a series resonant circuit is increased by decreasing the series resistance.
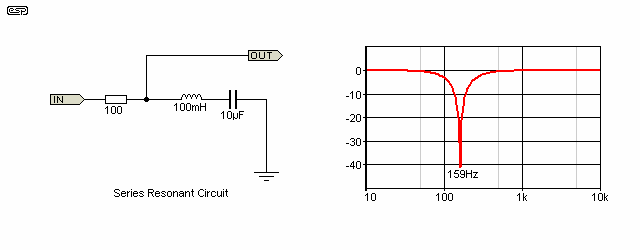
Figure 21 - Series Resonant Circuit
At very high frequencies, the so-called 'skin effect' increases the apparent resistance of the inductor. The skin effect is where the electrons tend to want to occupy the outer section of the wire and are not evenly spread through the conductor. This gets progressively worse as the frequency increases. Likewise, the dielectric absorption of capacitors reduces their efficiency and lowers the overall Q. We shall not investigate these effects further, since they are unrelated to audio frequencies generally, and especially to opamps.
A quick word about Q. In both cases above, resonance is at 159Hz. The reactance of both the inductor (Xl) or capacitor (Xc) at this frequency is 100 ohms, so with a 1k series resistance (parallel resonance) or 10 ohm series resistance (series resonance), the circuit Q will be 10. Resonance is defined as that frequency where the capacitive and inductive reactances are equal. The reactance can be calculated from ...
Xc = 1 / ( 2π × f × C )
Xl = 2π × f × L
This basic understanding of the ratios is essential in the design of bandpass and band stop filters, and is also very much a part of the design process for passive loudspeaker crossover networks. The latter have absolutely nothing to do with opamps, but I just thought I'd mention it  .
.
The Q of a resonant circuit determines its bandwidth. With a Q of 10, bandwidth of our bandpass filter above is 15.9Hz. This places the -3dB frequencies at 151Hz and 167Hz (near enough), so it is apparent that the range of frequencies allowed through is very limited. In practical audio work, this is usually far too narrow to be useful, so lower Qs are far more common. This is fortunate, because high Q opamp bandpass filters can be difficult to design, and may require opamps with very high bandwidth for proper operation at the upper end of the audio band.
Band-stop filters (aka notch filters) made using a series resonant circuit have a theoretically infinite notch depth, but this is never achieved in practice because of circuit resistance (inductor resistance, wiring resistances, etc.). Even a moderate Q can provide a narrow notch as seen in Figure 21. The Q is unity, so the -3dB frequencies for the notch are at 98Hz and 258Hz, but the notch depth may be greater than 60dB.
When used at signal levels, inductors are expensive, unwieldy and are likely to pick up any stray magnetic fields, inducing mains frequency hum into the signal path. This can be fixed by using one or more opamps, configured as a gyrator (covered briefly in Part 1). A more complete study of gyrators is available in the article Gyrator Filters. These are almost always preferable to using 'real' inductors, as they are smaller, cheaper, more accurate and suffer fewer problems. The inductance is easily adjusted over a wide range as well, something that is not possible with wound components at audio frequencies.
I have used various references while compiling this article, with most coming from my own accumulated knowledge. Some of this accumulated knowledge is directly due to the following publications:
National Semiconductor Linear Applications (I and II), published by National Semiconductor
National Semiconductor Audio Handbook, published by National Semiconductor
IC Op-Amp Cookbook - Walter G Jung (1974), published by Howard W Sams & Co., Inc. ISBN 0-672-20969-1
Active Filter Cookbook - Don Lancaster (1979), published by Howard W Sams & Co., Inc. ISBN 0-672-21168-8
Data sheets from National Semiconductor, Texas Instruments, Burr-Brown, Analog Devices, Philips and many others.
Recommended Reading
Opamps For Everyone - by Ron Mancini, Editor in Chief, Texas Instruments, Sep 2001
Main Index
Articles Index