
|
|
| Elliott Sound Products | Voltage & Current Regulators |

 Main Index
Articles Index
Main Index
Articles Index
The need for regulation of a power supply is a common requirement, but not everyone knows why a supply needs to be regulated, or when a circuit can safely run from an unregulated supply. There are many misconceptions about regulators in general, and a lot of disinformation about what is necessary and what is simply over the top. There are some requirements for ultra-stable regulated supplies, but that rarely is the case for the vast majority of applications.
The need for regulation is often misunderstood, with claims that basic opamp circuits in audio (for example) must operate from tightly regulated supplies or somehow the sound stage will suffer, or there will be a loss of bass 'authority' (whatever that might mean), or perhaps the treble will be 'veiled' or the midrange 'cluttered'. Mostly, this is nonsense, but these myths are widely circulated until they somehow become 'self evident' because of the number of references, cross-references, and people linking to sites that have information they believe 'proves' their point.
Voltage regulators are found in almost every piece of electronic equipment, and range from very low voltage types (e.g. 3.3V used for many microprocessors) up to hundreds of volts as used in some valve amplifiers and other equipment that relies on high voltages.
Not every voltage needs to be regulated. It is traditional to supply opamps used in audio with regulated supplies (typically ±15V), but this is primarily done to ensure low ripple (100 or 120Hz) and noise. Opamps don't care much if there's noise on the supply, and they are perfectly happy even if the supply voltages change a little while they are working. Provided their maximum operating voltage is not exceeded and the supplies remain high enough to allow the signal through without distortion, supply variations will not result in significant output variations.
However, this is generally considered unacceptable. The supplies to opamps should be regulated, because no opamp has an infinite PSRR, and it degrades at high frequencies as the open loop gain falls due to internal (or external) frequency compensation. In many cases, a simple zener diode regulator may be sufficient, but these are inefficient and are considered very 'low tech' by modern standards.
IC voltage regulators are very inexpensive and give excellent results. Of course there are limitations. The input-output differential voltage must never be exceeded, some are comparatively noisy, and a heatsink is needed if they are used to deliver moderate to high output current. Before IC regulators, people commonly used discrete versions, and these can be made to work very well. Naturally, high performance demands greater circuit complexity, and these days there are few cases where a discrete regulator is a better proposition than an IC version.
This article should be read along with Small Power Supplies. The two articles cover similar areas, but this version is aimed more at the full understanding of the concepts, rather than providing ideas for constructors.
Zener diodes also have their own page. Application Note AN008 - How to Use Zener Diodes describes many of the basic characteristics of zener diodes, along with some basic specifications and other useful information. Of particular interest is the dynamic resistance, which is a specification that indicates how well a zener diode can reduce ripple and noise. The lower the dynamic resistance, the better the zener will regulate and reject noise.
There are a number of terms that are used to describe the performance of any regulator. The table below is taken from the 'Small Power Supplies' article, and includes brief explanations.
Parameter Explanation Load Regulation A percentage, being the change of voltage for a given change of output current Line Regulation A percentage. being the change in output voltage for a given change of input voltage Dropout Voltage The minimum voltage differential between input and output before the regulator can no longer maintain acceptable performance Maximum Input Voltage The absolute maximum voltage that may be applied to the regulator's input terminal with respect to ground Ripple Rejection Expressed in dB, the ratio of input ripple (from the unregulated DC supply) to output ripple Noise Where quoted, the amount of random (thermal) noise present on the regulated output DC voltage Transient Response Usually shown graphically, shows the instantaneous performance with changes in line voltage or load current
Not all of the above specifications will be given, and not all are important for many applications. Transient response is important for any regulator that supplies a load which changes rapidly, such as TTL logic. Ripple and noise are important for low-level audio applications, especially those that use discrete transistors where the circuit may have relatively low power supply noise rejection.
It's sometimes thought that a simple resistive voltage divider is enough to provide a 'regulated' voltage. Unless the output is buffered with a follower (either integrated or discrete) it's not regulated. A voltage divider is sensitive to the load, so it can only produce the rated voltage into an open circuit (no load at all). As soon as you draw any current, the voltage will fall. In addition, any noise (hum, buzz, etc.) on the supply feeding the divider will also get through to the output. Simple dividers were common in valve (vacuum tube) amplifiers, where the main power supply may pass through several resistors with capacitors to ground at each junction, and the valve stages forming the load. This is not 'regulation' in any way, shape or form, it's just filtering, and is not covered here other than as part of a proper regulator (where such filtering schemes are also quite common).
So, why do we need a regulated voltage?
With many voltage sources and in a great many circuit topologies, we don't. However, it is now so easy to do and provides so many advantages that it would almost be silly not to do so. The primary benefit is that power supply ripple (at 100 or 120Hz) is almost completely eliminated, and we can operate opamps at close to their maximum voltage without having to worry about low mains voltages causing premature clipping or high mains voltages causing failures. An unregulated supply will vary its voltage as the mains voltage changes (which it does, typically by as much as +10% to -15%). Many people live in areas where the voltage changes by more, and if the supply is not regulated it will vary by roughly the same percentage as the incoming mains.
An unregulated power supply will also change its output voltage with load, so as the circuit draws power, the voltage falls. Likewise, when the load is reduced the voltage rises. This is called the load regulation, and with an unregulated supply it includes variations from the mains. Light load when the mains is at its maximum means the powered circuit(s) will get the maximum possible voltage, and that might exceed the absolute maximum value specified by the IC manufacturer. TTL logic ICs have a very limited tolerance to over-voltage, and they will fail if the maximum is exceeded. The recommended voltage is 5V, with an allowable range from 4.5 to 5.5 volts. Everyone uses a regulated supply for TTL ICs simply because it would be silly (and risky) to do otherwise. CMOS logic will normally be quite happy with a very simple zener shunt regulator because the current drain is so low. The supply must be properly bypassed with adequate capacitance.
Many early transistor power amplifiers used regulated supplies, because they used a single supply, and voltage variations could create a subsonic output signal. Also, many of these early amps used transistors that were operated at close to their voltage limits, and if the voltage were to increase too much they would fail. These days, almost no-one uses regulated supplies for power amps because it adds cost and a significant thermal load, and generally serves no useful purpose. Some valve amplifiers have used regulated screen-grid voltages to get the maximum power without stressing the valves. Others just stressed the valves (and even many recent designs still do so).
It is very rare to see any preamp using opamps or discrete transistors that does not use regulated power supplies. Most people use IC regulators, but there are some who believe that a discrete regulator will give better performance. I will not enter the debate on the alleged 'audibility' of a regulator and the 'sound of DC', because as far as I'm concerned it's mostly wishful thinking with no basis in science or validation by properly conducted blind AB testing. By definition, DC is direct current, and is therefore inaudible. Noise superimposed on the DC may be audible in some cases.
Most switchmode power supplies (SMPS) are regulated, and can be used directly without having to do anything else. However, these are almost always relatively noisy, having considerable evidence of the switching frequency (and its harmonics) on the DC supply. While these switching artifacts are almost always inaudible, they are disconcerting and can make sensible measurements on the circuit very difficult.
Next, why do we need a regulated current?
Apart from current sources, sinks and mirrors (see article), current regulators used to be more of a curiosity than anything else. They have been used in many areas for many years, but it's only recently that they have become ubiquitous - LED lighting. The vast majority are switchmode, because otherwise the energy losses are excessive, reducing the overall efficiency of a LED light source. However, there are still instances where a linear regulator makes more sense.
In particular, a simple linear current regulator is easy to wire up on a piece of Veroboard, something you can't do easily with any switchmode circuit. The requirement for linear current regulators is tiny compared to voltage regulators, but you'll never know when you'll need one. In some cases, you will need both voltage and current regulation, and battery charging is one of the most obvious cases where the two will be combined.
Overall, the need for a precision current regulator (as opposed to a current source as part of an amplifier circuit for example) is very limited, but since the principles and outcomes are much the same for both voltage and current regulation they are worth covering.
The first regulators that were used were gas discharge tubes [ 1 ]. The tube was supplied via a resistor, and the discharge voltage was fairly stable provided the current didn't vary too much. If high current was needed, then a traditional high-power valve (vacuum tube) was used as a cathode follower to supply it. Adding extra valves made it possible to get a well regulated supply that was relatively unaffected by load current changes or input voltage fluctuations.
The modern-day equivalent of a gas discharge tube is a zener diode. These are still very commonly used for regulation, either as a simple shunt regulator (like the gas discharge tube), or with additional parts to form a discrete regulator. Because the basic shunt regulator is the simplest, that's the one to look at first. There's a lot more information on using zener diodes in the Application Note 008 page on the ESP website.
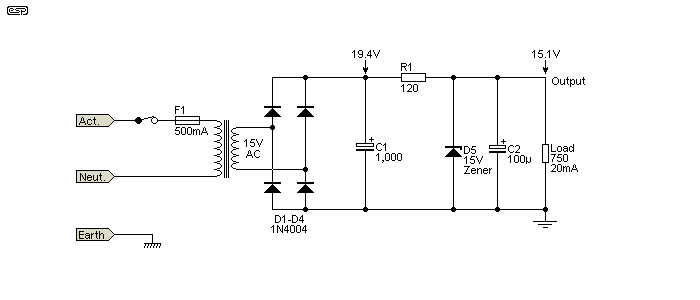
Figure 1 - Basic Zener Shunt Regulator
One major disadvantage of the simple shunt zener regulator is that it continuously draws the maximum allowable current from the power supply. As shown above, the supply voltage is 15V, and it is only a single supply. I will use this same general arrangement for most of the diagrams because it makes them less cluttered and easier to understand. If a negative supply is needed, it's usually just the inverse of that shown for positive voltage. The power supply itself (transformer and filter capacitor) is used for most examples, but will not be shown unless it's essential to understand the circuit.
In the above supply, R1 must be able to provide sufficient current to always remain within the zener's optimum range, as well as supply the load. Zener regulators are not recommended for any circuit where the current varies by more than a few percent. The zener current should be (roughly) between 10% and 50% of the maximum zener current, which is obtained very simply from the voltage and rated power. A 15V 1W zener can handle a maximum current of ...
I = P / V
I = 1 / 15 = 66.7mA
The zener current should not exceed 50% of the maximum to keep the zener's temperature rise to a reasonable value. Also, at that current it will run quite warm, and the voltage will not be greatly affected by the ambient temperature. So, we should aim for up to 33mA, and not less than 7mA to ensure that the zener's dynamic impedance is low enough to be useful. Since the nominal input voltage is about 21V, that means that the resistor should be around 180 ohms ( R = V / I ). 180 ohms gives a zener current of 33mA, but only when the load current is zero and the mains is exactly 230V (or 120V), and assuming the transformer output is exactly 15V RMS.
In reality, none of the above will normally be true. There's little point having a regulated voltage but no load, so we need to know how much current the powered circuit draws. This may be available from datasheets (for opamps), or you might have to either calculate or measure the actual current drawn. For these exercises, we'll assume a load current of 20mA.
Now, if the load takes 20mA, that means that the zener current is now reduced to only 13mA ( 33mA - 20mA ), which is within the range we wanted. To maintain the 33mA we looked at first, the total current drawn from the power supply will be the required zener current (33mA) plus the load current (20mA), a total of 53mA. R1 now needs to be re-calculated, and it becomes 113 ohms. 120 ohms is quite alright in this case. Because the total current drawn is higher than expected, we'll also have more ripple than we expected across the filter capacitor. Due to the extra current, the voltage will be less than the 21V (unregulated) we planned for, but fortunately these errors are not usually so great as to cause a disaster. If the load is disconnected, the theoretical zener current will be 33mA (normal zener current) plus the 20mA that the load would have drawn - a total of 53mA. The zener will get very hot, and this type of simple shunt regulator should not normally be used with no load.
The performance of the supply shown should be reasonable. The simulator tells me that with exactly 15V RMS input, we get 19.4V DC after the rectifier and filter, with 94mV RMS (300mV P-P) ripple at 100Hz. The regulated voltage is 15.1V with 4.9mV RMS (16mV P-P) ripple. Load current is 20mA, but the zener current is well down on what we planned, at only 15.7mA. While R1 could be reduced to provide more current into the zener, that will also cause the ripple voltage to be higher and will reduce the raw DC voltage slightly. The total current from the rectifier and filter is 35.7mA ... 20mA to the load and 15.7mA through the zener. R1 dissipates 152.7mW and the zener dissipation is 235.5mW (15V x 15.7mA). As it transpires, this is a safe overall configuration, and the zener will survive even if the mains input voltage rises to the maximum possible.
Transformer current is a little over 113mA RMS, consisting of sharp peaks of ±480mA. Note that the transformer current with a bridge rectifier is over 3 times the DC current in this example, but it may be higher or lower depending on the output impedance of the transformer (I used a value of 0.2 ohm for the simulations). If the impedance is raised, the RMS and peak current is reduced but so is the DC voltage.
As you can see from the above, there are multiple inter-related factors that must be considered. When normal mains variations are also taken into account, the number of possibilities increases dramatically. Fortunately, while there will always be errors and differences from the theoretical values, as long as the designer makes allowances the end result will still be satisfactory. The critical thing to be aware of is that things will almost never be as straightforward as they first appear.
If R1 is split into two equal value resistors (2 x 56Ω will work), then a second capacitor from the centre tap to ground will reduce ripple voltage. With as little as 220µF, ripple is reduced to less than a quarter (around 1.2mV RMS). The two resistors are required to separate the extra capacitance from the main filter cap and the zener diode, both of which have very low impedance (you'll see this trick used below, too). Perhaps unexpectedly, the ripple voltage is slightly greater with the load connected. This is because the zener passes less current and its dynamic resistance rises slightly.
Note that Figure 1 shows a final filter capacitor, and this is essential in most cases. It is not as effective as one might hope because it's in parallel with a low impedance zener diode, but it will reduce noise a little and (more importantly) provide instantaneous peak current which may be needed by some circuits. In fact, very, very few regulators of any kind should be used without a reasonable capacitance at the output. 10µF is often sufficient, but higher values won't cause any problems in most cases.
Shunt regulation as described above is still a very useful tool, and there are numerous cases where it's by far the easiest and cheapest way to get a low-current regulated supply for auxiliary digital circuitry for example. However, the line and load regulation isn't wonderful, so it's not a technique that suits loads that have rapid (or large) current changes. The next progression is a simple series pass transistor added to the zener, and this is described in the Small Power Supplies article. It will not be repeated here. Once the regulator load current passes through a transistor, the circuit is called a 'series' regulator, because the active output device is in series with the load current.
A basic discrete regulator is shown below. This used to be a very common circuit before the advent of 3-terminal IC regulators. Performance can be quite good, but it is not a precision regulator by any means. Several cunning additions are made to the most basic form of the circuit, and these are described below. The transformer and bridge rectifier are exactly the same as used for Figure 1. C4 will often be needed to prevent high frequency oscillation, and it's value will normally be somewhere between 47pF and 1nF. Higher values will slow the circuit, and it may not be able to respond quickly enough for fast load changes (poor transient response).
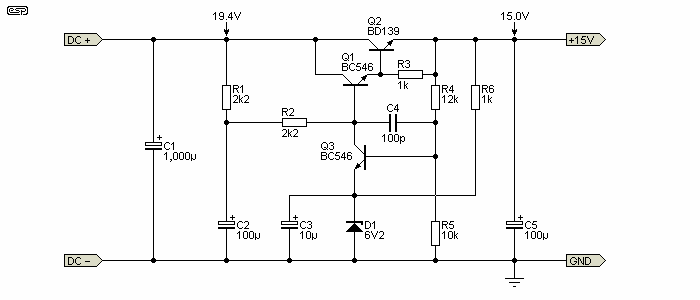
Figure 2 - Simple Discrete Series Regulator
Although the circuit shown has (close to) the same output voltage as the shunt regulator shown above, it draws less current from the rectifier. With the same 20mA (750 ohm) load connected, it draws 29.8mA (rather than a continuous 35.7mA whether the load is connected or not). The reduced current means that the input ripple is reduced, and the feedback used around the circuit helps even more.
In particular, note that there are two resistors (R1 and R2) to provide base current for the series pass Darlington stage. The centre tap connects to C2, and this reduces the ripple voltage from ~78mV RMS across C1 to about 500µV across C2 and less than 100µV at the base of Q1. Output ripple is only 28µV - a 70dB reduction from the ripple across C1. Compare this to Figure 1, which only manages a ripple rejection of about 25dB.
The next cunning trick uses R6. If this were not present, the zener current would only be a maximum of ~630µA which is far too low to ensure stable operation. R1 & R2 could be reduced, but then C2 would need to be larger. So, the regulated and smoothed output voltage is used to supply enough current to make the zener diode work properly. It adds a little over 8.7mA of zener current (the total is 9.4mA in the simulation). This is over the 5% minimum that's needed for stability (a 6.2V 1W zener can draw up to 161mA at 25°C).
To account for zener tolerance (up to ±10%), it was common to make R5 variable. For the example shown, you could use a 20k pot (which would be rather coarse) or R5 could be reduced to 8.2k with a 5k pot in series. This circuit has feedback, and the gain of the regulator is set by R4 and R5. The zener diode is the reference voltage. This regulator is the exact same basic circuit that I used for Project 96, a 48V Phantom power supply for microphones.
The reference voltage (zener diode) should be close to 1/2 the output voltage if possible, but can be as little as 1/4. So if you needed 100V output, you could use a 24V zener.
R4 and R5 form the feedback network and determine the gain of the circuit. If they are equal, the circuit has a gain of 2. The base-emitter voltage of Q3 is added to the reference voltage, so it's not really 6.2V but 6.85V for the circuit shown in Figure 2. This also adds an error due to the temperature of Q3's junction, and this is normally taken to be -2mV/°C. Provided the temperature of Q3 doesn't change by very much the error is of little consequence.
The output voltage can be determined by the following ...
Gain = ( R4 / R5 ) + 1
Gain = ( 12 / 10 ) + 1 = 2.2
VOUT = VREF × Gain
VOUT = 6.85 × 2.2 = 15.07V DC
To design a discrete regulator such as that shown in Figure 2, there are a few common guidelines. R1+R2 has to be able to provide enough base current for the series pass combination of Q1 and Q2. The base current needed is determined by the gain of the pair (assume 1,000 for a typical combination), and needs to be an absolute minimum of double that needed at the maximum output current. If it's less than this, Q3 (the error amplifier) will not have enough current to function and you will lose regulation. It is a common rule-of-thumb to allow between 5 and 10 times the worst case base current of the series pass transistor(s). However, that can be relaxed if you don't need perfect regulation.
So, for the above circuit we can use the following basic equations for R1 and R2 ...
R1 + R2 = V IN - V OUT / I B × 10 - where I B is determined by ...
I B = I OUT / h FE ( Q1 × Q2 ) ... (assume gain of 1000), so ...
I OUT = 20mA
I B = 20µA × 10 = 200µA
VIN - VOUT = 19.4 - 15 = 4.4V
R1 + R2 = 4.4V / 200µA = 22k, so R1 = R2 = 11k
While this could be made to work, it would be rather silly because the regulator could only supply 20mA if you stay within the design guidelines. By reducing the values of R1 and R2 to 2.2k, the circuit will work perfectly with up to at least 100mA output current. At 100mA, the output voltage will fall to 14.99V and ripple increases to 115µV. Considering the relative simplicity of the circuit, the performance is quite good!
Note that the series pass device is shown as a pair of transistors connected in Darlington configuration, but a Darlington transistor an N-Channel MOSFET will also work. A zener diode should be connected between the gate and source of a MOSFET - a 4.7V zener will allow more than enough current using an IRF540 (or similar) MOSFET, and will also provide very basic current limiting. Because the gain of the MOSFET is not as high as a Darlington pair, regulation and ripple performance are not as good. However, the gate draws no current, so R1 and R2 can be higher values than needed with bipolar transistors.
By adding some complexity, the circuit can be made to work even better, but for 99% of applications there really isn't any point. One thing we don't have is short circuit protection. If the output is shorted, the series pass transistors (Q1 & Q2) will fail. If we just limit the current to a preset maximum, we may find that the dissipation of Q2 is outside of the allowable safe area. With 20V in (close enough) and (say) 100mA out and a shorted output, the dissipation in Q2 will be 20 * 0.1 = 2W. This is obviously not a problem with a low input voltage and low current regulator, but it becomes a serious issue if the voltage or current is increased.
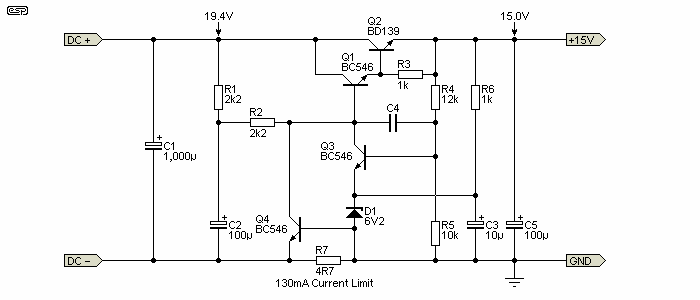
Figure 3 - Simple Discrete Series Regulator With Current Limit
By adding Q4 and R7, we can apply basic short-circuit protection via simple current limiting. When the voltage across R7 reaches 0.6 - 0.7V, Q4 will conduct and 'steal' current from the series pass transistors. This is only a very basic form of protection, and while it works it's certainly not a high-tech solution to the problem. As shown, the current is limited to about 130mA, and dissipation in Q2 is around 2.4W (a heatsink would be mandatory). The arrangement shown is not the only method by any means, but it does work well enough. The extra resistance reduces the regulation performance, and there is noticeable voltage 'sag' as the current limit is approached.
More advanced current limiting incorporates what's known as 'foldback' limiting, where the available current is progressively reduced as the output voltage falls. For example, as long as the output is close to 15V the limit may be set at (say) 1A, but if the output is shorted the maximum current available might be reduced to 100mA. Foldback current limiting is more complex, and in some cases can cause the power supply to refuse to start - for example if the powered circuitry draws a higher than normal current at low input voltages. Since this article is about general principles, foldback current limiting will not be included.
The discrete circuit still has advantages when you need a power supply that has higher voltage requirements than can be accommodated by standard 3-terminal ICs. While high voltage versions are available, they can be difficult to obtain, and still have a limited input-output voltage differential. You might imagine that the LM317HV (for example) would be fine, as it has a maximum input-output differential voltage of 60V.
It is easy to overlook the fact that the maximum input voltage is really only 60V with the LM317HV, because when it's first powered up the output capacitor is discharged and presents close to a short circuit. Likewise, the 317/337 series of regulators have short-circuit protection, but if the input voltage exceeds the maximum input-output differential voltage then there is a good chance that the IC will fail.
A discrete circuit can be made to have any input voltage you like, limited only by the selection of series pass transistors and other parts as required. If you need a 250V regulated power supply, then you are simply out of luck if you try to use any readily available IC regulator. If you know how to build a discrete regulator then there is (almost) no limit to the input or output voltages.
When designing high voltage regulators there are many factors that must be considered - especially short-circuit protection. If you have an unregulated voltage of (say) 500V and you need 400V regulated, imagine the instantaneous power dissipation in the series pass device if the output is shorted! Without elaborate protection measures, a short will cause instantaneous failure of the series-pass device, and it is extremely difficult to provide any protection scheme that's fast enough. It can be done, but will not be covered here because it would require extensive testing to ensure that the protection scheme will work properly (this is not a construction article - it is only intended to explain the principles).
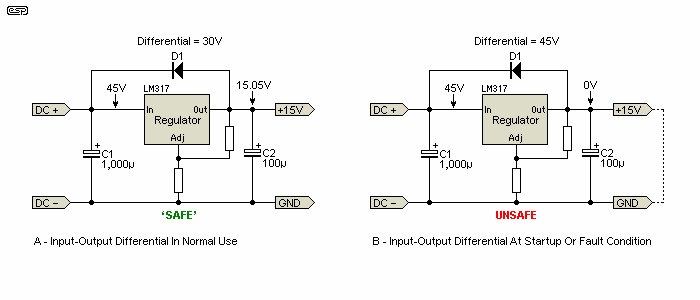
Figure 4 - Input-Output Differential Voltage
The circuit on the left of Figure 4 (A) looks safe, but at the instant of power-on, the output cap is discharged and represents a momentary short circuit. A larger cap may appear as a very low impedance for some time, as shown to the right (B). The differential voltage is therefore the full incoming voltage (45V) and that may well exceed the ratings for the regulator and cause failure. If the output is shorted (perhaps the equipment has tantalum capacitors to decouple the supply ¹), the regulator will have the full input voltage across it until power is removed or it fails!
Note 1: Tantalum capacitors are (and always have been) the most unreliable capacitors ever made. They are utterly intolerant of high impulse currents, and are unique in that their failure mode is often a short-circuit (which may be intermittent). As regular readers will be aware, I never recommend tantalum caps for anything.
It is very important that the input to output differential voltage is not exceeded, and for IC regulators it is in the specification (usually as an absolute maximum figure). For a discrete regulator, it's the maximum voltage across the series-pass and other transistors and is limited by the collector-emitter breakdown voltage, or the drain-source voltage for a MOSFET.
You may well ask why there is a diode across the regulator. In some cases, the total capacitance across the regulator's output may be such that it retains a charge for longer than the main filter cap (C1). This is especially true if there is an additional unregulated load taken from before the regulator. If the regulator should be reverse biased, it will almost certainly be destroyed, so you would be unable to connect a bench supply directly to the circuit without damaging the regulator. Adding the diode means that any voltage at the output is transferred to the regulator's input, which prevents possible damage to the internal circuit. The diode should be added to discrete regulators as well, if there is any possibility that there might be voltage on the output but not the input.

| In some cases you can use a (for example) 30V zener diode (or a string of zeners to increase instantaneous power handling) in place of D1, designed to limit the peak voltage across the regulator. At the instant of power-on, the zener(s) will conduct to charge the output capacitor, limiting the voltage across the regulator IC. If the output is shorted (or the output cap is large) the zeners will almost certainly/ eventually self-destruct. Like most semiconductors they will fail short circuit, placing the powered circuitry at great risk of over-voltage. The peak zener dissipation depends on many factors, and unless you understand how to work it out I suggest that you avoid using IC regulators at any voltage greater than their rated input-output voltage differential. |
While it is important to ensure that the maximum input-output differential is never exceeded, it's also important to ensure that there is enough differential to prevent problems. The minimum is usually specified in the datasheet, and this does not refer to the average value! The instantaneous input voltage must never fall so far (due to ripple voltage) that the regulator can no longer maintain the output voltage. For example, if a regulator requires a minimum of 2V differential to maintain regulation, the instantaneous input voltage must be greater than 2V above the output voltage at all times.
This includes ripple voltage, and any reduction of the mains voltage that is within the normally expected range for the incoming AC supply. Several people have asked why I recommend a 15-0-15V transformer for ±15V DC supplies, when I know that the transformer voltage will normally be higher than specified with light loading. In general, you can expect close to 25V DC at the regulator's input, which may seem excessive. However, this includes a generous allowance for low mains, ripple and additional smoothing.
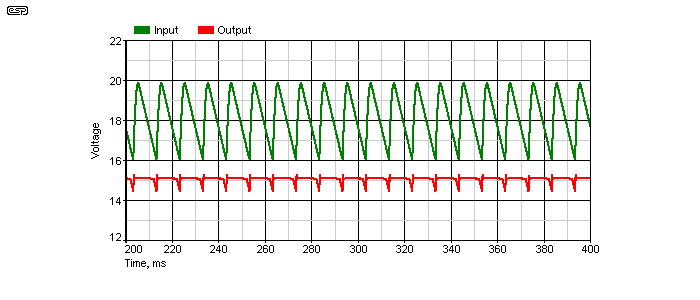
Figure 5 - Input Voltage Ripple Vs. Regulated Output
In Figure 5, you can see what happens if the incoming DC falls below the minimum needed to maintain regulation. Because the input filter cap is too small, the ripple allows the input voltage to fall below the limit where the regulator can maintain the output voltage at 15V. The result is that ripple is transferred from the input through to the output.
In the case shown above, the obvious answer is to increase the filter capacitor so that ripple is reduced to a sensible value and the problem is solved. However, you still need to consider the case where the mains voltage falls - this can have exactly the same effect. If the mains falls by 20% (from 230V to 184V or 120V to 96V), so does the transformer's output. That means that instead of a nominal 15V AC, the output will be reduced to 12V AC, and that is barely enough to allow the IC to maintain regulation - assuming zero ripple voltage!
It doesn't matter if the regulator is a discrete design or IC based - the results will be the same. The only solution would be to either use a transformer with a higher voltage (18V RMS for example), or to use a low-dropout (LDO) regulator design, either as an IC or discrete. LDO regulators can have stability issues because of their design, and generally should be avoided unless there is no option. See LDO Regulators if you want to know more about them.
IC (3-terminal) regulators are now the most common of all analogue/ linear types. For many years we had the 78xx (positive) and 79xx (negative) regulators, as well as many similar devices with different part numbers, and there were several common voltages. 5, 6, 8, 9, 12, 15, 18 and 24V versions were available, but these have (mostly) been rationalised to just three, 5V, 12V and 15V. Some of the odd voltages may still be available if you look hard enough though, but they may not be genuine. Adjustable regulators (LM317/337) allow people to build a power supply for almost any voltage they like, from as low as 1.25V up to 50V if you use the high voltage versions.
They are convenient, and the fixed regulators are also available as low power versions in a TO-92 package. The 78L05 is particularly common, as it can provide regulated power for small micro-controllers, PIC based projects and other low power logic circuits. The internal circuitry of these ICs is now quite advanced, and they are capable of very good performance. They all have short circuit protection, and include internal over-temperature cutouts so they are almost indestructible ... almost!
The common 78xx/79xx series regulators are often considered 'inferior' by many audio enthusiasts, but this isn't justified. Yes, they are somewhat noisy, but the typical noise output is low-level and will very rarely cause a problem with opamp circuits. It may be an issue with simple circuits with poor power supply rejection, and an output filter may be necessary. It's worth noting that the output capacitor is needed primarily for stability, and without it the regulator will probably oscillate. It doesn't matter if it's 10µF or 1,000µF, the output ripple (and noise) will not change by very much.
This apparently odd behaviour is due to the output impedance of the regulator. According to the datasheet for the 7815, it has an output impedance of 0.008 ohm (8 milliohms) at frequencies up to 1kHz, after which it rises at 6dB/octave. At 100Hz, a 1mF (1,000µF) capacitor has a reactive impedance of 1.59 ohms, and that has absolutely no effect against the 8 milliohms of the regulator. The output impedance remains below 1 ohm at any frequency up to 1MHz, and at the frequency extremes a capacitor will have some effect.
Ripple rejection is stated to be a minimum of 54dB (7815) with a typical value of 70dB. Typical output noise is claimed to be 90µV. An easy way to improve the noise and ripple voltages is to add a simple resistor/capacitor filter at the output of the regulator. For output currents of 100mA or less, a 10 ohm resistor and 1,000µF cap will reduce the output voltage by 1V at 100mA, but will reduce 100Hz ripple by another 16dB (minimum). It will also reduce wideband noise. At 1kHz, any regulator noise is reduced by 36dB, and 56dB at 10kHz. Combined with the already low noise and ripple, the residual is negligible. Predictably, this technique can only be used successfully at comparatively low currents.
It is also possible to use a filter consisting of an inductor and capacitor, but great care is needed to ensure that the -3dB frequency is well below the ripple frequency or you can easily end up with more ripple instead of less! For example, an LC filter consisting of a 1mH inductor and 1mF (1,000µF) capacitor has a resonant frequency of 159Hz, and will increase ripple by 4dB. Increasing the inductor to 10mH results in a ripple reduction of 10dB, and also rapidly attenuates all frequencies above 50Hz. Ideally, the inductor (or capacitor) should be larger, and any LC filter is sensitive to the load impedance and may cause transient ringing with varying loads - great caution is advised! A 10mH inductor will be quite large, especially if it's designed to handle significant current.
Many people also think that adding a large capacitor to the output will reduce noise and ripple. As noted above, this doesn't work. Clearly, placing over 1 ohm of capacitive reactance in parallel with less than 20mΩ won't achieve much. At higher frequencies the output impedance of the regulator will rise, so a capacitance of 10µF to 100µF is worthwhile to limit HF noise and ensure regulator stability.
Note that LDOs (low dropout regulators) often have strict criteria for stability, so I suggest that you read the article that deals with these potentially cantankerous ICs. Mostly they behave themselves, but it's not guaranteed unless you get everything just right.
The LM317/337 are recommended replacements for fixed regulators, and give far greater flexibility. They are stable, and perform well. Most importantly, they have no bad habits, and that's an important consideration for any design. Project 05 is an example of a dual regulator using these versatile ICs. When used as shown in the project, the performance is better than a fixed regulator. This can be improved further, but that's normally not necessary. The extra capacitors (and diodes) are included in the Project 05 PCB.
The output voltage is set using a pair of resistors. The normal current from the 'Adj' (adjustment) pin can vary from ~50 to 100µA, and it is necessary to provide a larger current that is fixed and at least an order of magnitude greater than the normal current from this pin. This is traditionally done by adding a resistor between the output and adjustment pin, typically 100 or 120 ohms. The reference voltage is nominally 1.25V, but it can vary between 1.2V and 1.3V from one IC to another. Assuming 1.25V, the current through an external 100 ohms resistor is 12.5mA - well above the adjustment pin current. The complete connection diagram is shown below.
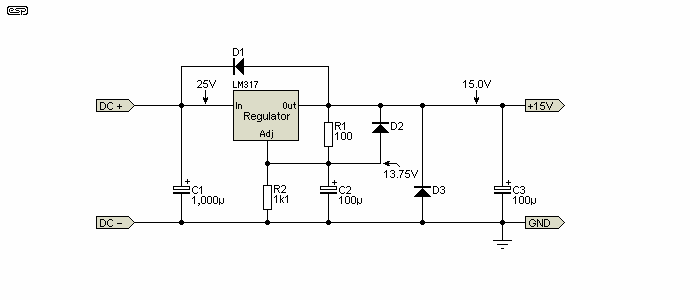
Figure 6 - Adjustable Regulator, LM317 Shown
As noted above, the internal reference voltage is 1.25V, so 12.5mA flows through R1. We can ignore the adjustment pin current because it will be no more than 0.1mA, and although this does cause a small error, it's less than the variation of the reference voltage. The value of R1 is fairly important. If it's too great, the IC's internal operating current will cause the output voltage to rise with no load. The maximum value dependent on the device - the negative version needs a smaller resistance. Most designers use values of around 100 - 220 ohms. The minimum output current for the LM317 is around 5mA, or 10mA for the LM337. By using 100 ohm resistors, a stable output is guaranteed for both positive and negative regulators.
It's easy to work out the value for R2, because we know that it carries 12.5mA and will always be 1.25V less than the output voltage. Therefore, for 15V output we get ...
I R2 = 12.5mA
VR2 = VOUT - 1.25 = 13.75
R2 = V / I = 13.75 / 12.5 = 1.1k
This is quite different from the formula provided in the datasheet, and although the process is a little longer, at least you can remember how to do it because it's based on simple maths (Ohm's law), which is far easier to remember than a formula. Because of the tolerance of the reference voltage (1.2 - 1.3V), the actual output voltage may vary from 14.4V to 15.6V (±1%), although most ICs will be closer to the design value. The voltage difference is of no consequence for opamp circuits. The formula provided in the datasheet(s) is ...
VOUT = 1.25 × ( 1 + R2 / R1 ) + IADJ × R2
This accounts for the adjustment pin current (typically 50µA), which will add around 55mV when 1.1k resistors are used. In general, there's no point aiming for this level of accuracy because the IC is a voltage regulator and not a precision reference. If you need accuracy, then you'd use a precision voltage reference such as the TL431, LM336, LT1009 or a solution as described in SLYT183 - Precision Voltage References from Texas Instruments.
The purpose of D1 is as described above - it prevents a voltage applied to the regulator's output from causing damage. D2 is there to discharge C2. If this diode is omitted, the adjustment pin can become greater than the output momentarily (for example if the output is shorted) which will damage the IC. D3 is a little trickier.
If you build a single regulator, D3 can be omitted. However, if you make up a supply with dual polarities (e.g. ±15V) D3 must be included (on both supplies). It's a protective diode that prevents the regulator from having its output pulled negative, which can cause the IC to shut down ... and it won't recover! How can this happen though? When two supplies are used, it is inevitable that one will be a tiny bit faster than the other. The load (opamps or other circuitry) usually only uses the earth (ground) connection as a reference, so power is drawn between the supplies, and not from each supply to earth. The one that comes up first may force the output of the slower regulator to the opposite polarity, and that can cause the IC to latch into a fault condition from which it cannot recover.
This is a real problem, and the diodes (D3 and its opposite number on the negative supply) must be included. This can be seen in the circuit diagram for Project 05. What can make matters worse is that the problem may be intermittent, and it is hard to track down if you don't know what to look for.
It's not at all uncommon that you might need far more output current than you can get from a 3-terminal regulator IC. TO-3 versions exist that have higher current, but that still may not be enough if you are powering a large mixing console for example. There is a very common trick that's used to get more output, and for a positive regulator it just requires the addition of one resistor and a PNP power transistor. If you use a TIP36C (the most readily available and cheapest power transistor you can get), it's easy to get up to 10A, although you do need to provide a very good heatsink and manage the input voltage carefully to ensure that the safe operating area is not exceeded.
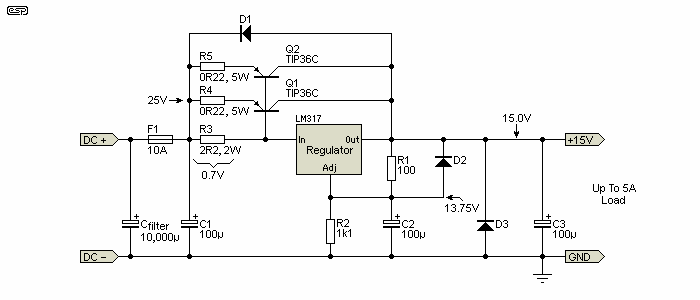
Figure 7 - Boosted Adjustable Regulator, Using LM317 & TIP36C
The regulator IC will provide current up to a limit determined by R3. Once the voltage across R3 exceeds 0.7V, Q1 and Q2 will turn on, and supply as much current as the load demands. The input voltage has to be high enough to ensure proper regulation at the higher current, and the main filter cap also needs to be sized appropriately to minimise input ripple. The above circuit would typically demand a 20V RMS winding on the transformer and the diodes also have to be capable of the maximum continuous current.
Be warned - there is no short-circuit protection, because the regulator will not be able to shut down the added transistors in case of a fault. You might be able to save the transistors by including a fuse as shown, but don't count on it. Despite the obvious limitations, this is a very useful circuit, and is often suggested in datasheets and application notes. In the configuration shown and assuming 25V DC at the input, the regulator will provide a maximum of about 320mA plus the transistors' base current, and the two TIP36Cs provide the rest. Q1 and Q2 dissipation will be almost 50W at an output current of 5A, so the heatsink and mounting must be excellent. A thermal resistance of only 0.5°C/W between case and heatsink will cause a 12.5°C temperature rise for each transistor, and using paralleled pass transistors is absolutely essential.
Some of the application notes suggest using a driver transistor and paralleled pass transistors, but this is only needed if the regulator cannot provide enough current to supply the base current needed. If we allow for the TIP35C/36C datasheet h FE of 25, a 1A regulator can power enough transistors to get 25A output current. Does anyone have a circuit that needs 10,000 opamps? 
The 'simplest' current regulator is just a high voltage power supply and a resistor. For example, if you had a 1kV DC power supply and a 1k resistor, that would give you 1A into a load ranging from zero up to around 20 ohms (with 2% regulation). Although the concept is simple, realisation is anything but - a 1kV at 1A power supply is a serious matter indeed, and the resistor would need a power rating of 1,000W (1A at 1kV is 1kW). So, although the concept is simple, realisation is difficult, expensive and dangerous.
Unlike voltage regulation, there is no simple diode that can perform current regulation. Current regulator 'diodes' do exist, but they aren't really diodes - they are ICs (commonly containing a FET and a resistor). The power rating is generally very limited, and they are only suitable for fairly low current operation. Any depletion mode junction FET (JFET) can be used as a simple current regulator, but the available current will be quite low as will be the maximum voltage. Unlike zener diodes, the stability isn't wonderful, and they are really only useful where precision isn't a requirement. Most are limited to ~20mA or so, and at relatively low voltages (<50V). Power dissipation is usually no more than 500mW.
However, a pair of transistors can be used to obtain very accurate current regulation, and the applied voltage is limited only by the breakdown voltage of the transistors. The maximum current available is mainly determined by the pass transistor's safe operating area. As with a voltage regulator, you need to know the requirements before you start. As with all things electronic there are compromises that must be made, and you need to know the essential parameters before you commit to silicon.
There is no truly simple current regulator that can be used at the kind of current that might be needed by LEDs - the most common load you'll find at the moment. The current needed by typical high-power LEDs is from 350mA to 700mA, with a forward voltage of ~3.5V for each series white LED. If we have 5 x 1W LEDs in series, we need a minimum voltage of 17.5V (we'll use a 22V DC supply) at a current of 300mA.
A discrete transistor circuit using a cheap MOSFET will work surprisingly well, and is quite simple to implement. It does have a small problem with thermal stability, but we can actually use that to our advantage. The circuit is shown below, and it's simply a high power version of a very common current source. The MOSFET will dissipate a little over 1.2W, and this power is completely wasted (a heatsink for the MOSFET is essential). However, that's not much more than we would expect in losses from a switching current regulator working at the same voltage and current, and in some cases may even be less.
D5 (12V zener) is optional, and protects the gate against over-voltage. The regulating circuit is fast enough to ensure that the voltage at the gate will never reach more than about 6V, even if the supply voltage rise is instantaneous. However, including the zener provides gate protection if the load is disconnected (or becomes open-circuit), or if the circuit is wired incorrectly (should you build one).

Figure 8 - MOSFET Based Discrete Current Source
Why did I decide to use a MOSFET rather than a bipolar transistor for Q2? In this case, it's all about minimising wasted current in the base of the pass transistor, and a MOSFET doesn't need any gate current. The 10k resistor supplies ~2mA collector current to Q1, and that's needed so the transistor can function and to provide the gate voltage. The current is monitored by Q1, which will turn on when the voltage across R2 reaches ~0.7V. When Q1 turns on, Q2 is turned (partially) off, because the gate voltage is reduced. There is a state of equilibrium that occurs in a matter of microseconds, and the system is stable. If either the load impedance or incoming voltage changes, the circuit will compensate. If compensation were perfect, there would be no ripple on the current through the load - it would be pure DC. The circuit shown produces about 380µA P-P (117µA RMS) of ripple through the load with an average current of 308mA.
Q1 has the normal 2mV/°C negative temperature coefficient of any silicon transistor, so if it gets hot the current will fall. We can use this to sense if the LEDs get hot, and the current can be reduced to compensate. If Q1 is at 50°C, the current is reduced to 290mA. While it can't be considered to be a full level of compensation, it's still better than none at all. This general form of linear current regulator can be used anywhere that you need the current to remain constant regardless of load variations. You must be aware of the temperature dependence of Q1 though, because it's there whether it's useful or not.
The current regulator circuit will have no significant variation between a load of zero ohms and the maximum (16.7V which at 300mA is equivalent to 55.5 ohms). It can be used with anything between 1 and 5 1W LEDs with no change of current, although the MOSFET dissipation will naturally increase with fewer than 5 LEDs. In fact, it's so good that even measuring the current change in a simulator is difficult. However, if the voltage across the MOSFET and R2 combined is less than ~1.5V, it will no longer be able to supply the rated current. Also, be aware that modern MOSFETs are not really suitable for use in linear circuits, but you can get away with it if the current is low (as is the case here).
The circuit in Figure 8 has one problem, in that the output current varies with the supply voltage. This is due to the varying current through Q1 (via R1). However, the variation isn't great, and is quite linear once the voltage is above that needed for regulation. Current varies from 308mA (19V input) to 312mA (30V input). This is more than acceptable, but it can be improved by supplying Q1 from a current source. This adds complexity that is hard to justify, but for some other applications it might be a requirement.
In the circuit shown, the 'reference voltage' is 0.7V, and is simply the base-emitter voltage of Q1. To make a current source that doesn't vary with temperature requires the use of a precision temperature compensated reference. Needless to say this adds complexity for little gain in real terms.
A current regulator is no different from a voltage regulator, in that it must have enough 'spare' voltage to allow it to function properly. In the case of the circuit shown above, the MOSFET needs almost nothing (about 200 millivolts) and there has to be a voltage across R2 - 650-700mV. Once the input voltage falls below these combined voltages (about 1V), either due to low mains voltage or because the ripple voltage is too high, the circuit can no longer regulate. The current through the load can never be higher than intended, but it can be much lower with low mains or high ripple.
The amount of extra voltage needed depends on the circuit, but it's unreasonable to expect the circuit to regulate the current within close limits if there isn't enough voltage headroom. If the voltage is excessive, dissipation in the series pass device increases and wastes power as heat. If the load is assumed to be a resistor that draws the same current as the normal load, Ohm's law says that the available voltage must be higher than that needed to force the desired current through the resistor.
For example, as noted above 5 x 1W LEDs at 300mA will require a voltage of ~16.7V, and that's equivalent to a resistor of 55.5 ohms. The instantaneous supply voltage must always be at least 17.7V to allow the MOSFET to regulate the current back to 300mA. It's worth noting that with a standard current regulated switching power supply the situation is no different - the input voltage must always be greater than the worst-case maximum voltage across the load. Buck-boost switching regulators can change their mode of operation depending on input voltage.
Where the switching regulator wins is when the input voltage is much greater than required by the load, as the efficiency will be a great deal higher. For the same load current, current from the supply with a switching regulator actually reduces as the supply voltage increases. With a linear regulator, the current remains the same, and wasted power (as heat) increases. Switching regulators are outside the scope of this article though.
The common variable regulator ICs can also be used as current regulators. There are examples shown in the datasheets (and below) and they work quite well. These circuits rely on the 1.25V reference voltage, so the current sensing resistor has to drop that voltage during normal current limiter operation. Unlike the version shown above which uses a 2.2 ohm sense resistor for 300mA (the resistor dissipates ~200mW), if you use an LM317 for example, the sense resistor has to be around 4.2 ohms, and dissipates nearer to 400mW. It's no big deal of course, but it also means that a slightly higher voltage differential is needed across the regulator.
A standard LM317 used as a current regulator has excellent performance. The down-side is that the reference voltage is 1.25V, while the 'reference' voltage for the discrete version shown above is only 0.7V. This means that the LM317 needs more voltage headroom. A simulation shows that the circuit shown below will not regulate the current properly until the input voltage is greater than 19.8V, including the minimum level from ripple voltage. C2 is used to ensure the circuit doesn't oscillate.
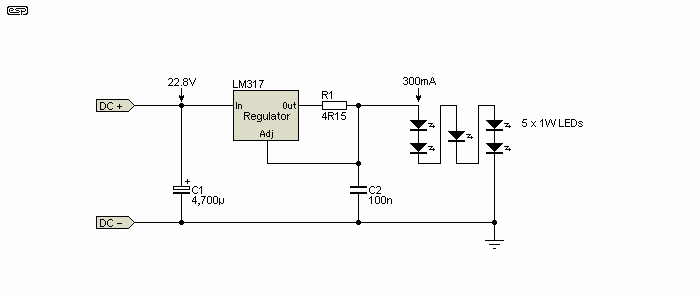
Figure 9 - LM317 As A Current Source
The difference in the reference voltage is easily seen by looking at the current sense resistor - R1 in Figure 9, and R2 in Figure 8. While 2.2 ohms is sufficient for the Figure 8 circuit, the LM317 needs a 4.15 ohm resistor which needs to be rated at 1W. The LM317 is interested in only one thing - the voltage across R1. Provided this voltage can be maintained at the internal reference voltage (1.25V), the output current is fixed at 300mA. Current equals ...
I = VREF / R1
I = 1.25 / 4.15 = 301.2mA
If you have some voltage to spare, R1 can be 4.7 ohms, with a resistor and trimpot in parallel as shown in Figure 10. The wiper connects to the adjustment terminal of the LM317, allowing you to vary the current. The circuit shown allows you to vary the current from 267mA to 340mA with VR1.
Figure 10 - LM317 As An Adjustable Current Source
You can use the LM317 as an adjustable current regulator up to the maximum current and power dissipation allowable. It's nowhere near as efficient as a switchmode current regulator, but is easily built on prototype board or even tag strips. It can be used for prototyping and proof-of-concept, or even as a stand-alone test supply for driving high power LEDs while testing heatsinking and lighting patterns (for example). Like the circuit in Figure 8, the current will be essentially the same regardless of the number of 1W LEDs used. This assumes that the forward voltage of the LEDs is around 4-5V less than the supply voltage of course.
This article has only covered positive regulators, but negative regulators are easily made using the same basic circuits, but with opposite polarity parts (reversed zener diodes, PNP instead of NPN transistors and vice versa, etc.). Negative regulators are therefore not covered in their own right. The negative equivalent to 78xx regulators are the 79xx series, and the LM317 is matched by the LM337.
However, there is one configuration that at first glance does not look like it will work, but it's so useful that it is shown here. It takes a bit of lateral thinking to realise that if one side of a power supply is regulated (for example the positive), then by definition the other side (the negative) must also be regulated. If it were otherwise, electronics as a whole simply wouldn't make any sense and would not work.
Figure 11 - Positive & Negative Voltages Using Only Positive Regulators
In fact, the power supplies can be completely separate, and simply connected with the negative of the upper regulator/power supply connected to the positive of the lower. Two separate switchmode supplies can be connected like this, and it works with any type of power supply, as long as there is no connection between their secondaries other than the one you make yourself. You can even have different voltages for the +ve and -ve supplies if you wanted to (but that's not often useful).
All voltage and current regulators require a voltage reference, because it's used as a fixed point against which output voltage or current can be compared. The ideal voltage reference will be completely insensitive to age-related drift, temperature and input voltage variations, so it will remain at exactly the same voltage at all times. Needless to say, an ideal reference doesn't exist but some circuit tricks do come fairly close.
As noted in the introduction, valve circuitry used gas discharge tubes, and these are neither particularly accurate nor stable. With the advent of silicon semiconductors the situation improved greatly, with zener diodes becoming the reference of choice. A 6.2V zener diode has a complementary positive and negative temperature coefficient (tempco), and is quite stable over a reasonable temperature range. However, the voltage does change with current, so a simple resistor will not provide a reference voltage with the desired stability. This hurdle is normally overcome by supplying the zener via a constant-current source - usually two, with one providing the reference current for the second.
If it were possible to build a current source that was insensitive to both applied voltage and temperature, then the easiest voltage reference known is a resistor. If a defined (and perfectly regulated) current is passed through a resistor with a very low tempco, then the voltage across that resistor must be constant. Of course you can't draw any load current, and to make the precision current source you would need a precision voltage reference. Having gone in a complete circle, it's obvious that something more practical is needed.
Zener diodes with a breakdown voltage of around 6.2V can be operated at a specific current and will exhibit very close to zero tempco if the current is right. Unfortunately, this is not specified in the datasheets, and the optimum current varies from one diode to the next. The exact current needed can be found experimentally, but the method is time-consuming and few people will be so inclined (myself included). This is especially true when precision reference diodes can be obtained easily and cheaply.
The µA723 (and LM723) uses a 5.7V zener which has a low tempco. Better still is 5.6V zener having a +2mV/°C tempco (typical), in series with a forward biased diode which has a -2mV/°C tempco - the result is zero. It will never quite work out to be perfect, and the forward current must still be tightly controlled to get a stable voltage.
In modern ICs, the most common reference is a bandgap circuit. Note that although the circuit is called a bandgap, it doesn't actually rely on the energy band-gap of silicon (around 1.205eV - electron volts), but simply has approximately the same effective voltage. Yes, I know this doesn't make much sense and is confusing, but that's just the way it is. There are many different versions in common use, and most rely heavily on IC processing techniques to function. If you were to build one using discrete parts it would almost certainly be unusable. Being on a single piece of silicon and with all parts in close proximity means that all the junctions are at the same temperature as each other. Bandgap references utilise circuitry that has equal but opposite temperature coefficients - just like the zener and diode described above, but at a lower and more useful voltage. The 'standard' (if there is such a thing) bandgap reference has a voltage of between 1.2 and 1.5V - for example the nominal reference voltage for the LM317 is 1.25V.
If you want to know exactly how a bandgap reference is made, there is a lot of information on the Net. However, most of it isn't particularly useful because it's very technical, and most articles concentrate on IC fabrication techniques. Of course this makes sense, because you must have IC fabrication to create a workable bandgap reference. However, in the interests of completeness, a typical circuit is shown below. The idea is that there are two complementary parts of the circuit, with equal but opposite temperature coefficients. The current is often tightly regulated, and it's not uncommon for bandgap circuits within ICs to use the bandgap reference voltage to stabilise the supply current that feeds the reference circuit!

Figure 12 - Bandgap Reference Conceptual Circuit
Some examples of precision voltage references include the LM113 (the first, dating back to 1971 and designed by Bob Widlar), TL431 and LM336 (both adjustable), plus many more. The conceptual schematic of the LM113 is shown above. Note that the physical area of Q2 is made 16 times larger than Q1, and this is one of several factors that make the circuit work. Most use a similar technique.
It's interesting to note that if you happen to need a precision current source, you need a precision voltage reference. Ideally, and especially if the input voltage can vary by more than a small amount, the best way to power the precision voltage reference is via a current source. This need not create a conundrum though, because the reference current source needs only to be good, not perfect. The world of precision sources (whether voltage or current) requires great attention to detail, and it is necessary to minimise variations of input voltage, load current and temperature. Opamps are often essential, because they have closely matched input transistors that will remain at virtually identical temperatures.
Where extreme precision is needed, it's always been a common practice to use an electronically controlled oven to elevate the ambient temperature of the circuitry enough to ensure that atmospheric temperature changes have minimal or no influence over the temperature of the circuitry. Needless to say this is only necessary when measurements of much higher accuracy than normal are made - such techniques used to be common in very high precision meters, but are not necessary for the majority of day-to-day applications. A modern bandgap reference often provides as much precision as you'll need for most measurements.
It's unfortunate but inevitable that some people will associate voltage regulators with 'magical' properties, able to somehow affect "pace, rhythm, timing, and space" (and no, I don't know what that's supposed to mean either) as well as sound stage, bass 'authority', treble 'air' and by extension, the taste and mouth feel of one's breakfast cereal. That last claim is (regrettably) no sillier than any of the others. Almost without exception, this is blatant nonsense, and will never be backed up with double blind test results or meaningful measurements.
There are a few 'special' designs that seem to have captured attention, but I have no intention of giving them any credence by naming names. There are a few (very few!) designs that demand better than normal regulation, usually requiring lower noise than can be achieved with off-the-shelf regulator ICs. This is often because the circuit design is also richly steeped in snake oil, and may have particularly poor power supply rejection or be overly sensitive to supply impedance.
There is no doubt that some of the 'special' regulators can have superlative performance, with much lower noise than common IC types. If you wish to experiment, they can be very educational and can provide lots of fun as you experiment with them. However, they will not make any competent audio design sound 'better' or even 'different' - especially those using opamps.
Nothing I say, nor the protestations of other sensible designers, will change anyone's mind of course. If people are inclined to believe in the 'magic' aspect of audio they will almost certainly hear a difference, and that opinion will not be challenged by double blind testing, so reinforces the belief that we can hear things that cannot be measured or quantified by science or physics. This 'belief' mechanism is part of our psyche, and even when you know there's no change, our minds are easily fooled.
The only valid test is double blind, but a simple A-B test is easily set up. It's imperative that you don't know which switch setting is which, because that defeats the whole idea of A-B testing. Ideally, you'll have someone else make the connections (which cannot be visible) while you are out of the room. Unless you can pick the design under test with at least 70% accuracy over a number of tests, the selection of 'A' or 'B' is within the bounds of random selection (i.e. pure guesswork).
Regulated power supplies are used everywhere, and are considered necessary in many cases, even though the circuits might work well enough with no regulation. The simple fact is that regulating the power supplies gives us the freedom to use circuits that would otherwise inject large amounts of hum into the circuits. It's usually cheaper (and the end result smaller) to use a regulator than to try to use more advanced filters to remove 100/120Hz hum and noise from the power supply.
In the early days when valves (vacuum tubes) were the only amplifying devices available, regulation was difficult and expensive. Valve regulators were used only when absolutely necessary because of the cost and additional reliability concerns. By today's standards, regulation stability was pretty ordinary, but it was sufficient for the applications of the time. In most cases, designers went to great lengths to use filtering to remove hum (100Hz or 120Hz) from the power supplies. Filters used inductors, resistors and capacitors to remove the hum from the most sensitive parts of the circuit, and regulated supplies were virtually unheard of in consumer equipment.
Today, we have a vast array of regulator ICs, precision voltage reference ICs and access to circuitry that would have been astonishingly expensive to try to achieve just 50 years ago. One of the earliest regulator ICs was the venerable µA723, which was made by a number of companies after its introduction. It was first released by Fairchild in 1967, and still survives to this day. It's doubtful that many people would bother using it any more other than to repair an existing product, and that's why I didn't include a circuit using it. Despite its age, it is still a very fine IC, and often finds uses in bench power supplies for example.
For increased accuracy, in some cases you will find one regulator providing the voltage for a second regulator - a doubly regulated circuit sometimes known as a 'super regulator'. Doing so only isolates the second regulator from input voltage variations, but if the noise, load regulation or temperature stability of the second regulator is less than perfect the end result is probably not worth the effort. You will probably get very good hum rejection, but that's easy to achieve anyway. Bear in mind that a single slightly misplaced wire or chassis earth connection in the power supply can easily undo the effects of the regulators in terms of hum/buzz reduction.
There are many different voltage regulator ICs available from various makers, and it would be difficult to try to include them all. Precision references are also used in ADCs and DACs, especially those designed for accurate measurement functions. You also have to include switchmode regulator ICs, both voltage and current - some are optimised for one or the other. The number of devices is enormous, especially with switching types. More are added to supplier catalogues every year, with much of the demand for new devices driven by the demands for 'solid state' (LED) lighting.
Linear regulators are far easier to design and build than any kind of switchmode regulator, because there are no high frequencies involved, and no magnetic components to worry about. This makes linear the sensible choice for testing a design, even if it is known beforehand that the final supply will be a switching type. The design should be complete and the required voltage, current and thermal demands established first. When these are all known, then it's time to work on the final switchmode design.
Main Index
Articles Index