
|
|
| Elliott Sound Products | Project 63 |
 Main Index
Projects Index Main Index
Projects Index
|
The multiple feedback bandpass (MFB) filter is a simple looking design, but it is difficult to calculate the values for a given set of parameters. These filters are useful for equalisation, analysis and other tasks such as the Sound to Light converter (Project 62) or even a fully functional Vocoder. For those who have not heard of the vocoder, it is a device that takes a music source as one input and vocals as the other, allowing a guitar, keyboard or complete ensemble to be made to speak or sing. The 'speech' from a good vocoder is quite intelligible, and is 'ear candy' of the very best kind for experimental musicians.
The MFB filter is the basis of several projects that use bandpass filters, and I have included a small calculator programme to make it easier to determine the component values for different filter parameters. I must admit that I've never been a huge fan of MFB¹ filters due to the (usually) odd values that are needed for a given frequency, gain and Q. On the positive side, all three are able to be defined by passive components, so they are very flexible.
¹ My 'preferred' filter is the State Variable, and that's the one I'd use wherever possible for most 'serious' applications. It has three simultaneous outputs (low-pass, high-pass and band-pass) and with one extra opamp can also provide a notch (band-reject) filter. The frequency, gain and Q can all be set with pots, making it the most flexible filter topology of all analogue designs. It's more complex and uses at least three opamps, but it beats the MFB in all significant respects.
A schematic for the multiple feedback bandpass filter is shown in Figure 1. The source impedance must be low with respect to the input resistance, and normally these filters are driven from an opamp buffer. If a high impedance is used, it adds to the total input resistance, causing unpredictable centre frequency and response. The input impedance is (roughly) the value of R1.

The resistor and capacitor values shown give a Q of 4, with a centre frequency of 159Hz. Component values are calculated from the formulae below, or by using the calculator program (see below for details). The two caps (C1 and C2) are always the same value. The opamp shown in the schematic is a single device, but most commonly dual or quad opamps will be used for this kind of application. Cb1 and Cb2 are supply bypass caps to ensure the opamp remains stable.
A resistance (Rx) from the +ve input of the opamp is optional to minimise the DC offset voltage. In general, this is completely unnecessary because the filters are usually not DC coupled anyway. Maintaining DC accuracy serves no purpose and is actually impossible. However, if used, the resistor from +in to earth (ground) should be the same value as R3 to obtain minimum DC offset from the opamp output. A 100nF capacitor (Cx) in parallel is highly recommended to bypass the non inverting input to earth for AC - this helps to reduce noise. Offset will normally only ever be an issue with bipolar input opamps and high values for R3, because the input bias current flows through the resistor and causes the offset. Use JFET input opamps and the problem goes away, because their input bias current is so low.
If offset is not a problem for you (and there is absolutely no reason to use DC coupling), simply connect the non inverting input to the earth (GND) rail as shown. Cb1 and Cb2 are supply bypass capacitors, and should be used at each IC package, with the supply rails both decoupled to ground with 10μF caps. Ceramic capacitors are recommended for the most effective high frequency bypass. The opamp can be any common device for low frequencies, but at high frequencies (above about 2kHz) a high speed device is required for best performance.
Somewhat surprisingly, the TL071 (or TL072 dual opamp) is quite a bit faster than many people realise, and it is quite sufficient for most audio applications. However, don't expect to be able to use these filters at much more than 20kHz, because general-purpose opamp limitations will cause poor performance. As noted above, use FET input opamps for minimum DC offset without having to include Rx and Cx.
 |
The pinout for a typical dual opamp is shown for reference. This is pretty much an industry standard, and nearly all dual opamps use this pin configuration. As always, I suggest that you download the data sheet for the device you intend to use to double check. |
 |
The pinout for a single opamp is also shown for reference. Again, this is pretty much an industry standard, and nearly all single opamps use this pin configuration. As always, I suggest that you download the data sheet for the device you intend to use to double check. Note that the circuit shown in Figure 1 uses a single opamp! |
With any bandpass design (or indeed any filter), one of the important parameters is Q, or 'Quality Factor'. The Q of a filter determines its bandwidth, and this is especially true of bandpass filters. Perhaps unexpectedly, bigger is not better. Most audio applications will require a maximum Q of about 4, which is suited to a 1/3 octave filter set. Few applications require closer filters than this, and to have 1/3 octave band filters covering the audio band requires 30 separate filters. Naturally, for even greater resolution this would increase dramatically.
At this point, a discussion about Q, bandwidth and the even division of octaves is needed.
A filter with a Q of 10 has a bandwidth that is 1/10th of the centre frequency. Thus, a 1,000Hz filter with a Q of 10 has a bandwidth of 100Hz, measured at the -3dB frequencies on either side of the resonant peak. This Q is too high to be useful in most audio applications. Response is shown in Figure 2 for a filter having a centre (resonant) frequency of 159Hz, and is derived from the circuit values shown in Figure 1.
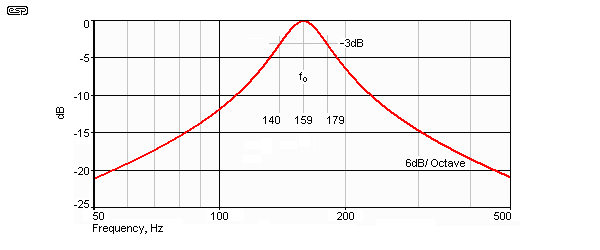
With -3dB frequencies of 140 and 179Hz, bandwidth is 39Hz, so Q is 159 / 39 = 4.08
Note that beyond about 2.5 octaves either side of the resonant peak, the rolloff slope is 6dB / octave. This limits the usable range of the circuit in some respects, as the ultimate slope of 6dB / octave (20dB / decade) is only a first order filter response. Increasing the Q does nothing to solve this, the peak will be narrower and will extend more than the typical 8 to 10dB, but the ultimate slope is unaffected.
Where very high Q is needed (non-audio applications), it's common practice to cascade filters, with two, three or even more filters in series. Sometimes, they are 'stagger tuned' (each has a small frequency offset from the next) to get a wide (and relatively flat) passband while retaining a high rolloff slope.
When filters are cascaded (connected in series), the ultimate rolloff slope is also affected, so two filters gives 12dB rolloff, four gives 24dB rolloff, etc. For example, two filters with a Q of 4 connected in series gives a composite filter with a Q of 7 and an ultimate rolloff of 12dB/Octave. Four of the same filters in series have a combined Q of about 9.4 and 24dB/Octave ultimate rolloff.

All filters affect the rise and fall time of any transient signal. For the example used here (a Q of ~4), an applied sinewave at the tuned frequency will reach about 90% of the steady state value within about 3 cycles. It also takes around 3 cycles for the output signal to disappear after the input signal has ceased. This is clearly visible in Figure 4, and as you can see the output doesn't rise to the full value for about 5 cycles. The signal is turned on at 10ms and off again at 90ms.
As seen, the filter will also 'ring' for at least 5 cycles after the input is removed. This may appear to be disconcerting, but it's not usually audible with Q below five. Even at higher Q values, the filter effect is so strong that we hear only the sound 'created' by the filter. Other 'artifacts' are not usually significant, but need to be understood if you wish to perform detailed analysis. These effects are due to the act of band-pass filtering, and are not determined by the topology.
As the filter Q is increased, so too is the delay before the output reaches the level of the input (at the filter frequency). Likewise, the filter will ring for the same period when the input is removed. Very high Q filters are not appropriate for audio, and can never work the way you might hope with wide band material such as music.
Division of an octave is simple once you see how it is done. An octave is the doubling (or halving) of a frequency, so for A440 (Concert Pitch), an octave above is 880Hz, and an octave below is 220Hz. All notes are 'A', but in different octaves. If we want to divide an octave into 12 parts (the equally tempered scale, as used in most musical instruments) we will get 12 semitones. Using A220 as a starting point. we must divide the 220Hz bandwidth into 12 musically related frequencies. The trick here is that you can't divide 220Hz by 12 to find the interval, because our ears have a logarithmic frequency response.
Instead, we must find the 12th root of 2 (1.05946...). If you multiply 220 by 1.05946 twelve times, you will get 440 (well, near enough anyway). To divide an octave in half, we use the square root of 2 which is 1.414. So (for the sake of simplicity), a half octave division from 100Hz gives the halfway point at 141Hz, and the next octave is at 200Hz.
To locate the 1/3 octave intervals, we use the 3rd root of 2 (1.26), so the frequencies will be 100Hz, 126Hz, 158.7Hz and 200Hz. By this means, an octave can be divided into as many frequencies as desired. Ahhh, but how to find these 'odd' roots? Most calculators don't have provision, but it's actually easy when you know how. The nth root of 2 is found by ...
nth root (of 2) = 2^( 1 / n ) For example ...
3rd root of 2 = 2^( 1 / 3 ) = 1.2599
You can substitute any number for '2' - for example, use 10 if you wish to divide a decade logarithmically into a number of divisions. For example, 10^( 1/12 ) is 1.21153 (the 12th root of 10), allowing you to have 12 log spaced intervals in a decade. The sequence is ...
10, 12.12 (12), 14.67 (15), 17.78 (18), 21.54 (22), 26.10 (27), 31.62 (33), 38.31 (39), 46.42 (47), 56.23 (56), 68.12 (68), 82.54 (82), 100
You may never need to know this, but then again you might - electronic calculations can throw up some surprises. The E12 resistor value sequence is roughly based on the 12th root of 10 shown here! The E12 values are shown in bold.
By far the easiest way is to use my program (download here), but since it is only applicable to Windoze machines, some of you will have to do it the hard way. Note that you will also need the Visual Basic 4 (VB4) runtime library, which can be obtained from the Microsoft support Website.
Be sensible when deciding on the Q. There isn't a specific limit, but as the Q increases, the component tolerance (and sensitivity) becomes an issue. Input and feedback resistor values will be high, and you'll almost certainly need to use the E24 series of resistors. Even then, the desired frequency may end up with a few percent error from the design value. Component sensitivity increases with increasing Q. If you really need a high Q filter, there are much better options (see Project 218 as an example. Based on the circuit above, select an appropriate capacitance first (both capacitors must be the same value), then these are the formulae ...
Input resistance R1 = Q / (G × 2π × f × C) Attenuator resistance R2 = Q / (( 2 × Q² - G ) × 2π × f × C ) Feedback resistance R3 = Q / ( π × f × C ) Passband Gain G = 1 / (( R1 / R3 ) × 2 ) Centre Frequency f = 1 / ( 2π × C ) × √(( R1 + R2 ) / ( R1 × R2 × R3 ))
In each case, G is gain, Q is quality factor and f is frequency. Capacitors are in Farads, resistors in Ohms and frequency in Hertz.
This process can hardly be regarded as trivial, especially if there is a significant number of filters to design. The program also allows you to apply standard resistor values and then calculate backwards to see how far out the final design will be from the design ideal. This applies to frequency, gain and Q. Capacitor selection is the first step, and making a decision will come with experience, but as a guide, the following table will help ...
| f (min) | f(max) | Capacitance |
|---|---|---|
| 20 Hz | 80 Hz | 220 - 390 nF |
| 80 Hz | 300 Hz | 47 - 100 nF |
| 300 Hz | 1,200 Hz | 10 - 22 nF |
| 1200 Hz | 4,800 Hz | 3.3 - 5.6 nF |
| 4,800 Hz | 20 kHz | 1.0 - 1.5 nF |
Increasing capacitance decreases the resistance values, and especially with multiple filters, care must be taken to ensure that the loading on the input buffer opamp is not excessive. At the same time, low values of capacitance cause problems due to stray capacitance on the board and in any wiring, and resistor values become too high. The above is a reasonable set of values, and will give satisfactory results for most applications.
Naturally, any spreadsheet program (OpenOffice for example) can be used to calculate the values, and this is a much easier way than using a pocket calculator. Of course, you do have to program the spreadsheet, but that only needs to be done once. Texas Instruments (TI) also has a program that was originally called 'FilterPro' (see TI WEBENCH® Filter Designer) that works quite well. It's not easy to drive unless you understand the terminology though, so be prepared to learn the program's quirks as you learn about filters.
The TI application has a few more bells and whistles, tells you the required minimum gain-bandwidth product of the opamp and is all-in-all a very good design program. It includes many different types of filters and is very flexible, but beginners will find it heavy going at first. It's particularly useful for complex high-order filters, which can be very difficult to design.
For both equalisers and analysers, there are commonly accepted frequencies that are normally used. The exact frequencies depend on the octave division, the application and some degree of manufacturer preference, but nearly all share the basic octave boundaries which are based on a 'key' frequency of 1000Hz. This is often used as the 'centre' frequency for basic tone controls, but if you look at the ½ octave and ⅓ octave distribution, the centre frequency is somewhere around 700Hz. In this case convention seems to overrule reality.
For an octave band EQ or analysis instrument (10 Band) the frequencies are usually as follows ...
1/2 Octave band frequencies (20 Band) will be (typically) ...
Finally, 1/3 Octave band instruments (30 Band) will typically follow this sequence ...
Frequencies in brackets may or may not be used, depending on the manufacturer and/ or the purpose of the equaliser. Naturally, it is possible to use wider bandwidth (and fewer filters) or narrower bandwidth and more filters. Although some 5 band 'graphic' equalisers have been made, they are of limited use for anything other than elaborate tone controls (and are generally not useful at all, IMO). Anything narrower than 1/3 Octave is rare, since the complexity of the filters increases for higher values of Q. This can get rather expensive, and in reality is of limited use for most applications in audio.
 The symbol to the left is a standard representation of a band pass filter, and will be used in future articles or projects using this building block. There are several projects that use bandpass filters, and this article simply describes the basic building block. Some of the projects I originally thought about are already published, and the remaining one is fairly unlikely unless someone submits an article for publication. Several people have said they will do so, but none have delivered so far. Those I originally thought of are ...


The last circuit (should it ever come to fruition) will represent a considerable commitment in time and money, but you will be able to build a basic version first, and expand it later as your needs and/or funds allow. The really hard part is the VCA, since once cheap but ok for the purpose ICs are all obsolete now. There are no low-cost alternatives other than a DIY version (see Project 213 discrete VCA). Making perhaps 20 of them for a half-octave vocoder is a tad daunting.
| Main Index
Projects Index
|