
|
|
| Elliott Sound Products | Project 30a |
 Introduction
This is part one of probably the most ambitious project so far, in that it can be huge (there is no real reason that it could not be built up as a 36-8-2 (i.e. 36 input channels, 4 "sub" stereo output channels and a main stereo output, not including auxiliary sends). The picture on the left is a representation of how a single mic / line channel might look, with the sub-master (or group) switching included. There are modules planned for every input type imaginable, including:
All input modules have 3-band EQ, with the mid frequency variable from 500Hz to 2kHz to allow maximum flexibility. Inputs all have variable gain, and each input module has a peak level LED, PFL (Pre-Fade Listen) button, channel insert and auxiliary sends. Optionally (for a four output mixer), there is a simple selector switch to select the master bus (A or B), and all channels have a pan control for stereo positioning. Stereo input modules have a balance control instead.
The maximum gain of the mic / line unit has been set at 46dB, which is more than enough for most music recording. This allows for microphone levels down to 5mV, which is almost always exceeded by most musical instruments with a typical low impedance microphone. In many cases (especially with vocalists), the mic output level can easily reach 250mV, and I have measured the output of a low impedance mic at about 1 Volt with loud singers! Where extra gain is needed, this is easily accommodated.
Each of the input preamplifier units can easily be changed to give more gain, but noise must be considered the greatest enemy of any recording or live music mixer. As gain is increased, noise increases as well.
The nominal operating level of all modules is 0dBv (1 Volt RMS), and the peak LED will operate at +6dBv. This allows 15dB headroom, which is more than adequate provided the mixer is not operated with all the peak LEDs continuously on!
Please note that although presented in project form, this is not necessarily a "real" project. Rather, it is a gathering of ideas with a common theme, and circuits for audio mixing consoles are few and far between on the web from what I have seen.
The output module is also configurable, allowing a selection of options. As can be imagined, this project will take some time to complete, so will be presented in stages. This is the first in a series, and provides all the information for building the microphone / line input module.
Following is the master module, and this way you can start to build a complete unit, and add the other modules later. The next is the power supplies, which has much higher current capacity than one for an audio preamp and includes the optional 48 Volt phantom feed supply. This does not require particularly high current, but needs to be very well smoothed, to prevent hum from being introduced into the low level microphone inputs. The phantom feed supply is designed to handle a maximum of about 10 microphones (or direct injection boxes) at any one time.
Figure 1 shows the block diagram of the mic / line input stage with a single stereo output. This is the option most likely to be built, as it is simple to use and is relatively cheap - but only compared to more esoteric options. This is not a cheap project to build, but will provide a standard of performance that is very hard to beat with equivalent commercial offerings.
Although I have designed this mixer with two auxiliary sends, there is no real reason that more could not be provided. Even with the two pots, a switch can be used to select one of several buses for each control. Generally, the ability to select either of two buses for each auxiliary send is enough, but more can be used if desired.
I will leave it up to the individual constructor to determine the ideal combination. Remember that for each bus, there must be a mixing module (these can be as simple or as complex as you like), and the necessary output connectors for each. This all starts to add up (rather quickly, too), so you do need to consider the final cost.

Figure 1 - Mic / Line Module Block Diagram
Each mic/line channel has 7 pots, up to 5 switches, one push-button and a slide pot for the fader. In addition, there is a Cannon XLR input connector, a stereo jack for channel insert and the overload LED. Naturally, there is also the electronics to make it all work. An ambitious project indeed, but one that I hope will be popular despite all of this.
The mic/line input module is the most important part of the system, since it is this unit that determines the functionality of the entire mixer. Accordingly, this provides input selection, gain control, phantom power, phase reversal, tone controls, auxiliary sends, pre-fade listen, pan-pot and overload indication. (If you say that really quickly, it still sounds like a lot of stuff!)
This is common to all of the following amplifier units, and provides the following functionality:
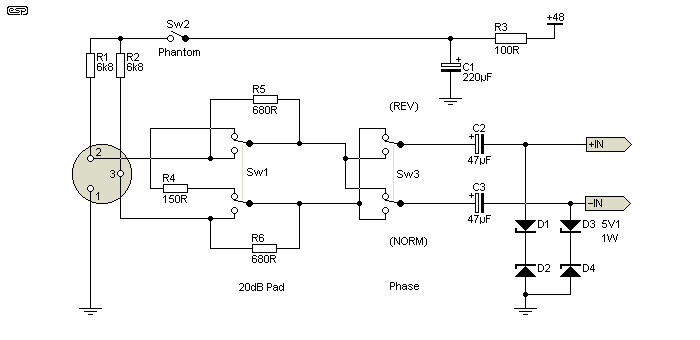
Figure 2 - Mic / Line Inputs And Switching
The 48 Volt phantom feed can be omitted if you are quite sure that you will never need it, but it is needed if powered microphones are contemplated, and can also be used to power direct injection (DI) boxes so that batteries do not have to be used.
The 20dB pad is needed if high level line inputs are going to be used. All of the amplifier options have a minimum gain of 3 (close enough to 10dB), so if a line input of 0dBv (i.e. 1 Volt) is applied the gain control will be set near its minimum gain setting. For higher levels, the pad reduces the input signal, allowing up to +20dBv (10V RMS) to be applied without overload. It has always been something of a convention to use a 20dB pad, but in my experience these are a bit of a pain. The pad tends to reduce (or increase) the signal by just that little bit too much, so I thought briefly about a 10dB pad instead. Feel free to modify the circuit if you prefer a 10dB pad.
The phase reversal switch is used where two microphones are used in close proximity, and cause phase cancellation because of their relative distance from the source. This can result in a "hollow" and often unpleasant sound - especially when miking a drum kit or piano. The phase switch allows you to select the best setting to get the sound you want.
The capacitors and zener diodes protect the following amplifier from transients when a mic is plugged in or removed with phantom power applied. These are recommended even if the phantom feed option is not used, especially with the electronically balanced circuits. They are not essential with the transformer input, but will do no harm.
 Click on the PCB image to see Project 96 - a different version of the phantom feed and distribution (and a power supply) - PCBs are available.
There are three options for the input, using a transformer to balance the input, or using either of two electronic balancing circuits. My preference is (and always has been) for the transformer, as the common mode performance is far better than the electronic method, and also provides much better radio frequency interference suppression. However, transformers are expensive, so both methods are shown, but the noise performance will suffer and interference will also be worse if the transformer is not used.
In reality, these differences may not be an issue, and the use of a cheap ($20 - $50) transformer may (will?) degrade performance far more than the use of an electronically balanced circuit.
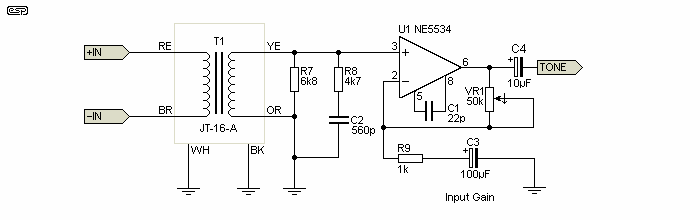
Figure 3 - Transformer Input Mic/Line Input Circuit
The suggested transformer is a Jensen JT-16-A. This is a 1:2 step up transformer, which provides a useful gain of 6dB, and more closely matches the impedance to obtain the optimum noise figure from the input amplifier (an NE5534A single opamp). It is more than probable that most constructors will be stopped by the transformer (it stopped me, so I did most of my preliminary testing using a 1:1 transformer that I had to hand), but if you can get them this is the best option. Be warned, good transformers are expensive, so if you can't afford good ones use the next circuit instead. Cheap transformers will degrade the sound to an unacceptable degree, and should be avoided.
Also note that as shown, this circuit has a maximum gain of 40dB. To achieve the 46dB gain mentioned above, change the 50k pot to 100k.
The electronically balanced input stage needs some fairly radical protection from the switching transients produced when the 48 Volt phantom supply is turned on or off. This is most easily accomplished using the zener diodes as shown in Figure 2. The input circuit is a modified version of what is commonly called an "instrumentation" amplifier, and provides far better impedance balance than the simpler version commonly used. The impedance balance is very important in this application, because if the impedances are not equal for the inverting and non-inverting inputs, the noise rejection suffers badly.
The gain is set using the 10k pot VR1. The capacitor C4 helps prevent the circuit from oscillating (these opamps have a very wide bandwidth), and also act as an RF stopper, along with the two 1k resistors. This combination gives a worst case upper -3dB frequency of about 25kHz, and from tests I conducted is extremely effective.

Figure 4 - Electronically Balanced Mic / Line Input Module
I would rather have liked to have used a "bootstrapped" input circuit, but it is patented (by someone else), so was not used in this design. The alternative shown is only marginally worse than the bootstrapped design, and should give a fairly good account of itself, even under adverse noise conditions.
There is one major benefit of the arrangement shown, in that it behaves just like a transformer for unbalanced inputs (well, almost exactly). If the source is connected to only one input, the output voltage is negligible, and it requires that the unused input connection is grounded. Apart from anything else, this indicates that the external noise contribution is far lower than would be achieved with the simple balanced input circuit (U3) alone. The input stage shown is variable gain, without any fuss or difficulty.
This circuit has much better impedance balance than the circuits you normally see, because the centre tap of the two input resistors is not connected directly to ground. This allows the input circuit to "float" above ground, and improves common mode noise rejection for inputs that are not perfectly balanced (which is most of them, due to imperfect leads etc.).
The balancing shown is so good that it is necessary to disconnect the phantom supply completely, or it will degrade the performance for noise rejection quite badly. The same applies to the transformer input, by the way. In tests I conducted, the unbalanced signal rejection was better than 30dB. This is not magnificent, but it is much better than the 6dB from the conventional single opamp version.
Maintaining a good signal to noise ratio is very hard without the transformer, but using either the NE5534A or the dual version (NE5532 or [and IMO only if you really have no choice] LM833) is a good start. With an input noise figure of less than 5 nV / √Hz (see Noise Figure and Other Stuff) for an explanation), these are probably the best choice for a reasonable price, and they are readily available - this is a bonus, as I hate to use devices that are hard to get.
There are (allegedly) better opamps, but they may not easy to get or may be inappropriate for high quality audio, and will be more expensive as well. The NE5534 is a very good opamp, and is always a safe bet. Make sure that you use the NE5534A for the input amps, as these have a better noise figure than the standard version.
This version is very similar to the one above (although it might not look like it), but uses an Analog Devices SSM2017 microphone input amplifier. It is electrically almost identical to the "version 1" amplifier, but uses a single device. It is a far cheaper option if you can get the SSM2017 devices, but I figured that most constructors will have trouble finding them (hence version 1).
Since this article was originally published, the SSM2017 has been declared "obsolete", and is no longer available. Texas Instruments make a pin compatible replacement, called the INA217, and its performance is said to be as good or better than the original. The latest incarnation of the Analog Devices IC is the SSM2019, which is pin compatible with the SSM2017 and can be used in the circuit below.
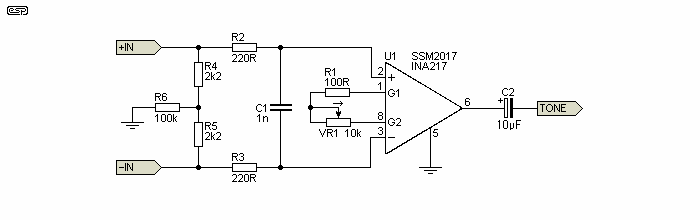
Figure 5 - Electronically Balanced Mic / Line Input Module (Alternate Circuit)
As you can see, this is a very simple circuit indeed. I cannot vouch for its performance, since I have been unable to get the SSM2017, so the circuit is basically directly from the manufacturer's data sheet. The only modification is the input grounding, which is the same as shown for version 1.
The SSM2017 has been around for many years, so I must conclude that it is probably fairly good. Noise performance is something of an unknown, because of the rather obscure way it has been specified in the data sheet. It is alleged that the noise figure is 950pV / √Hz (yes, that is pico-Volts), but this is only for a gain of 1000 (60dB). At lower gains, the noise figure climbs, and is 1.95nV / √Hz at a gain of 40dB and 11.83nV / √Hz at a gain of 20dB.
Regardless, it can be assumed that the noise is very low, but I have also read reviews of products using it that claim it is "ordinary". Exactly whether this is good or bad is unclear, but I expect that you will not be disappointed if you can get hold of the ICs. The SSM2019 seems to be readily available.
Click on the PCB image to see Project 66 - yet another version of the mic/ line preamp - this one has a PCB available.
The tone controls are unusual in this design, because I wanted to have something a little more flexible than the standard 3-band EQ commonly used. As a result, there are two "gyrators" or simulated inductors, and one of these is made variable to allow the midrange control to be swept from 500Hz to 2000Hz. This is expected to cover the range where most nuisance peaks and dips will be found, and will make accurate equalisation far easier than is the case with a fixed control. Bass and treble are conventional fixed frequencies, but as can be seen are also connected unconventionally.
The channel insert jack allows a signal to be routed via any external device - compressor, graphic or parametric equaliser, or any of the multitude of effects that are now available. This is post EQ (after the tone controls), which is good in some respects (the external unit's noise is not increased by applying treble boost, for example), but is a problem if the channel insert is used to inject a signal into the mixer. This is not the way any signal should be sent to the mixer, and I prefer it the way I have designed the circuit (but I suppose I would).
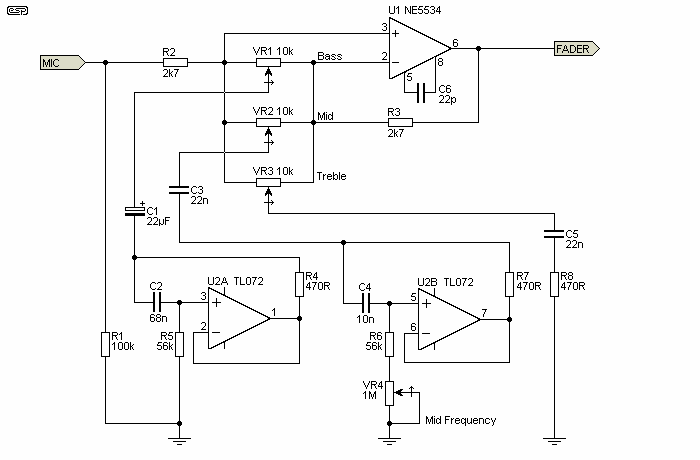
Figure 6 - Tone Control Module
The mid frequency control can be modified to change the range, so by multiplying the value of C3 by 4, the frequencies are halved (so it will have a range of 250Hz to 1kHz) and dividing by 4 will double the frequency. Likewise, the bass and treble controls can also be modified to change the turnover points from 300Hz and 2.7kHz respectively. With the values as shown (the mid frequency is set to about 650Hz), the tone control characteristics are shown in Figure 6a. As can be seen, there is plenty of variation, and bass and treble controls are deliberately moved away from the centre frequency band. Conventional tone controls tend to be centred around 1kHz, but the idea of providing bass or treble boost and cut from this frequency has always seemed a trifle ridiculous to me.

Figure 6a - Tone Control Response Curves
The +/- 3dB frequencies for the bass control are about 300Hz, and 2.7kHz for the treble. The midrange control is variable, and its Q ("Quality factor") increases as the maximum boost or cut is approached. At low settings, the Q is quite low, so the control is "self adjusting" to some degree. High Q values are normally not needed at moderate levels of boost or cut, but if there is a real problem frequency (the rim of some snare drums springs to mind), it can be notched out very effectively to get that "fat" sound without the hollow ring.
Note that one omission is a low frequency high pass filter. While these can be very important for a system that's just used for speech reinforcement, for a music desk the usefulness is very dubious unless it is made variable. If you wish to include a low cut filter, the best place is just before the tone controls, as this removes unwanted bass before it is boosted by the tone controls, and ensures maximum level without clipping. Although not included, high and low pass filters can easily be added. Virtually any simple opamp filter can be used, or even a passive first order (6dB / octave) could be included if you wanted to.
The fader is connected to the "tip" connection of the insert jack, so a signal can be directly inserted. When not in use, the switching jack connects the output from the tone controls directly to the fader. It is important to use the best quality faders that you can afford (or can find - they are pretty thin on the ground, I'm afraid).
The Aux 1 send can be switched pre or post-fade, while Aux 2 is post fade only. An additional switch can be used to allow pre and post fade for this as well, if desired. The PFL (Pre-Fade Listen) push button is designed to allow you to listen to the signal, even if the fader is fully off, and over-rides the main headphone signal. This is done in the master module, and the PFL switch is connected to a bus.

Figure 7 - Fader, Channel Insert and Aux Sends
When more than one PFL switch is pressed, there is a minimal drop in level, but at less than 0.1dB this will not be audible. To remove the problem altogether, use a buffer stage before the PFL button.
Optionally, the main output can be switched to one of a number of stereo buses, allowing the mixer to be used with group masters, all feeding the main stereo send. This is commonly used to allow sub-master control for a group of microphones, such as drums, back-up vocals, horn or string sections, etc.
Although this complicates the construction of the mixer (yes, even more), it allows an entire section to be raised or lowered in the mix with a single fader. Without this, if for example, the percussion section needed to be a little louder for one song (or one section), it would be necessary to operate perhaps four or more channel faders simultaneously. This can be done, but it is far easier if the sub-masters are used. A single fader adjusts the entire section, maintaining the balance of the mix exactly as it was originally set up. See Figure 9 for the details.
The mic / line module can also be used as a recording mixer, by taking a send to the tape machine from the channel insert or an extra connector could be used. If you use the channel insert, use stereo plugs with tip and ring shorted (so the mix is available in the studio monitors). For recording use, it would be a good idea to have an additional (switchable) input for tape playback, wired in parallel with the XLR. If balanced outputs are required for the recorder, then you will have to wait for the master module, since this has a floating balanced output circuit.
The peak detector is the best method of ensuring that all signals are well below clipping level. In this design, the detector operates when a signal is greater than 2V RMS, and is not polarity sensitive so it will indicate when either a positive or negative peak exceeds the threshold. The dual opamp is a very basic (and cheap) 1458 type, as it is more than adequate for this application.
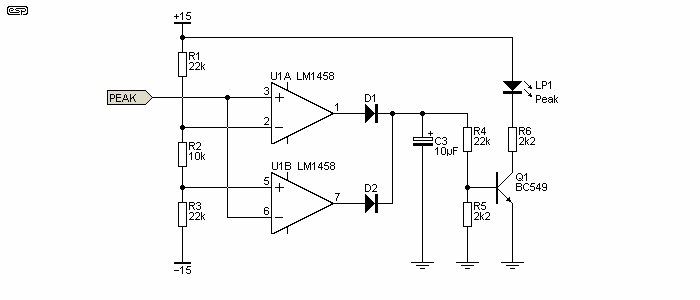
Figure 8 - Peak Level Detector
The peak detector can be a simpler affair than that shown, but most of the simple ones only sense one polarity. This is not suitable in my opinion, because audio signals can be extremely asymmetrical, so one side can be clipping and you would not know it without listening carefully. Note that the circuit is designed to ensure that no LED switching currents flow to the signal earth. These currents are "dirty", in that they contain fast switching times and the resulting transients. It is important to ensure that the earth connection used is separate from the signal earth, and must not run in parallel with the mixing buses or analogue earth (ground).
Note that the peak detector is after the tone controls. I have seen many circuits where the detector is before the EQ, and it is entirely possible to have a signal that just flashes the LED, but goes into clipping when EQ is applied. This arrangement will hopefully help the user to avoid any such problem.
Although C3 is shown as 10uF, it can be as small as 100nF. Using a smaller cap allows shorter transients to be captured, but also reduces the display time. I suggest that you experiment with the value to find something that suits you. My personal choice would be to use 1µF.
The detection threshold is set by the resistor string R1, R2 and R3. As shown, it is ±2.75V peak (close enough to 2V RMS). Increase the threshold by increasing R2, and vice versa. The maximum I recommend is to increase R2 to 22k, giving a threshold voltage of ±5V - equivalent to +16dBm. The closer you get to the clipping threshold (+22dBm), the greater the risk of momentary overloads causing clipping.
The use of groups or sub-masters makes a live (i.e. stage) mix much easier. It is generally not needed for studio work, but can still be very useful for the mixdown.

Figure 9 - Switching for Sub-Master Groups
A method of switching to multiple buses is shown in Figure 9, and uses a dual-gang rotary switch to select the required bus. As shown, you would be able to select sub-masters 1 to 4, the master mixing bus or Off, giving six positions in all. A 5 position switch would leave out the "Off" option - this is the version shown on the panel artwork above. This (or an expanded version) provides the maximum possible flexibility for the final mix.
In following articles, I will show the master module, power supplies and additional input modules. This is by far the most complex single module, so it gets easier after this one.
| Index | Stage 1 | Stage 2 | Stage 3 | Stage 4 |
 Main Index
Projects Index
Main Index
Projects Index