
|
| Elliott Sound Products | Notch Filters |
 Main Index Articles Index Main Index Articles Index |
Notch filters are a special kind of circuit. They are used for distortion analysis, but there are many other uses for them. At one stage, 10kHz (later reduced to 9kHz in most countries) notch filters were used in 'high end' AM receivers (something of an oxymoron) to remove any inter-station 'whistle' caused by the AM channel spacing.
They are also used to remove hum, in particular 50Hz/ 60Hz mains hum, but they can be used at any frequency within reason. The idea is to create a filter with high rejection of the unwanted frequency, but not affect adjacent frequencies. Notch filters are also used in communications systems to remove unwanted frequencies, and they have even been used in the old 'POTS' (plain old telephone system) to suppress DTMF (touch-tone) signals from the speech signal. I suspect that this was done to make it harder to place calls without paying, a process that used to be known as 'phone-phreaking'. (Interestingly, this is still a problem, but it's done differently now - just in case you were wondering. No?)
Predictably, it's not possible to just remove just one frequency from an audio signal, and there is always some disturbance to other nearby frequencies. It's unrealistic to expect a 50Hz filter (for example) not to affect 40Hz and 60Hz, but if the filter Q ('quality factor') is high enough, these two can be affected by no more than 3dB. The bandwidth would be stated as 40-60Hz (-3dB) with a theoretically infinite rejection of the unwanted frequency.
Infinity is a pretty big (or small) number, but it's not difficult to reject the centre frequency by more than 60dB, and some filters make 100dB fairly simple to achieve. As for the circuits themselves, there are several. Some are very well-known, such as the 'twin-T', which represents the majority of the notch filters you'll see if you perform a search on the Net.
Other variations include the Wien bridge, phase-shift (all-pass), state-variable, and one of the lesser known, the Fliege filter. A pair of 12dB/ octave Sallen-Key filters can also be used, but this isn't practical - other than when implemented as a state-variable filter. Each has its particular advantages and disadvantages, and there are two main criteria - ease of tuning to an exact frequency and notch depth. We can add ease of setting the Q, as that can be important in many applications.
Note: In a number of on-line 'explanations' you will see a pair of 1st order (6dB/ octave) filters summed, allegedly to generate a notch. This will not work, as the phase shift between the two filters is only 90°, and we require a 180° phase shift to obtain a null at the selected frequency. This completely wrong circuit is repeated ad-nauseam on the Net. As always, be careful with material found on-line, as much of it is incorrect. To get the required 180° phase shift, the filters must be 2nd order (12dB/ octave).
Another circuit is called a Bainter filter [ 1 ], but it's a complex filter to design despite its apparent simplicity. While a circuit may exist because someone has gone to the trouble to design it, that doesn't automatically mean it's a good idea. From what I could find about the Bainter filter, it appears to fall into the 'don't bother' category.
A 'bridged differentiator' is another topology that can be used, and while it's claimed to be easily tuned, this is something of an illusion, as it's only over a narrow range. It is an interesting circuit, but it's also difficult to tune over a wide range. It's rather impractical for most applications because of this. It also requires 3 perfectly matched capacitors, making it even more impractical. The Bainter and bridged differentiator aren't included here. The Bainter filter has relatively poor rejection and the bridged differentiator is just too irksome to tune properly. The multiple feedback (MFB) filter is covered here, and although it can't achieve a notch depth of much more than 50dB this may be enough for some applications.
With some notch filters, a second opamp is the secret to obtaining a narrow notch, as it provides feedback that tries to force the output to have a flat response. This can't be done because the notch is so deep, so it corrects the response either side of the notch. This technique is used for the twin-T, Wien bridge and phase-shift notch filters. The Q is adjustable as described for each circuit. This works because feedback cannot correct the frequency response if there is (virtually) no gain at a particular frequency. A 60dB notch qualifies as 'virtually no gain'. However, as discussed further below, the 'feedback' may actually be bootstrapping. Some notch filters do use negative feedback though, and it can even be applied to those that normally use the bootstrap circuit.
One final design has to get at least a mention, namely the LC (inductor/ capacitor) series circuit. Unfortunately, the end result isn't useful, as the inductor will almost certainly pick up hum from nearby transformers (or even current-carrying cables), negating the reason you'd build one. Getting a high Q is difficult because of winding resistance. Workable values are 2.7μF and 3.75H. Resonance is at ...
1 / ( 2π × √( L × C ))
You could use a gyrator (opamp 'simulated inductor'), but that makes high Q even harder. The notch depth will only ever be mediocre, and neither the physical nor simulated inductor is useful. No further discussion of this option is offered.
Notch filters are also used in conjunction with 'traditional' high and low pass filters to obtain a steeper rolloff. You can get an apparent rolloff of 60dB/ octave or more, but the output signal 'rebounds' beyond the notch. The Cauer or elliptic filter is an example (see Active Filters, Section 7.3 for details). These are a special case of filter, and are uncommon in audio (with the possible exception of anti-aliasing filters for digital systems). The NTM (Neville Thiele Method) crossover uses this type of filter, optimised for phase shift to ensure that the outputs sum flat. This is otherwise very difficult to achieve.
Note: Almost all filters shown have a frequency of 50Hz, but all can be tuned to any frequency you like or need. I've not shown frequency switching or variable resistor/ capacitor tuning, but this is generally easily added as required. Dual-gang pots never have acceptable matching between gangs to provide a deep notch, so if a pot is used you'll need additional series low-value pots to allow fine tuning. This is the case for all notch filters used for distortion measurements (for example). Even multi-gang variable capacitors are not accurate enough, and fine tuning is always needed. These are only ever available with a small capacitance (less than 1,000pF = 1nF), so resistor values are generally very high for low frequencies.
Information on Q determination is somewhat divided for notch filters. Unlike a bandpass filter, a band-stop (notch) filter has a theoretically infinite rejection of the centre frequency (with infinitely small bandwidth), so the Q cannot be determined by the standard method (fo / (fH - fL)). For a bandpass filter, fH and fL are the -3dB frequencies referred to the peak, and fo is the tuned frequency. This doesn't work for a notch filter, and if used it will give an impossibly high Q value. Claiming a Q of 150k might sound impressive, but that's not the way it's measured for notch filters (and yes, this is quite easy to achieve with a good notch).
In most texts, it's stated that notch filter Q is determined by ((fH - fL) / fo), with fH and fL referred to the out-of-band level (typically close to unity gain). This gives an inverted Q (i.e. 1/Q) otherwise called damping. When I refer to the Q in this article, it will be taken as the value determined by this method. It doesn't make a difference as long as the way the Q is determined is disclosed. As the Q is decreased, the distance between the -3dB frequencies either side of the notch decreases, indicating less disturbance to the adjacent frequencies.
While this method is correct, it doesn't provide a number that's intuitive. If you'd rather use the 'inverted' version, it's just the reciprocal of the figure I've used. The fo value should be double-checked - it should correspond to √(fH × fL). From Fig. 1.1 you can see that the bandwidth of the notch (between -3dB frequencies) is ~19Hz, so the Q is 0.38 - this is a good figure, and it's unlikely that there will be any benefit to having a narrower bandwidth. The graph was taken from a simulation of the twin-T notch filter.
The green trace shows the response without feedback. As you can see, the response is compromised for over two octaves either side of the notch. For measuring distortion, the feedback needs to be just enough to ensure that there's minimal reduction of the second harmonic (100Hz in this example). If the goal is to remove a troublesome frequency with minimal disturbance to the rest of the spectrum, more feedback/ bootstrapping is needed to get a narrower notch.

The various circuits described here show a tuning resistance of 11.79k (12.05k for 60Hz). It needs to be adjustable, because the tuning capacitors won't be exact, and resistor tolerances also require compensation. The series circuit using 10k, 1k, plus a 2k trimpot will allow enough range for most purposes (the two fixed resistors can be replaced with 11k if you have them to hand). At 50Hz, the notch can be tuned from 45.4Hz to 53.7Hz, assuming exact capacitor values. You could also use a 10k resistor with a 5k trimpot in series, but that will be harder to tune (even with a 25-turn trimpot).
Most of the circuits shown below use the same feedback components, but this does not mean they will have the same Q. Each circuit has an 'intrinsic' Q, which is different with different topologies. The circuits shown were all simulated using 'ideal' opamps, but the difference when a TL072 was used in the simulations was minimal. This will be the case in reality, but only at low frequencies. The twin-T circuit uses the opamps as unity gain buffers, so their response is as good as it can be. Some of the others may require a wide-band opamp for high frequencies (greater than 10kHz).
If you look at the transient response of a notch filter, you'll discover that if stimulated by a single pulse, you will generate the very frequency you're trying to remove. This is a characteristic of all narrow-band filters (peaking or notching), and as the Q is increased, they take longer to settle to steady-state conditions. For this reason, making the filter any narrower than is strictly necessary may cause more problems than it solves. When used with music (for example), there are generally no transients fast enough to cause problems.
It's theoretically possible to have a total bandwidth of less than 1Hz for a 50/ 60Hz filter, but doing that reduces the notch depth, and the tiniest component value mismatch will cause the unwanted frequency to get through. A very narrow bandwidth also means that the frequency to be rejected must be absolutely stable. Should it drift by only 0.01Hz (much better than the AC mains), the rejection is reduced dramatically. A 40dB notch can be reduced to less than 20dB if the frequency drifts by 0.01Hz if the bandwidth is too narrow. It will also show severe ringing, and the effects of that may not be what you hoped for!
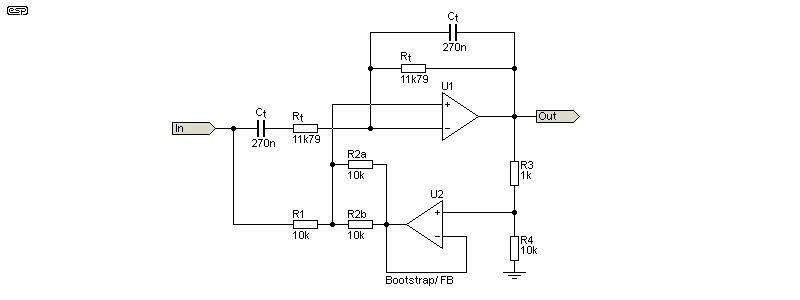
For 'simple' filters such as the Twin-T and Wien bridge, the feedback system is not what you expect. It would be better described as a form of bootstrap circuit, as the 'feedback' is positive, not negative. The way it works is not immediately obvious, because there is no gain-stage involved as you'd normally expect with a 'proper' negative feedback circuit. The two opamps are used as buffers, with the lower one (in the drawings) having a gain of slightly less than unity (typically around 0.91 or so).
When the input signal is at the notch frequency, (next to) no signal gets through, so the lower buffer can't affect the notch because its output level is very low. As the input signal shifts away from the notch frequency, the buffer 'bootstraps' the filter network, so it has close to the same voltage at its input and at the feedback point. If the same voltage is present at both points, no current will flow and the notch becomes irrelevant. This is most easily seen with the Twin-T filter.
This 'bootstrap' mechanism can only work when the filter can pass some signal - when it's not at the notch frequency. The proof of this is looking at the input impedance. At the notch frequency, the impedance is ~8.37kΩ both with and without 'feedback'. When the bootstrapping is applied, the input impedance below and above the notch frequency rises. At 10Hz the impedance is 153k, and at 250Hz it's 30k. Without the feedback, the range is from 18k to 3.6k (10Hz and 250Hz respectively). This increase of input impedance is exactly what we expect from a bootstrap circuit. The impedance at the notch frequency is the same because at that point there is no bootstrap action. For more information on just how this works, see Bootstrap Circuits - A look At Those In Use.
In many descriptions I've seen, it's claimed that the feedback is negative, but that's clearly impossible if the signal isn't inverted. A few on-line articles do get it right though. You actually can use negative feedback to achieve much the same goal, but it's possible that there will be issues with stability. The 'bootstrap' arrangement is simple and stable, and it's by far the most common approach.
Some other circuits do use negative feedback, notably the phase-shift/ all-pass design. The state-variable filter tunes the high & low pass filters for high Q, which means that they have high gain if you need a high-Q notch. The version shown has a gain of 8.3dB (×2.6) with the values given, so there's a significant loss of headroom and high levels will cause clipping. The MFB bandpass-derived notch doesn't have that problem, and the Fliege filter has only modest gain (about 2dB).
Of course, it's not critical that you understand the exact feedback mechanism of each filter type, but if it helps you to understand how it functions that's never a bad thing. One thing I will not do here is go into details of poles and zeros, not will I discuss radians/second or other 'high-level' maths functions. These are traditionally used for 'proper' mathematical descriptions, but with few exceptions they won't improve your understanding - often the 'true' mathematical methods only serve to create FUD (fear, uncertainty and doubt). The information shown here is more than enough to allow you to design a notch filter for any desired frequency and Q, without stress.
This is probably the best-known of all notch filters. It has a sibling called the bridged-T, but that won't be covered because it usually has both limited notch depth and fairly poor Q. Both can be improved, but there's nothing even remotely intuitive about it.
The twin-T can be made as a completely passive circuit with centre frequency rejection of more than 60dB, and in that respect it's unique. Unfortunately, it's a very broad filter without some electronic assistance. A 50Hz passive filter will have -3dB frequencies of 13Hz and 183Hz, and that's a lot of your audio signal to lose. Fortunately, adding an opamp and a couple of resistors allows the Q to be adjusted without affecting the notch frequency or depth.
The frequency is determined by the traditional formula ...
fo = 1 / ( 2π × R × C )
Because we're dealing with a filter that can reduce the centre frequency by 60dB or more, the values are critical. Without exception, adjustment will be required to tune the filter to the desired frequency and ensure maximum notch depth. The twin-T is a good, reliable and fairly simple circuit to set up, and it's still an excellent choice. The horizontal part of the 'T' is made up of equal-value resistors and capacitors, with the vertical sections using ½Rt and 2Ct.
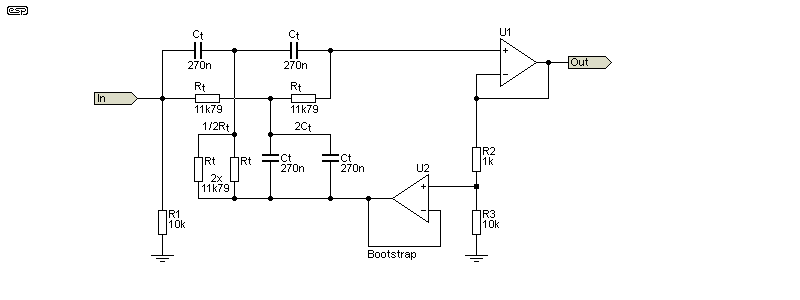
A practical example is shown above. Resistor and capacitor values are assumed to be exact, but in reality there will be trimpots used in series with one 'Rt' value and the '½Rt' value, as shown in Fig 1.1. ½Ct is treated the same way to get 2Ct. The filter uses a dual opamp to buffer the output and provide the bootstrap signal, which reduces the bandwidth but has little or no effect on the notch depth. The degree of bootstrapping can be varied by changing the value of R2 or R3.
The twin-T has been the notch filter of choice for many distortion meters, both commercial and home-made. The 2Ct and 1/2Rt values are most easily made by using the same values as for 'Rt' and 'Ct', with two in parallel for both. The source impedance isn't critical, so it will work even with a comparatively high source impedance. A common approach was to use a 10k pot to set the level at the input.
R2 and R3 set the feedback ratio, and therefore the Q. If R2 is made smaller, Q is decreased (less effect on adjacent frequencies) and vice versa. A practical minimum value for R2 is 100Ω, but I wouldn't recommend anything smaller than 390Ω. With 1k and 10k, the -3dB bandwidth is 18.3Hz.
There's an alternative solution for the twin-T, which makes it asymmetrical [ 3 ]. While this is claimed to improve the performance, it also makes the circuit very difficult to tune, so it cannot be recommended as a workable solution. There's also a simpler circuit called a bridged-T, but these generally have poor rejection. They are sometimes used as a 'contour' control in some guitar amplifiers, but their performance as a 'true' notch filter is inadequate.
The twin-T can also be used as a 'whistle' filter for AM reception, with only a single transistor needed to get fairly good performance. As shown below, the notch is tuned for 9kHz. You need 5.89k resistors for 10kHz and 6.53k for 9kHz, and they need to be fairly accurate as the notch is sharp. Many AM tuners will have such a narrow bandwidth that a filter isn't needed, but a few have been made that do need the filter.
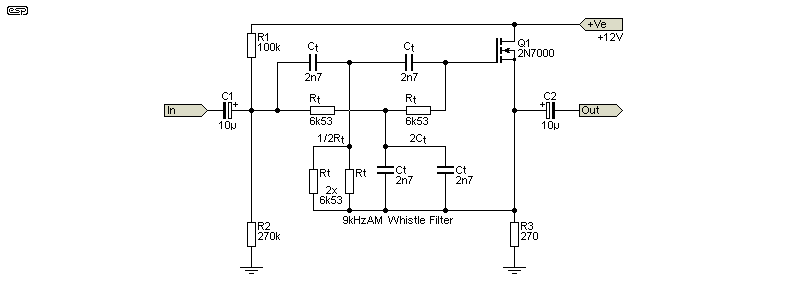
By using just a transistor, you can't expect the same performance as you'd get with opamps. As simulated, the above filter circuit has a rejection of 30dB at 9kHz, with a -3dB frequency of 7.6kHz. We can do a great deal better, but for general AM purposes it's probably not worth the effort. Making two of the tuning resistors variable(one vertical and the other horizontal as seen in the drawing) allows easy tuning for the best notch. With 2 x 10k trimpots, you can tune for 9kHz or 10kHz with no other changes.
By nature, the Wien bridge has fairly low Q and a poor notch depth, and it requires a dual opamp to function well as a notch filter. It's one that I have used, and while it requires some trickery to function properly, when it's set up it has excellent performance. There are only two frequency-selection networks, with one being a series R/C circuit, and the other a parallel R/C circuit. By using feedback, the notch depth can easily exceed 70dB, and the bandwidth can be adjusted easily. Adjusting the Q changes the gain, but this isn't always a problem.
The series R/C network feeds the inverting input of U1, and the parallel network is in the feedback path. The network of R3 and R4 is the key to getting a good notch depth. The input voltage is divided by 3 (R3/R4+1) and fed to the non-inverting input of U1. A Wien bridge has an insertion loss of 3, and this lets U1 subtract the phase-shifted signal from the input, providing a notch depth of well over 60dB without feedback.
When feedback is added the Q can be changed via R3 and R4. As shown (1k, 10k) the -3dB bandwidth is 23Hz. R4 can be reduced for higher Q, but anything less than 390Ω will make the circuit too hard to tune. The Wien bridge feedback system is neither 'true' feedback or bootstrapping, hence the label 'Bootstrap/ FB'. Whether it's one or the other depends on how you look at it. It's possible to re-configure a Wien bridge so it does use 'pure' bootstrapping, but the circuit complexity is greater.
The Wien Bridge is easily configured for any frequency within the capabilities of the opamps you use. For a 9kHz 'whistle filter' (as discussed above), the resistor and capacitor values are the same as those used for the Twin-T, namely 6.53k and 2.7nF (9kHz). It's not possible to use a single MOSFET or transistor for this configuration, and it requires a dual opamp as shown.
This is one that you don't see very often because it uses more opamps than the twin-T or Wien bridge. The filter itself uses 3 opamps, and it must be driven from a fixed source impedance (another opamp). The filter uses two all-pass (phase-shift) networks and a summing amplifier. Feedback is applied directly to the input, and it's irksome to make it variable because that will cause a gain variation. This may not be an issue with some applications.
Despite using fairly 'ordinary' opamps, the notch depth can be over 100dB with feedback. This arrangement has been used in a few distortion meters where measurements down to 0.01% (full scale) were required, and it's one of the few that can manage that degree of attenuation of the selected frequency. The feedback really is feedback in this circuit.
In many respects, this could almost be classified as a state-variable design, but it's not. While it certainly looks similar, there is no similarity in the way the two work. The all-pass notch has only a series of peaking filer responses from the opamp outputs. This shows how a subtle change can make a vast difference to the way filter circuits work.
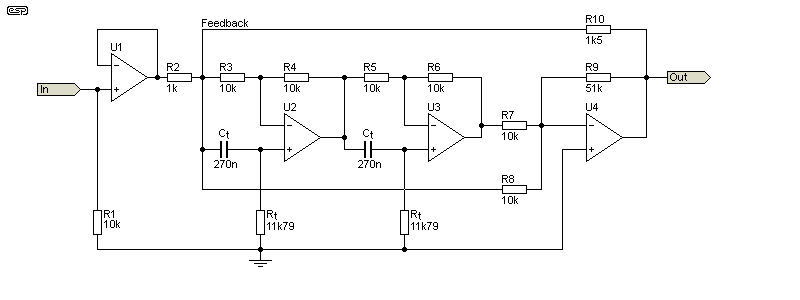
There are two frequency-selection networks, both identical. It's possible to only tune one of them to get a good notch, making it unique. The only requirement for a perfect notch is for a total of 180° phase displacement through the two phase-shift networks (nominally 90° each), but if one has a little less and the other a little more than 90°, the result is the same.
U1 is a buffer to ensure a consistent source impedance, and feedback is from the summing amp (U4) back to the input. The 10k resistors can be a different value - the only requirement is that they are all identical (small differences can be corrected by tuning).
Although it's not a common circuit, it has better performance than most of the others. If it's used to measure distortion, the opamps all must contribute the least amount of their own distortion possible, which means premium devices. This makes it a more costly option than the twin-T or Wien bridge filters.
With the values shown, the -3dB bandwidth is 23Hz. Increase the value of R7 to decrease the bandwidth. With 100k, it's reduced to only 12.4Hz. A more realistic value is 51k, giving a bandwidth of 21.5Hz.
This is an uncommon filter topology, but it has good performance. As is common, there are two networks that determine the frequency, and the Q is changed by varying RQ1 and RQ2 (which must be identical). 1% tolerance resistors are good enough (without selection) only if you are willing to accept a shallower notch. A Q of 0.233 (more than acceptable) is obtained by making RQ1 and RQ2 10 times the value of the tuning resistors. The -3dB bandwidth will be only 11.7Hz, and a more realistic Q will be obtained by making the two RQ resistors 56k as shown (20.5Hz bandwidth).
The selection of the Q is somewhat inconvenient, and making the filter fully variable is difficult. Neither the frequency nor the Q can be varied 'on-the-fly' because no dual-gang pot will have good enough tracking. For a fixed-frequency notch filter this isn't a limitation.
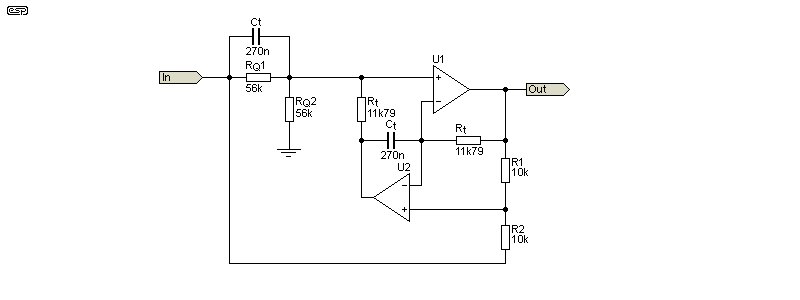
The ratio between R1 and R2 is just as critical as that between RQ1 and RQ2. To get the optimum notch depth, both resistor pairs could use a trimpot to allow adjustment to get the best null. Both resistor sets will also change the frequency (albeit slightly for small adjustments), making the filter somewhat less attractive than other solutions.
It's an interesting filter with good performance, but it's impractical if different frequencies are required. The main tuning resistors (with trimpots) will generally allow enough variation to accommodate small errors with R1/R2 and RQ1/RQ2. If not, it's the only circuit that would use four trimpots, increasing the cost and difficulty of setup.
With the values shown, the -3dB bandwidth is 21Hz near enough. It's changed by varying the ratio between both RQ and Rt resistors. If the two RQ resistors are reduced, the bandwidth is greater, and vice versa.
The state-variable topology is one of the most flexible of all common filters. To get a notch, it's just a matter of summing the high and low pass outputs, and the Q can be adjusted by changing RQ. The value of 1.5k as shown gives a Q of 0.38 (-3dB at 41.5 and 61Hz). One unfortunate aspect of this design is that the high and low pass filters have significant gain (about 8.3dB, or ×2.6) and this reduces the headroom, meaning that you can't get as much overall level through the filter because it will clip. The same applies if the filters are standard Sallen-Key types (which saves one opamp but adds 2 caps). Using Sallen-Key filters isn't recommended and is not shown.
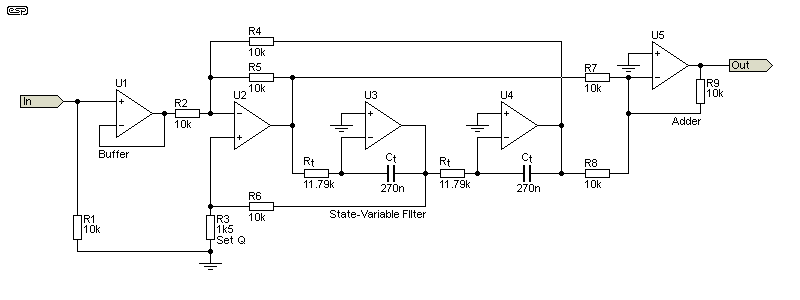
An input opamp is essential, because R2 controls the gain and Q, and the filter must be fed from a low source impedance. While 5 opamps seems a lot for a 'simple' notch filter, they aren't expensive and the performance is very good. However, when compared to the others shown it wouldn't be my first choice.
I mentioned at the beginning that you can use a pair of 12dB/ octave filters (high and low pass), and that's what the state-variable version is. At the centre frequency, the two signals are 180° out-of-phase, so the signal is cancelled. By increasing the Q of each filter, the disturbance near the notch frequency is minimised, but at the expense of reduced headroom.
The MFB filter is included here, but only as an example. The MFB topology invariably demands 'odd' resistor values, but it's usually possible to rationalise them to the point where the frequency can be fine-tuned with only one trimpot. This will affect both gain and Q, but depending on how close you can get the other resistors to the target values, the variations won't cause major deviations from the desired response. One disadvantage of an MFB filter derived notch is the notch depth. Unlike the others shown, the typical rejection you can expect will be around 30dB. This will often be enough for suppression of an interfering tone, but it can't be used to measure distortion (for example). If you get all values exact, you can get up to 50dB or so, but that requires very odd resistor values. Note that there is no 'Rt' value, because frequency, gain and Q are all determined by R1, R2 and R3.
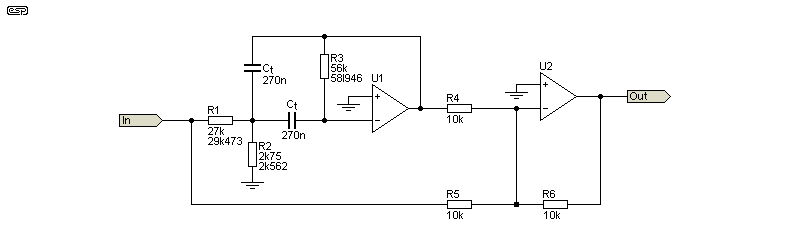
The circuit is deceptively simple, but the devil is in the details. The 'really odd' values shown for R1, R2 and R3 are the ideal calculated resistances, with a 'rationalised' value shown first. R2 must be a trimpot so the frequency can be adjusted. If desired, you can make R5 (say) 8.2k with a series 2k trimpot to adjust the gain of the summing amplifier and therefore the notch depth. I don't intend to show the frequency, gain and Q calculations here, but the easiest way to design the filter is to use the calculator program I wrote many years ago. This is available in the software page ... mfb-filter.exe. Your operating system, browser and/ or antivirus will no doubt complain, but the file is safe (I check this to ensure that no malware has been 'inserted'). It requires the VB6 runtime library (this should be included with Windows 10/ 11).
The gain needs to be set for unity, and the frequency and Q determined by your requirements. These filters are used in the 8-band subwoofer EQ project, hence the development of the program. The ultimate notch depth is highly dependent on the filter's gain, and even a tiny variation either way (referred to unity) will degrade the ultimate attenuation. As a utilitarian filter, this is probably of no great concern - you don't build an MFB notch filter for high attenuation (you may not build one at all  ).
).
The Cauer (aka elliptical or Zolotarev) filter is a special case, where a traditional high or low pass filter is followed by a notch filter (or vice versa - the notch can come first in some designs). The advantage is a much steeper initial slope, and complete rejection of a small range of frequencies. The Cauer topology is sometimes used as an anti-aliasing filter, and can become very complex. Only the basics are shown here, as the design process is very involved if you need very high rejection of out-of-band frequencies.
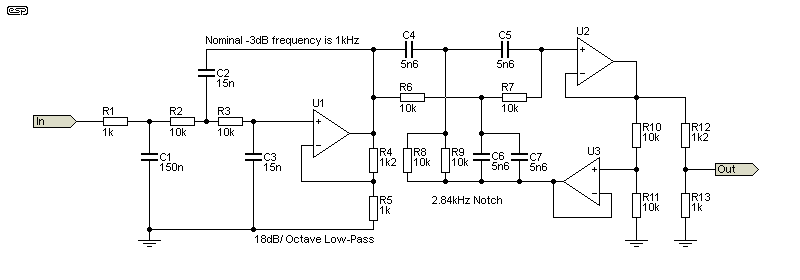
A 1kHz, 18dB/ octave filter is based on U1, which has gain to allow equal-value components in the filter network. The notch filter is a twin-T with minimal bootstrapping, because very narrow bandwidth is not required (and is not desirable). The twin-T filter is tuned to a nominal frequency of 2.84kHz. The simple voltage divider at the output is to obtain overall unity gain (the filter has a gain of 2.2).
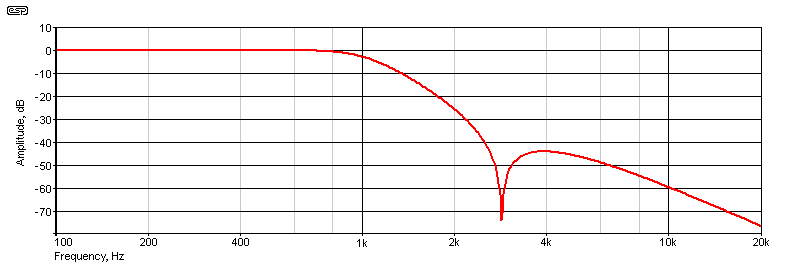
The initial rolloff is much faster than 18dB/ octave (it's about 25dB/ octave), and there is virtually no output at the notch frequency. The response then 'rebounds', reaching about -43dB at 4kHz, after which it falls, ultimately at 18dB/ octave. The final rolloff is always the same as the low-pass (or high-pass) filter, as the notch has no effect outside a range of about 2 octaves either side of the notch frequency. Multiple notch filters at selected frequency intervals can be used after the initial high/ low-pass filter, suppressing the out-of-band frequencies even more. An initial rolloff of >50dB/ octave is fairly easy to achieve.
'True' elliptic/ Cauer filters are very complex to design, and this is a highly simplified example. It's included here to illustrate that notch filters can be combined with high/ low pass filters to get a faster rolloff, but it's not intended to cover the design in any detail. There's a lot of information on-line, but it's not for the faint-hearted, as the equations will be considered somewhat daunting by most readers. It's notable that most specialised filter design software does not include elliptical filters. Elliptical filters are used in passive format (inductors, capacitors and transmission lines) for radio frequency applications, typically to remove troublesome frequencies that may overload sensitive RF front-end circuits.
In some cases, a notch filter may be able to remove an unwanted peak from a transducer (e.g. a loudspeaker). The notch depth will usually be fairly shallow, usually no more than 6dB or so. Several of the circuits shown can be adapted without affecting the frequency, but in many, reducing the notch depth will change the frequency. Ideally, the two will be separate functions, allowing you to select the desired frequency, then apply the appropriate notch depth and bandwidth with as little interaction as possible.
Unfortunately, none of the circuits shown allow fully independent adjustment of frequency, notch depth and Q. In fact, this is very hard to achieve with any filter, but some make it (at least a little) easier than others. In most cases, you're probably better off using a gyrator notch filter. These aren't useful to get deep notches, but they are economical and easy to build. They aren't covered here, as there's a complete description in the article Gyrator Filters. Note that it doesn't cover this specific application, but you should find enough info to let you set up an equaliser for a troublesome response anomaly.
Response correction is always tricky, and there will always be some element of compromise involved. There's little point trying to provide a complete treatise on the topic, because every case will be different, and there is no 'one size fits all' solution. There is one possible exception - a parametric equaliser. Using a state-variable filter with appropriate support circuitry, a parametric EQ can have variable Q (bandwidth), boost or cut, and variable frequency. Each can be adjusted individually without interaction, but the circuitry needed is fairly extensive. Consider that any transducer that requires a very sharp filter to obtain flat response is probably flawed and is not fit for the purpose.
The filters described here are not intended for response correction - they have one job, to remove a specific frequency as completely as possible. With a minimum rejection of 60dB (many are capable of much more), this goal is achieved pretty well.
It's unrealistic to expect a Q of much less than 0.4, indicating -3dB frequencies of around 41Hz and 61Hz. That means there's a band of about 20Hz where the signal is reduced or missing completely. A notch depth of better than 60dB is fairly easy to achieve with (almost) any notch filter topology, but the phase-shift/ all-pass version can achieve better than -100dB, at the expense of four high-quality opamps. If you just need a good notch and aren't too concerned by a bit of distortion, even a pair of TL072 opamps will be fine.
In almost all notch filters, there will be two resistors that require adjustment, and the notch depth at the desired frequency requires setting first one trimpot for minimum signal, then the other. This is an iterative process, and you may need to adjust both trimpots several times to get the tuning 'just right'. In most of the filters, the tuning resistances are indicated by Rt, and they will be a fixed resistor and trimpot in series. The MFB filter is the odd one out, as R1, R2 and R3 are all responsible for setting the frequency, gain and Q. Making R2 and R5 adjustable allows the filter and notch depth to be adjusted.
Bear in mind that if the goal is to remove mains hum, the frequency may average 50 or 60Hz, but the frequency may vary by 0.1Hz during the course of the day. A variation of 0.1Hz is enough to reduce a -80dB notch to perhaps -40dB, and there's no easy way that this can be corrected. Adding an 'auto-tuning' circuit will compensate in real time, but that adds a great deal of additional circuitry, using a phase-sensitive servo system controlling LDRs (light dependent resistors) to fine-tune the system in real time.
Somewhat predictably, I'm not going to provide the circuitry needed to achieve this, as it's not an especially straightforward process. For a system that carries a normal audio signal (not a single tone), the addition of 'auto-tune' is made that much more difficult. All auto-tuning filters used in distortion analysers only have a single frequency (and its harmonics) to deal with, making the circuitry 'simpler'. It's still complex though, and adds a lot of additional circuitry.
The choice of capacitors is critical. For low values, C0G/ NP0 ceramic are ideal, with film caps used for higher values (anything 1nF or more). Multilayer ceramic caps are unusable, because their temperature-sensitive characteristics mean that the notch frequency will be unstable. It is often a good idea to select the caps for the closest match you can get, as this will make sure that the tuning is predictable. Polypropylene caps have the lowest thermal drift, but unless extreme temperature variations are likely, polyester (aka Mylar) caps will usually be stable enough.
Where possible, all resistors should be metal film, and in most cases a tolerance of 1% is the minimum acceptable. If pots or trimpots are used, they should be the lowest reasonable value, with the majority of the resistance being fixed values. Where the optimum value is 11.79kΩ, this would be made up using 10k plus 1k plus a 2k trimpot. This will also work for 60Hz (with 220nF tuning caps).
For general usage, it's hard to go past the TL072 opamp. It's low-cost, has an extremely high input impedance, and the bandwidth is acceptable for use at any sensible frequency (i.e. less than 30kHz). The output impedance and drive capability are both alright, as there's rarely a need to load the output with less than 2kΩ. Most of the circuits will also work with other work-horse opamps, such as the 4558 or similar. Note that opamps won't affect the frequency to any significant degree (a fraction of 1Hz at most), and the performance of most notch filters is determined only by the resistance and capacitance of the tuning networks.
All the filters are shown designed for 50Hz, but 60Hz is not difficult. As noted above, for most of the filters the frequency is determined by ...
fo = 1 / ( 2π × R × C )
This can be re-arranged to determine R or C as required.
I've concentrated on notch filters to remove mains hum, which is still one of the major uses. Eliminating mains hum can be critical for medical systems (e.g. electrocardiography [ECG]) systems, and in some cases there may be other frequencies that interfere with the wanted signals. These can also be removed with one or more notch filters. With some electromechanical systems, a servo can become 'confused' if there's an unwanted resonance within the mechanical drive. If this is the case, a notch filter can remove the unwanted resonance, improving the performance of the servo. This is a topic unto itself, and won't be covered further here.
With seismometers and vibration sensors, notch filters can remove noise or unwanted frequencies to isolate earthquake or vibration signals. These measurements are usually very sensitive, and interfering signals can render a measurement almost useless if they aren't removed. Of course, a notch isn't the only solution, and in some cases the system will simply use a low-pass filter set to allow the wanted frequencies through, while blocking anything out of the normal range.
Notch filters have also been used (with mixed results) to help reduce feedback in public address systems. Feedback occurs at frequencies where signals from the speaker get back to the microphone, and they are usually a few narrow-band frequencies that cause most of the troubles. A notch can help, but there are better alternatives, including room treatment, optimum mic (and speaker) positioning, and good mic technique by those using the system.
For feedback suppression, 'automatic' tunable notch filters have been applied by a number of manufacturers. These determine the frequency of the feedback loop, and apply a notch at that frequency. In real installations, there will be any number of unstable frequencies, and it's not possible to eliminate them all. However, these systems can work well if set up properly. Acoustic feedback is always a moving target, and as one dominant frequency/ phase combination is corrected, another will occur. It might be very close to the original/ first feedback frequency, or it may be separated by an octave or more. There's a practical limit to the number of notch filters that can be applied before the sound quality is adversely affected. The Behringer 'feedback destroyer' is probably the best known implementation of this technique.
Notch filters are a special kind of filter, and in theory (and in practice - within measurement limitations) they have an infinite rejection of the selected frequency. Greater than 60dB (1:1,000) rejection is easy, so a 1V signal at the tuned frequency is reduced to 1mV, but even 100dB can be achieved (1V reduced to 10μV). The frequency to be rejected cannot drift, and a variation from 50Hz to 50.1Hz (2%) will cause the notch depth to be reduced to around -40dB.
The most common use for notch filters used to be for distortion analysis, where the signal is rejected, leaving only distortion and noise as the residual output. This was the method of choice until quite recently, and it's still used because it's easy and fast. You won't get all the 'bells and whistles' that come with advanced DSP (digital signal processing), but do get to see the distortion residual on a scope, and that can tell you everything you need to know about the nature of the distortion (and/or noise) once you're used to doing it.
If there's a troublesome frequency that interferes, be it high or low frequency, a notch filter can remove it, while removing no more than around 1/2 octave from the wanted signal. That's usually a problem for bass if you have to get rid of 50/ 60Hz hum, but it's less of a concern if the frequency is above 5kHz. Back in the days when people tried to build 'hi-if' AM receivers, a notch filter was essential because the intermediate frequency (IF) amplifier had a much wider bandwidth than normal. Most AM sets have a bandwidth of perhaps 3kHz (often less), so the 'whistle' caused by another transmitter with only 9 or 10kHz carrier spacing is attenuated and isn't a problem. Expecting high quality audio from AM is generally unwise - it may have been acceptable 100 years ago, but not now.
While I've concentrated on analogue solutions, many of the newer products that utilise notch filters (such as the 'feedback destroyer' mentioned above) use DSP to define the filter parameters. This is not something that will be covered here, as it requires dedicated hardware and software, and it's well outside the scope of this article.
1 Active Notch Filter (Bainter)
2 Bainter and 'bridged differentiator' circuits
3 Band stop filters with real operational amplifier, January 2003 (Jirí Kolár and Josef Puncochár)
4 LTC1059 Universal Switched Capacitor Filter (Analog Devices)
5 Feedback Cancellation (Stanford)
| Main Index Articles Index |