
|
|
| Elliott Sound Products | Project 34 |
 Please Note: PCBs arc available for a simplified version - see Project 211.
Well, its not really just for guitar or keyboards, you can use it for anything that you want. Spring reverb units are most commonly used in guitar amps, having been replaced by digital effects in most other areas. This cannot really be classed as a 'real' project, because the circuitry is somewhat experimental, and may change quite dramatically depending on the type of spring reverb unit you can actually get your hands on.
The one I have is an Accutronics (they are still going, so check out their web site - see below), but you might already have one, or can get something different, so you will have to take measurements of the tank you have and experiment to get the best performance and the sound you want. There aren't a great many options, and although you can almost certainly get a cheap unit made in Asia, it's likely you'll be disappointed in the performance. There's also another brand that's surfaced fairly recently (MOD), but I've not used one and know little about them.
Only a few of the possibilities are discussed here, but with a small amount of mucking about you should be able to create a reverb unit tailored to your exact needs. For additional information, see the end of this page. In particular, I suggest that you read The Care & Feeding Of Reverb Tanks, as that has a great deal more information.
Since the P113 headphone amp is very easily modified for constant current drive, this is recommended. The original circuit diagram for Figure 3 is no longer shown because it had too many limitations. The main limit was the allowable voltage swing, but this is overcome by using the circuit below, which can be implemented with the P113 board with appropriate modifications (all described in the construction article).
The circuit shown in Figure 5 is the latest incarnation of the reverb circuit. Unlike the others that are somewhat 'piecemeal', it's a complete reverb sub-system. It can be used in an effects loop, or stand-alone. The reverb and 'dry' (original) signal levels are independently adjustable.
The basic spring reverb chamber is a simple affair (see Figure 1), with an input and output transducer, and one or more (usually three or four) springs lightly stretched between them. Each spring should have different characteristics, to ensure that the unit does not simply create 'boinging' noises. Stay well clear of single spring units, they are usually cheap Taiwanese and Chinese affairs and can often found in really cheap guitar amps. They sound awful, and nothing you do will ever change this. This is not to say that the Taiwanese or the Chinese don't or can't make decent spring reverb units too, I just haven't seen one yet. Really basic looking 2-spring units pop up on auction sites at regular intervals - I've not tried one, and I'm not about to waste any money to do so.

Figure 1 - Traditional Spring Reverb Unit
Many reverb units appear to have only two springs, but you will see that there are joins in the middle. This is where two springs are joined, and each spring should be very slightly different. Ultimately it doesn't matter how many springs they really have, a spring reverb always sounds like what it is. This is not a criticism, merely a description of the sound.
Of the units around, most of the common ones have a low impedance (about 8 Ohms) input transducer, and are well suited to being driven with a small power amp IC. The one I have has a relatively high input impedance (200 Ohms DC resistance, and according to the specs, about 1,475 Ohms impedance), but the principles are still pretty much the same.
Another common type of reverb tank (common terminology, BTW), was the folded spring type. These had the springs arranged in a Z pattern and sounded quite good. They have been used by some very well known guitar amp manufacturers, but do not appear to be available any more other than the occasional one that pops up on eBay. Made by O.C. Electronics Inc, they were "MANUFACTURED BY BEAUTIFUL GIRLS IN MILTON, WIS, IN CONTROLLED ATMOSPHERE CONDITIONS" according to the label, but I'm unable to verify that. 
In all cases you will need a small power amp to be able to drive the unit properly, but you must be very careful, because overdrive causes the small pole piece to become magnetically saturated, leading to gross distortion that increases with decreasing frequency. One solution to this is to use a series resistor to reduce the drive and give a higher output impedance from the amp. This usually improves frequency response, especially at higher frequencies, but tends to disappear the bottom end. This is not always a bad thing, since in reality low frequency reverberation in a typical room or auditorium is rare, and generally sounds awful when it does exist.
The preferred solution is to use an amplifier with a high output impedance, and this is the approach taken in most guitar amps. One method of obtaining at least some degree of current drive is to use a series resistor. This is the easy to implement and helps to protect the transducer from gross overloads, but it also requires a drive amplifier with a great deal more 'headroom' than is normally available. The basic scheme is shown in Figure 2, and it requires a tank with an input that's isolated from the tank's chassis. These are very common, because this is the way that most will be used.
Using current drive is explained in greater detail in the additional info (links below) and it works well. This might make the reverb a bit 'toppy', with not much bass. Most players prefer the sound of a modified current drive, where the output impedance is defined (rather than 'infinite') because you can tailor the sound to your liking much more easily. This is tricky with small power amp ICs though, and they are generally unsuitable (hence, none are shown here).
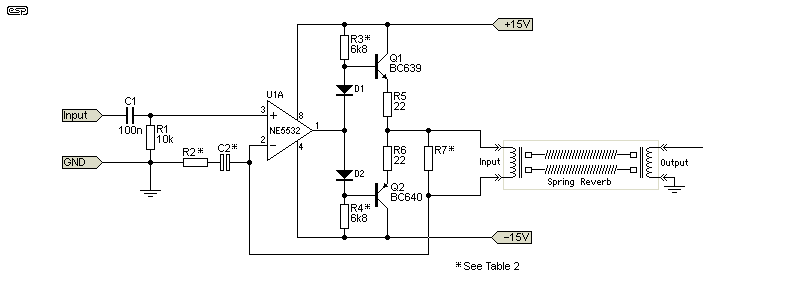
Figure 2 - Reverb Input Transducer Drive Amp
The above is the suggested circuit, and it is known to work very well with most reverb tank impedances. However, it is marginal with a 600 ohm drive coil, and is not suitable for high impedance tanks. However, it can be used if a small transformer is used to step up the voltage. Little 8:1k transformers work quite well, wired in reverse so the output voltage is increased (by a factor of 11 times for the transformer I used). The transformer can simply be wired between the driver amplifier and the reverb coil, but you must be prepared to experiment if you have a high impedance tank.
| Coil Z | R2 | C2 | R7 | Current | Volts @ 6kHz | mA/ V (1kHz) |
| 8 ohms ¹ | 33 ohms | 100µF | 150 ohms | 28mA RMS | 1.34 V RMS | 30mA/V |
| 150 ohms | 150 ohms | 10µF | 3.3 k | 6.5mA RMS | 5.85 V RMS | 6.6mA/V |
| 200 ohms | 180 ohms | 10µF | 3.9 k | 5.8mA RMS | 6.96 V RMS | 5.6mA/V |
| 250 ohms | 220 ohms | 10µF | 5.6 k | 5.0mA RMS | 7.50 V RMS | 4.5Ma/V |
| 600 ohms ² | 330 ohms | 10µF | 12 k | 3.1mA RMS | 11.2 V RMS | 3.0mA/V |
| 1,475 ohms ³ | n/a | n/a | n/a | 2.0mA RMS | 17.7 V RMS | n/a |
Notes: 1 When driving an 8 ohm reverb coil, R3 and R4 may need to be reduced in value (3.9k is suggested) or the output transistors may run out of base current causing the circuit to clip prematurely. 2 The Figure 4 & 5 circuits are marginal with the 600 ohm coil, as it is unable to provide more than about 7V RMS, so high frequencies may cause clipping. It's unlikely that you'll ever hear the distortion though. 3 Again, the Figures 4 & 5 circuits are not suitable for the 1,475 ohm coil, as they can't provide a high enough voltage to get good results. The circuit will run out of drive voltage at about 3kHz, and a high voltage drive circuit is needed.
I have seen quite a few reverb drive amps used in other circuits, including just an opamp. Few opamps have sufficient current capability to drive the input transducer properly, and even some of the small power amp ICs are a pain. The circuit shown has good drive, low current drain and works well. Many of the circuits I have seen also do not make any attempt to obtain current drive, and use the low impedance output from the drive amp. This is not the best way to drive these transducers, and the method shown works much better.
While it might seem perfectly alright to use an opamp to drive coils that need less than 10mA, it doesn't work well at all. Most opamps can provide up to ±20mA (peak), but that is a measure of the short circuit current. Attempting to get a useable signal level at the maximum current may get (just) enough level, but allows no headroom. In some cases you can use two opamps in parallel (with 'current sharing' resistors at the outputs), but even that can be marginal. The small extra effort to make a boosted opamp circuit such as that shown in Figure 2 is well worth it.
The original schematic I used here featured an LM386, and has been replaced. The LM386 can (and does) work, but it's far too limited because of the relatively low output level due to the single supply used. It also has fixed gain, and can't be used for current drive.
The output transducer will have an output of (typically) about 6mV, and a gain of 100 (40dB) is usually enough to match the output of the guitar - for use with an amplifier insert or a mixer, an output of around 1V is preferred. This may require a gain of up to 1,000. The circuit shown uses 1/2 of a NE5532 low noise opamp which is quite adequate for what we need here. A TL072 can also be used, but with a significant noise penalty.
With the values shown, the gain is variable from unity up to a maximum of about 40dB (100 times), which should be enough for anyone. ("640k of RAM should be enough for anyone" - Bill Gates ). If your application requires less gain, simply increase the value of R7 (1k). With 2.2k, maximum gain will be 46 (33dB).
The complete circuit is shown in Figure 3, with a reverb mute switch and level controls. The drive control (VR1) can be a trimpot (or even fixed), since once you have determined the maximum level this will not need to be changed. There is no gain control for the guitar input, as the circuit has unity gain, so amp settings are unaffected by using the reverb.
The capacitor marked S.O.T. will need to be selected to give the sound you want. High values (above 100nF) will give quite a lot of bottom end, which tends to sound boomy and very indistinct. You will probably find that a value somewhere between 1.5nF and 10nF will sound the best - try 4.7nF as a starting point. Like the guitar amp itself, a reverb unit has its own sound, and it is only reasonable that you should be able to change it to suit your own taste.
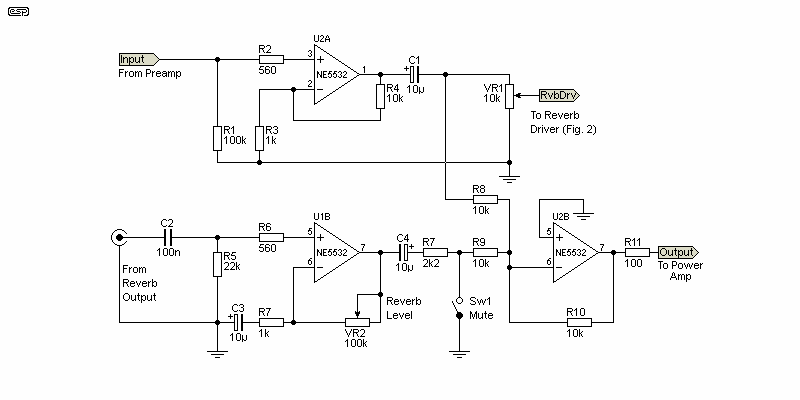
Figure 3 - Recovery & Mixing Circuit
The power for the opamps is Pin 4 -ve, Pin 8 +ve. Note that the opamp requires a dual supply, ±15V is fine. U1B is the other half of the opamp used in Figure 2.
The unit could also be installed inside the amp head, and wired into the circuit. I will have to leave it to you to determine the gain needed for the various stages, since it is currently designed for a typical level of around 100mV. Make sure that you provide proper isolation between the input and output of the reverb tank. I have seen circuits where this was not done, and the whole reverb circuit goes into feedback. Isolation is provided in this circuit by the virtual earth mixer (pin 2 of U1 is at 0 Volts at AC and DC).
Most reverb units use RCA sockets for input and output, and be careful with mounting. The springs will clang most alarmingly if moved about while playing, and acoustic feedback can also be a problem, especially if the low frequency gain is too high.
The circuit shown above will give very good results, but the novice may find it hard to wire up. It's very easy to use a modified version of Project 113, which can drive reverb tanks having a drive coil impedance of up to 250 ohms or even 600 ohms at a pinch. See the project info for the details of the project PCB upon which this version is based.
For a great deal more information about how to drive reverb tanks properly, including measurements and tables with optimum values, see Care and Feeding of Spring Reverb Tanks. The circuit below is easily configured to suit the tank you have (or can get), and has very good drive capabilities, both for voltage and current. Note that it is not suitable for the high impedance drive coil - an amplifier for those coils needs ~±35V supplies to get sufficient voltage swing.
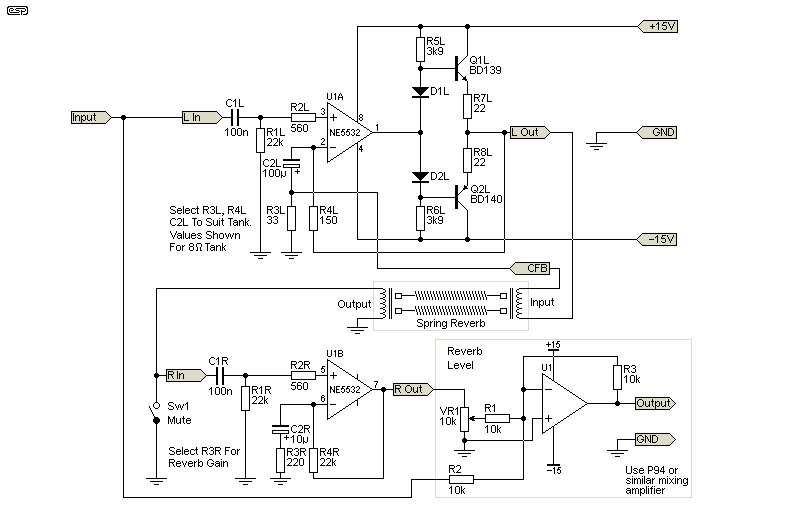
Figure 4 - Modified Version, Using P113 Headphone Amp PCB
The version shown in Figure 4 uses the drive amp configured for high output impedance. Maximum input level depends on the gain of the drive amp, which is controlled by R3L. The optimum value depends on the impedance of the reverb tank's input impedance. As shown, it is optimum for a (nominal) 8 Ohm coil. Note that the input transducer must not connect to the tank chassis. Reverb units are available with isolated inputs for just this purpose. I have specified BD139/140 transistors, but BD639/640 can also be used. For the tiny cost difference I wouldn't bother with the TO92 devices though.
The recovery amp has a gain of 100 as shown (40dB), but this can be changed by using a different value for R3R (higher value, lower gain). The remaining section can use the Project 94 universal preamp mixer board, which includes tone controls to allow tailoring of the reverb effect.
If the mixer is part of P94, this provides the option of tone controls, additional gain, and the second half can be used for an effects send and receive amplifier. P94 is referred to as a 'universal' preamp/ mixer, and it's very flexible. It can be configured in many different ways to achieve what you need. The combination of a modified P113 headphone amp and a P94 mixer will allow almost any configuration you like, but you'll need to look at the many options provided in the P94 project article.
As noted in the beginning, a PCB for the following circuit will be made available if there's sufficient demand. The circuit is a complete reverb system, and can be used in an effects send or stand-alone for mixing consoles. The 'wet' (reverb) and 'dry' (original) signal levels are independent, so the output can be set for any mix of the two via VR1 and VR2. The circuit is suitable for reverb tanks with an input impedance of 8 ohms to 250 ohms, with only a couple of value changes. The correct values are shown in the following Table (it's the same as Table 1, but the component numbers are changed to suit the new schematic).
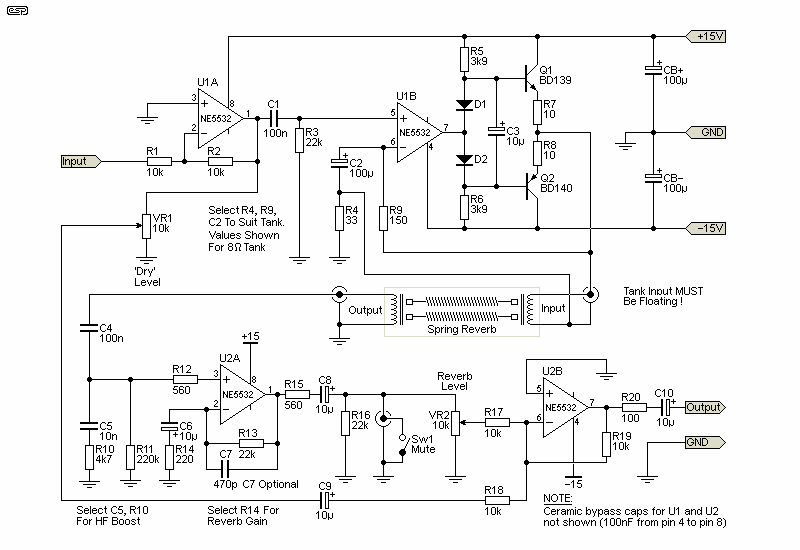
Figure 5 - Updated Version (PCB Candidate)
The values for R4 and R9 will give the optimum drive signal, with the low frequency response tailored by C2. Mostly, no-one wants deep bass in the reverb, so it's rolled off first by C1 (-3dB at 72Hz), and also by C2 at a lower frequency so that there's always a minimum of signal across C2 which can cause distortion. The bass can be rolled off further by reducing the value of C1, but I wouldn't recommend much less than 47nF (-3dB at 154Hz).
| Coil Z | R4 | C2 | R9 | Current | Volts @ 6kHz | mA/ V (1kHz) |
| 8 ohms ¹ | 33 ohms | 100µF | 150 ohms | 28mA RMS | 1.34 V RMS | 30mA/V |
| 150 ohms | 150 ohms | 10µF | 3.3 k | 6.5mA RMS | 5.85 V RMS | 6.6mA/V |
| 200 ohms | 180 ohms | 10µF | 3.9 k | 5.8mA RMS | 6.96 V RMS | 5.6mA/V |
| 250 ohms | 220 ohms | 1µF | 5.6 k | 5.0mA RMS | 7.50 V RMS | 4.5Ma/V |
| 600 ohms ² | 330 ohms | 10µF | 12 k | 3.1mA RMS | 11.2 V RMS | 3.0mA/V |
| 1,475 ohms ³ | n/a | n/a | n/a | 2.0mA RMS | 17.7 V RMS | n/a |
There's also provision to add a Zobel network across the tank's output. This can be used to provide a degree of boost (as shown it's about 3dB at 2.7kHz, referred to A440). The gain of the recovery amp is 100 (40dB), which will suit a tank having an output impedance of 2,250 ohms, which have a 'typical' output level of around 6.5mV. The gain can be increased if necessary, but that should not be required for the most part.
Almost all the reverb tanks that you will see are Accutronics (Now Called Accu-Bell Sound Inc. - Accutronics & Belton).
Note: This is not a specific endorsement of their products or services, but a reader service.
 Main Index
Projects Index
Main Index
Projects Index