

|
| Elliott Sound Products | Project 22 |
As a piece of test equipment, an audio oscillator has to be considered essential for anyone working in with hi-fi gear. Together with an audio millivoltmeter (as described in Project 16), and even better if you have access to an oscilloscope, you will be able to make proper measurements on everything from preamps, RIAA equalisation stages (for vinyl disks), tone controls, crossover networks, etc. There are several versions of sinewave oscillators on the ESP site, from the simplest to the most complex, with the latter having vanishingly low distortion.
I have several, and could not verify any of my circuits without them.
Before embarking on this project, please see the article on Sinewave Generation Techniques. This has a lot of additional information - far more than most of the other material you'll find on-line. Many of the examples shown have been built and tested, and the others have been simulated to verify that they work as claimed.
An alternative circuit that is worth considering is Project 86. Circuit boards are available, and it requires no hard-to-get parts.
Normally when I design something, I try to stay away from hard-to-get parts, because if they are hard for me to get, they will probably be a lot harder for many of my readers. That creates a problem for this project, because one of the essential items is a rather obscure thermistor that is now impossible to obtain from any supplier I know of. The thermistor is ideally used in the gain stabilisation circuit, and as this is an absolute requirement for a sine-wave oscillator, lack of availability poses something of a problem.
As a result, I show two different ways to achieve (more or less) the same performance. Of these, the thermistor stabilised type is no longer possible, so using lamp amplitude stabilisation is the only viable option. The preferred option (by default) uses the lamp stabilised circuit. Bear in mind that small incandescent lamps have fallen in number and risen in price, because the need for them has diminished. Thermistor stabilisation is included because there will be a few people who have squirreled away a suitable thermistor, or have come across one in an old oscillator.
As with an audio millivoltmeter (Project 16) which is a natural companion for an oscillator, it is not possible to use a standard opamp for the oscillator because of the frequency response needed. A variation of a discrete opamp is used for this design, using common bipolar transistors. Because it has high open-loop gain but operates with a gain of three, there is plenty of feedback so distortion is much lower than you may expect.
Note that calibration of an oscillator is never easy if you do not have access to a frequency counter.
An oscillator is simply an amplifier whose positive feedback is greater than the negative feedback, resulting in a signal which is amplified over and over again (by the same amplifier) until the output can increase no further.
This generally results in a square wave if the frequency of oscillation is low enough relative to the amplifier's bandwidth. There are several things that must be done in order to create a usable audio sinewave oscillator:
The choice of filter circuit is discussed below, as is the stabilisation process.
The design presented will provide sine wave signals of typically less than 0.1% distortion from 15Hz to 150kHz, in four overlapping ranges. An optional square wave generator is also shown, and may be included if you have a use for it.
The oscillator is designed to operate using the AC 'plug-pack' power supply described in Project 05 (or Project 05-Mini), since this is simple and safe. The output level is adjustable in 20dB steps, from a maximum of +10dBV down to -50dBV in 4 ranges as shown in Table 1, with a variable control to enable any desired voltage from 0V up to the maximum.
| Range in dB | Voltage (RMS) | Range | Lower Frequency | Upper Frequency |
| -50 | 3.16 mV | 1 | 15 Hz | 160 Hz |
| -30 | 31.6 mV | 2 | 150 Hz | 1.6 kHz |
| -10 | 316 mV | 3 | 1.5 kHz | 16 kHz |
| +10 | 3.16 V | 4 | 15 kHz | 160 kHz |
Table 2 shows the frequency ranges available, and this is generally sufficient to cover the vast majority of likely applications. It's easily changed by using different capacitor values if necessary.
There are many different types of oscillator, but the one almost universally used for audio work is the Wien Bridge (also mis-spelled as 'Wein' Bridge). This is chosen because of its stability, relatively low distortion and ease of tuning. The basic arrangement of the Wien Bridge circuit is shown in Figure 1.
The bridge is not really a filter as you would normally expect, but is predominantly a phase shift network. Another way of looking at it is as a very basic high-pass filter followed by an equally basic low-pass filter. Although it does have a bandpass response, the tuning circuit has a very low Q, and does little to attenuate harmonics.
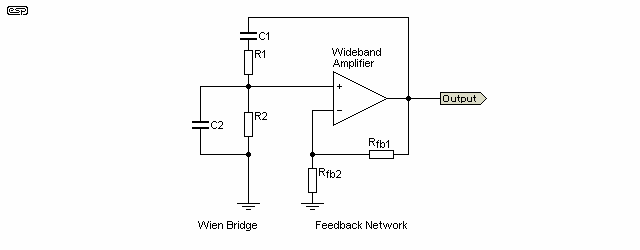
Figure 1 - The Wien Bridge Basic Circuit
The basic circuit above shows the Wien bridge and an opamp. R1, R2, C1 and C2 determine the frequency, and in all cases R1=R2 and C1=C2. Rfb1 and Rfb2 determine the gain. In an ideal system, the gain needs to be exactly 3, but it must normally be higher than that to ensure reliable oscillation, and the feedback network requires some form of amplitude stabilisation. The following shows the frequency and phase response of the Wien bridge, based on 100nF capacitors and 10k resistors. As expected, the frequency is 159Hz (see the formula for frequency below).
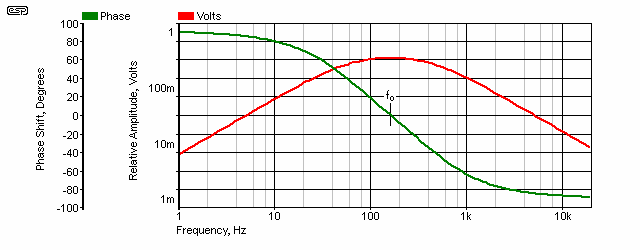
Figure 1A - The Wien Bridge Frequency & Phase Response
While the amplitude response is not well defined, the phase response is such that oscillation can only occur at one frequency, where the phase shift is exactly 0°. This allows positive feedback around the amplifier, and the circuit will oscillate. In the circuit shown in Figure 2, R1 = R2 and C1 = C2. Frequency of oscillation (fo) for the lowest range is ...
fo = 1 / ( 2π × R × C ) ... where R is two 10k pots in series with two 1k resistors, and C is two 1µF capacitors
fo = 1 / ( 2π × 11k × 1µ ) = 14.4 Hz (maximum resistance)
fo = 1 / ( 2π × 1k × 1µ ) = 159 Hz (minimum resistance)
Other ranges are simply multiples of the above, and as can be seen this is very close to the specification shown above. Since the maximum capacitance needed is 1µF (the others being 100nF, 10nF and 1nF), polyester caps should be used throughout.
As noted above, Rfb1 and Rfb2 must be carefully selected to provide a gain of exactly 3 (the loss in the phase-shift network). Since this is not possible in real life (due to component tolerances and other problems), amplitude stabilisation is essential to ensure that the gain is automatically corrected. More on this subject below.
Some care is needed to minimise stray capacitance, since 100pF of stray will create a 10% error on the highest frequency range. No special precautions are needed, but keeping all leads as short as possible helps, and don't try to make the frequency range switching really neat (with all the caps nicely arranged), since this will usually add extra stray capacitance.
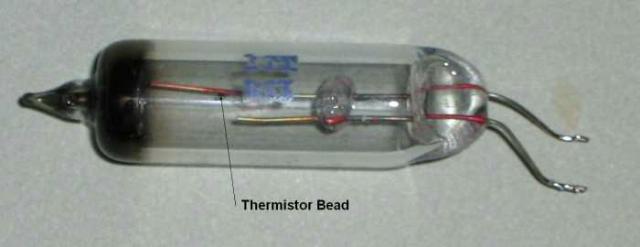
This should be really simple, but unfortunately it is not the case. STC, ITT (and various others) used to make an NTC (Negative Temperature Coefficient) thermistor - and the the RA53/4 (or R53/4), were specifically intended for this purpose. I can find no-one who supplies this part any more. The unit is (was!) a directly heated glass encapsulated bead type, with a response time that is fast enough to be usable, but not so fast as to cause low frequency distortion. This particular device has been used in hundreds of audio oscillator designs (and millions of oscillators) over the years, but now we need to use something different.
RA53 Thermistor (5kΩ at 20°C)
If you happen to find thermistors that look like this, then (and only then) can you build the circuit shown in Figure 7. There are many different thermistors available from nearly all suppliers world-wide, but only this type can be used for amplitude stabilisation of an oscillator. Most 'normal' miniature thermistors are designed for temperature sensing, and are not suitable. I have had countless photos of small thermistors sent by people wanting to know if they will work, and the answer is always "no".
There are a number of possibilities for amplitude stabilisation, outlined below (best to worst) ...
Since the NTC (Negative Temperature Coefficient) RA53/4 (or R53/4) thermistor was well over AU$30 when you could last get them, this option is sadly eliminated for constructors - availability of any suitable thermistor is now zero. Note that any thermistor that you can obtain is unsuitable unless it has an ultra-miniature bead in a glass vacuum tube as shown in the photo above. I have received a great many emails asking about this or that thermistor, and none even come close.
The only real option is to use a lamp - not ideal, but they do work and will suit the purpose very well. The lamp is a nuisance because of the extra power it needs, but such is life. Be aware that when you use a lamp, the earth (ground) must be absolutely solid. You cannot use resistors and capacitors to 'split' the supply, because the 'resilient' ground causes uncontrolled amplitude bounce, regardless of the lamp used. Lamp stabilisation was used in the first commercially available sinewave oscillator made by Hewlett Packard, and in many subsequent versions.
The NTC thermistor works by the rather simple method of decreasing its resistance as the signal level rises. Since it is located in the feedback path (as Rfb1), this increases the amount of applied feedback, thus reducing the gain. Should the gain fall, the resistance of the thermistor increases again (less available voltage, less current, so less heating of the thermistor bead). This naturally causes the gain to rise again.
A lamp (having a PTC - positive temperature coefficient of resistance), requires a re-arrangement of the feedback path, so it will perform the same function. The lamp stabiliser is connected as Rfb2. To give you an idea of the resistance variation needed to maintain the oscillation at the set level, the value of Rfb2 needs to change by less than 0.1 ohm. If you look at Figure 3, you'll see that the lamp operates over a very small range.
One irritating habit of the thermistor (or lamp) stabilisation is that the output voltage 'bounces' whenever the frequency is changed. One gets used to this, and ultimately it is worth it for the low distortion available. This bounce will also be apparent on most stabilisation techniques, including FET or LDR versions. Improving the speed to eliminate bounce will cause an unacceptable increase in low frequency distortion. There are many 'synthesised' sine-wave generators (I have one of them, too), and while they are fine for performing a quick test, the distortion is too high to be useful for serious measurements. Any digital waveform generator using fewer than 14 bits is useless for audio measurements.
For what it's worth, the main cause of amplitude bounce is due to small tracking errors in the pot (or variable capacitor) used to set the frequency. As the pot is turned, the two resistances do not remain exactly equal - this upsets the circuit gain and the bounce occurs as the stabilisation network compensates for the change. A change of less than 0.1% of one resistor in the Wien bridge is sufficient to mean that the stabilisation network has to make a gain compensation. I recommended that you obtain a few dual pots (they'll never go to waste because they are useful in many projects), and select one that shows good tracking between the two resistance elements. This minimises amplitude bounce.
One of the most important aspects of the stabilisation circuit is that it must be slow enough to prevent the shape of low frequency waveforms from being altered. This will introduce considerable distortion at low frequencies, and it is the slow response time that is responsible for the waveform bounce and low distortion.
The circuit for the oscillator itself remains unchanged for all options (other than the feedback path), since once a suitable design is found, there is no real need to change it. Unfortunately, use of batteries is not recommended due to the current drain of the Class-AB output stage, so the AC power supply is a necessity. The BC549 and BC559 transistors should be the 'C' suffix (e.g. BC549C) for highest gain and lowest distortion.
Figure 2 shows the oscillator itself, with the lamp stabiliser. The frequency range switching is done with a 4 position, 2 pole rotary switch, and the capacitors should be wired directly to the switch to minimise stray capacitance. The capacitor between base and collector of Q2 (indicated as 'See Text') may or may not be needed, depending on your layout and the transistors used. If the amplifier oscillates at some high frequency (typically over 1MHz), then add the extra cap. It will normally only be a few pF - somewhere between 2pF and 10pF should be enough.

Figure 2 - Lamp Stabilised Wien Bridge Oscillator
The circuit is a low power version of a simple power amplifier, and will provide the necessary 3.16V RMS easily using a ±12V supply. Peak amplitude is about ±4.5V, and a simple emitter follower buffer is used to drive the output voltage divider (see below for level control, buffer and output attenuator). Set VR2 so that you have an output voltage of 3.16V RMS, or other voltage that suits your purposes. Bear in mind that the range is fairly limited, and 3.16V was chosen because it's convenient (it's 10dB above 1V or 0dBV).
Current in the output stage and buffer is quite high at 8mA, and a small heatsink is a good idea for the output devices (those with the 33 Ohm emitter resistors). They will be dissipating about 100mW each under normal operating conditions with a ±12V supply. Likewise, heatsinks may be used on the power supply regulators (these are normally not needed when powering a few conventional opamps). The diodes shown are 1N4001 or similar. Resistors are all 1/4 Watt 1% tolerance metal film, and a multi-turn trimpot is recommended for VR2 (the 500 Ohm variable resistor).
While the amplifier looks pretty basic, its performance is surprisingly good. It can certainly be improved but there really isn't much point, because it's quite capable of less than 0.01% distortion at any frequency up to ~50kHz, and response extends from less than 10Hz to over 1MHz. While most opamps will beat the circuit for distortion, few (well, none in reality) can drive the low impedance feedback circuit and provide the extended frequency response.

Figure 3 - Typical 12V/50mA Lamp Characteristics
Figure 3 shows the average measured response of 4 typical 12V 50mA 'Grain of Wheat' lamps (as used for the prototype). The full-voltage resistance is nominally 240Ω. The result is a non-linear resistance, which increases with increasing current (positive temperature coefficient). This is what we want, but as can be seen, the resistance is rather low, and a useful response is only achieved with a current of above 6mA (or with no less than 10% of rated voltage). Typically, with 1.05V across the lamp and series resistor (3.16V output) the lamp resistance will be in the order of 60 Ohms or so, add the 47 Ohm resistor in series giving a total of 107 Ohms. Since the feedback resistance needs to be double this value, the pot will be set to 214 - 47 = 167 Ohms. These are all very low impedances, and this is the reason that the output stage needs to be able to supply more current than normal.
There are quite a few different lamps that can be used, but if the lamp is changed to something different from the one I used, you will have to change the value of VR2. For some reason, the US based IC manufacturers who publish the application notes all seem to think that everyone not only knows what a #327 lamp is, but can get one easily. Application notes refer to this mysterious 327 lamp as if it were some kind of (minor) holy grail. If you use a similar lamp, increase the value of VR2 - around 1k should be ok.
The #327 seems to be readily available in the US, but elsewhere? It transpires that it is a 28V lamp, rated at 40mA or thereabouts (1.12W on that basis). At full voltage, the filament will have a resistance of 700Ω. While the #327 lamp can be obtained outside the US, they are not readily available, but anything with similar characteristics will perform equally. The application notes generally fail to state that many different types of lamps can be used, and they provide no details to make it easier for the constructor to choose something suitable.
You will need to experiment with the lamp. They are not precision devices, and even lamps of the same type and from the same manufacturing batch can differ. Some constructors (including me) have found that one lamp from a batch is next to useless, while another works just fine. Ideally, the lamp's filament will not use any 'supplementary' support wires, as these can cause amplitude variations. (My thanks to the reader who discovered this and let me know.)
It's worth noting that with so many filament lamps being replaced by LEDs (both for dial illumination and indicators), the number of suitable lamps you can get is diminishing. It's probable that some time in the future, you won't be able to find many usable types at all. When (or if) that happens, analogue audio oscillators may become much harder to build. It's important to note that R3 (47Ω) may need to be adjusted to get the optimum voltage across the lamp. If the voltage is below about 10% of the rated voltage, the amplitude may be unstable, refusing to settle on the design value.
Figure 4 shows the circuit for the level control, buffer and attenuator. The buffer stage is used to ensure that the impedance seen by the attenuator is low, regardless of the pot setting. This arrangement is not as elegant as some others I have seen, but is quite acceptable and introduces little distortion. The loss introduced by this stage is about 0.05dB, which can be considered negligible.
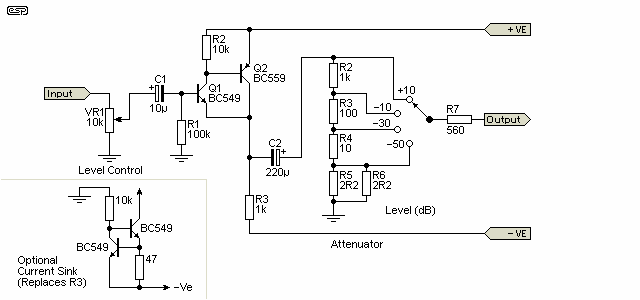
Figure 4 - Level Control And Attenuator
The level control is a single gang linear pot, and as shown, the attenuator provides a passably constant output impedance of 560 Ohms at all output settings. If desired, the output can be calibrated in Volts, with the ranges 3V, 300mV, 30mV and 3mV. Attenuator accuracy is very good, provided 1% resistors are used for all ranges.
The BC559 transistor may benefit from a small heatsink, as it is operating at a current of about 12mA so dissipation is 140mW. Distortion performance can be improved if R3 is replaced with a 15mA current sink (shown inset), which reduces (theoretical) distortion from around 0.02% to 0.005%. While this is a worthwhile improvement, it's probably not worth the effort.
The electrolytic capacitors should ideally be low leakage types, and can be low voltage. The input is taken directly from the output of the oscillator via a capacitor, which is included to remove the small DC voltage that would otherwise be across the 10k pot. DC makes the pot noisy, but it should be fine with the coupling capacitor (C7 in Figure 2).
There are many ways to create a square wave output, but by far the simplest is to use a CMOS Hex Schmitt trigger inverter. These are fast, and with the outputs in parallel, will provide enough drive to ensure that the rise and fall times are very short indeed.
It is very important that you get the 4584 or 74C14 version of the hex Schmitt, because if you use the 74HC14 the 12V supply will destroy it instantly. It is also important to use the switching as shown, because if the square wave converter is left running all the time it will introduce switching spikes into the sine wave, which will seriously degrade the distortion figure.
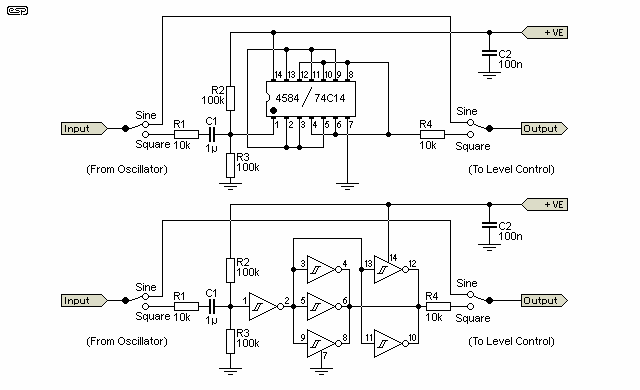
Figure 5 - Optional Square Wave Converter
The output of this circuit is from 0V to +12V, and is fed to the 10k level pot by a 10k resistor. This reduces the level to 6V P-P, which is equal to 3V RMS. The input circuit is designed to ensure that the Schmitt input is supplied from a 1/2 supply voltage (6V), so the applied AC will swing evenly about this point and produce a symmetrical square wave.
The view of the IC is from the top, with the dot indicating pin 1. For people who prefer a traditional schematic, this is also shown (the two are identical). Use the drawing that you are most familiar with - the pictorial view of the IC makes it easier to see where to locate jumpers if you use Veroboard. Make sure that C2 is mounted physically as close to the IC as possible.
The switch is a double-pole, double throw (DPDT) type - a slide switch or mini-toggle are equally suitable. As is (hopefully) apparent, this circuit goes between the oscillator and the level control and buffer of Figure 4.
The construction is not overly critical, but do remember the heatsinks for the output transistors of the oscillator and the buffer stage (as well as the current sink transistor is you use that option). The one that needs a heatsink is the transistor with the 47 ohm emitter resistor if you were unsure. Because of the simplicity of the circuit, it should pose no difficulties in construction. You need a power supply, and P05-Mini is ideal. It can be used with a 16V AC wall transformer, eliminating any requirement for mains wiring.
The only tricky part is the frequency dial. There are a number of ways to do this, and the easiest is to reproduce the scale shown below, and stick it onto a disk of aluminium or fibreglass (or an old CD - you will need to resize either the CD or the image though). You then need to attach a suitable knob in the centre, using epoxy glue or small screws from the rear. The 'pointer' can be as simple or elaborate as you like - mine uses a small piece of acrylic (Perspex) with a line scribed on the rear, supported just above the dial. Figure 6 is designed for the pointer on the right hand side of the dial, and Figure 6A is for a pointer on the left hand side of the dial.
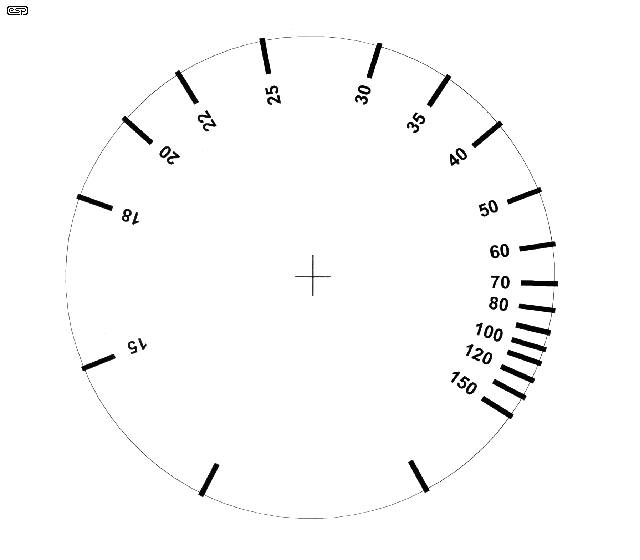
Figure 6 - The Frequency Dial
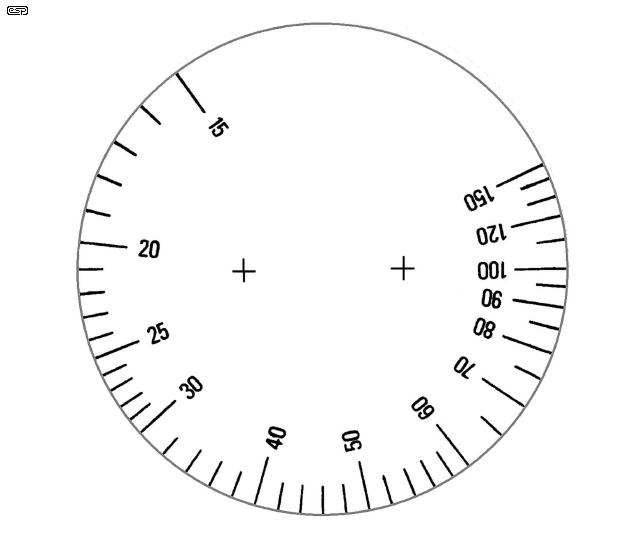
Figure 6A - Alternate Frequency Dial
Notice that the frequency scale runs backwards, so that the pot will be wired in the 'normal' fashion, with minimum resistance at the fully anti-clockwise position. Since minimum resistance is maximum frequency, this works out the way it should. The pointer is expected to be on the right hand side of the scale, otherwise the lettering will be upside down (or vertical) for the wanted frequency.
Unfortunately, the image scanned from my unit was fairly scungy, so I have had to do a reproduction. This is not perfect either, but it will still look better than hand lettering. The image shown is fairly good, but if you want a better one, you'll have to do it yourself. The two unmarked pointers should coincide with the limits of travel of the pot, so if you have no other method of calibration, this should get you into the ball park. However ...
Calibration
Calibration is the next step. If you have access to a frequency meter, then you have no problems, but without one all you can do is hope for the best from one range to the next, having calibrated by ear from the mains supply (using a small transformer to generate a suitable voltage), or just use the pot travel markers on the dial.
If you have a 12V transformer, connect one secondary output to the oscillator's earth point, and connect the other via a 4.7k resistor to the output. Set the output to the 3V or +10dB range, but keep the level turned down. Set the frequency range to 15Hz, and the variable control to 100Hz (or 120Hz if you are in the US or anywhere else 60Hz is used).
Using a set of headphones, you should be able to hear the 50 (or 60) Hz hum softly. Now increase the oscillator level control, and a second tone should be audible. Adjust the frequency control slowly until the two tones are 'in tune', at which point you should hear the 50/60 Hz and its second harmonic. The level should be stable - you will hear the signal 'beat' as you move the frequency control slightly high or low.
It is possible to tune to an accuracy of 0.1% using this method. Once the perfect second harmonic is found, you need to rotate the knob on the pot shaft - without moving the shaft - until the pointer is exactly on the 100Hz (or 120Hz) mark on the dial.
This is included purely for completeness, or just in case someone happens to have a stray R53, RA53, RA54, etc. thermistor that needs a home. The thermistor stabilised unit is very similar to the lamp stabilised version above, but can be expected to have better distortion figures at low frequencies. There is more amplitude bounce with the thermistor because it has a longer thermal time-constant, but this contributes to its lower distortion.
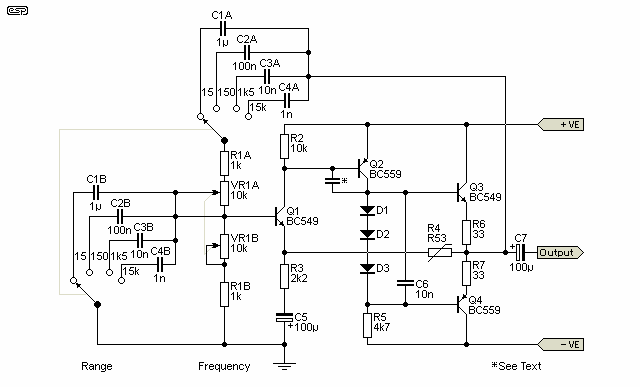
Figure 7 - Thermistor Stabilised Circuit
As can be seen, it is very similar to the previous circuit, but the feedback impedance is higher. This will also help lower the circuit's distortion, but as I stated earlier, the thermistor is almost impossible to get. It used to be advertised in a Farnell Components (now Element14), but no longer. Same with RS Components and every other supplier that I looked at. It has to be accepted that these thermistors are unavailable other than by accident.
Back in 1999 a reader sent me some information, including a part number from RS Components. Element14 also used to stock the RA54 (you don't want to know the price). Unfortunately, both suppliers have dropped the RA53 and RA54 thermistors, nor does either have any equivalent. The only viable option now is to use a lamp.
 Main Index
 Projects Index