
|
|
| Elliott Sound Products | Project 189 |
 Main Index
Projects Index Main Index
Projects Index
|
There isn't usually a great deal of call for an audio wattmeter, as most people are happy enough to estimate the power based on the applied voltage and the speaker's nominal impedance. For a speaker designer or anyone who wants to know the 'real' power, this is what you need. It doesn't measure the product of RMS volts and RMS amps, as that's VA (Volt Amps), which the amplifier has to supply, but when voltage and current are out-of-phase, the power is a measure of actual work performed. VA is the voltage and current needed for the loudspeaker to perform that work. They are rarely the same, other than at a few spot frequencies where the speaker appears resistive.
Mostly, a simple calculation based on the voltage or current is all you really need, but sometimes, you might want to know the actual power, because a loudspeaker's impedance is hardly flat, and it varies widely with frequency.
For a single driver, you can simply measure the DC resistance of the voicecoil, then measure the RMS current delivered to the speaker. Power is determined by the standard formula of P = I² × R, where R is the voicecoil's DC resistance. This works because the vast majority of the power delivered to any speaker is simply converted to heat, and the majority of that heat is dissipated in the voicecoil. There are some additional non-reactive losses, but they are comparatively minor. You can generally expect to get within 5% of the actual power by this technique.
However, when a speaker system is involved, this simple trick won't work as well. It might be close, but there are too many other things that will cause errors. Chief amongst these is the crossover network, which makes it somewhere between difficult and impossible to determine the resistive losses. While the method described above (probably) won't be too far off the mark, losses in the speakers' suspensions and the crossover network aren't easily accommodated. However, it's by far the easiest way to get a representative measurement without too much faffing around. The final result will usually be closer to the actual power than you'll obtain using the RMS voltage and nominal impedance.
While a wattmeter can be built using a PIC (or some other microcontroller), the ADCs (analogue to digital converters) must be at least 14-bit or accuracy will be badly compromised. Most common PICs aren't fast enough to be able to handle the full-range audio signal (a minimum of 41.1kHz sampling is required, for both analogue inputs), and when that's combined with the code needed to calculate the instantaneous power, you'll likely find that you need something far faster than is commonly available. This isn't something I'm willing to attempt, so if that's what you want then you'll have to look elsewhere.
You will also see countless 'wattmeters' on the net, but the vast majority are only voltmeters. They show only the voltage delivered to the speaker, but while they may show calibration in Watts, this is simply an estimate based on the voltage and nominal speaker impedance. This includes the ESP Project 180, which measures only the peak voltage and displays 'nominal' Watts only. The project can be described as 'eye candy' - it looks nice and if set up properly will tell you that the amp is clipping, but it does not measure power.
While they aren't especially common, you can buy a true wattmeter, albeit with limited frequency range and a bunch of functions you won't use (at least in any audio measurements). One that I looked at sells for a measly AU$1,276 and it's an option for people who have deep pockets (with loads of cash therein), or where a certified measurement is required. The meter described here doesn't even try to compete, because it's not relevant for the most part.
Provided you can cope with the cost of the analogue multiplier IC (around $30 or so each), this project is interesting. I've built the basics and verified that it performs as expected, and the results are interesting. More to the point, it's a great learning tool, and can be used to measure the power used by anything that runs from AC. While it can be adapted to measure mains power, this is absolutely not recommended. It will work, but the risk to life is simply too great, and mains AC wattmeters can be obtained for very little from ebay or the like (see Project 172 if you wish to measure mains power).
Note that this is the only project of its type on the Net, but it has been stolen (or at least schematics have been 'lifted') by a few other sites. There are a few other 'wattmeters' described, but the majority are either just voltmeters (calibrated in watts) or are highly unlikely to work as intended. Although much of this design was simulated, I also built one and tested it. Predictably, it works as described, and shows only true power. This is easily proved - just disconnect one speaker lead, so it has voltage but no current. The output is (close to) zero. The project description explains how to calibrate the zero power condition, but it's already so close that you'll be hard-pressed to even see the small error on a meter.
There are very few true power meters designed for audio work. This is primarily due to minimal demand - mostly people don't care about the real power, only that value determined by the applied voltage and nominal impedance. You can't simply measure the RMS value of voltage and current and multiply them together, because that provides a figure of VA (volts × amps), which is known in electrical engineering as the 'apparent power'. This is what the amplifier must deliver, but loudspeakers are reactive loads, and combine resistance, capacitance and inductance to create the impedance. As most people will have seen, impedance varies widely over the operating frequency range. Reactive loads cause the phase of the current to be shifted with respect to the voltage (typically by up to ±45°, sometimes more).
A purely reactive load (having no resistance) draws current from the source, but dissipates no power. This applies for capacitors, but inductors always have some series resistance, and they will always dissipate some power. Unlike an electrical circuit that operates at a single frequency, a loudspeaker is subjected to a continuously varying frequency (or frequencies), because that's the very nature of audio. Consequently, it's difficult (but not actually impossible) to make a loudspeaker perform as a purely resistive load. The additional circuitry (inductors, capacitors and resistors) end up consuming considerable power, but don't change the performance of the drivers themselves. In some cases (such as a tuned enclosure), there are additional reactive elements created by the tuning port, air mass (inductance) and the trapped air provides cone loading and 'springiness' (capacitance).
Impedance correction is essential near the crossover frequency to ensure that the crossover frequency (or frequencies) aren't adversely affected by the varying impedance of the drivers at (or near) the crossover frequency. These networks invariably absorb some power, but it's not always easy to calculate. This is largely due to the constantly varying frequency and amplitude of any audio signal. The factors all combine to make a true power measurement very difficult.
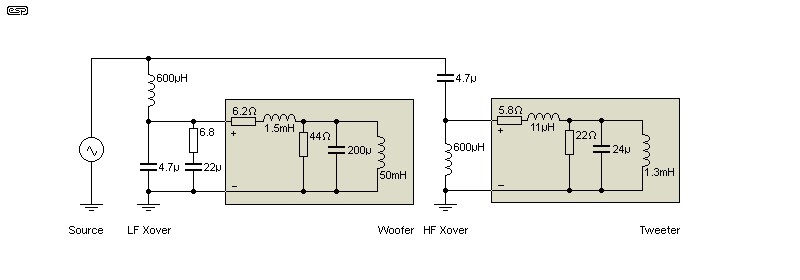
The circuit above shows a speaker system, comprising a woofer, tweeter and a basic 12dB/ octave crossover. No attempt has been made to optimise anything other than woofer impedance correction (6.8Ω and 22µF), the tweeter impedance correction network is missing, and it's simply an example. The impedance plot is shown next, and we can experiment with basic calculations. The speaker has a nominal impedance of 8 ohms, which only means that this is the average impedance, taken across the frequency range. The actual impedance varies from a minimum of 5.56 ohms (at 270Hz) to a maximum of 44 ohms at the woofer's resonance.
The impedance is resistive at (mainly) two frequencies - 47Hz (woofer resonance) and 270Hz, although it's passably resistive between 1kHz and 3.6kHz. Quite obviously, only a small amount of power is delivered to the woofer at resonance (11W with 22V input at 47Hz). Resonance is also a point where the impedance is resistive, and phase shift is zero. The frequencies where the impedance is a 'pure resistance' are shown on the trace - at all other frequencies the impedance is reactive. Inductive reactance shows as an impedance increase with frequency, capacitive reactance is indicated where the impedance falls with increasing frequency.

If the input voltage is set up as a noise signal with a nominal 22V RMS output, we can verify the three methods of power calculation. If we use 20.7V as the reference (the actual noise voltage from the simulator), power works out to be 53.6 watts. The RMS current drawn by the system measured 2.54A, which gives a power of 51.6 watts. The simulator tells me that the actual power is just over 49 watts, so the other two methods have rather over-estimated the true power. If we multiply the RMS voltage and RMS current, that gives 52.6 watts (actually VA, volt-amps), which is also in error. The total error is about 7%, not exactly a precision measurement. You can see that measuring the RMS current gives the closest to the actual power, and in many cases that will be 'good enough'. Note that continuous power measurements using voltage or current only work reliably at low power. At high power, the voicecoil gets hot, its resistance rises and power is reduced.
The real issue here is "does anyone care?". Mostly, we don't, but if you do want to get a better result then you need to read on. Bear in mind that this example may easily be either far better or far worse than a real system, so unless you have the means to calculate the true power, you will never know if your basic measurement is way off the mark or not.
In reality, because speakers are used at levels and with material that are both somewhat unpredictable, accurate measurements aren't usually essential. However, there are many people who really do want to know the right answer, and being able to measure the true power will certainly help to quantify the real sensitivity of a speaker or system. It also allows you to assess the degree of power compression without requiring accurate SPL (sound pressure level) measurements. The speaker being tested will still make a great deal of noise though, so a soundproof chamber might be a good idea. 
The earliest power meters operated using a similar principle to the old style kWh (kilowatt-hour) electricity meters that one found in the outdoor fuse box. These used two coils of wire - one with thick wire (and few turns) that monitored the current, and another with fine wire (and many turns) for the voltage. The two coils were (are) arranged in such a way that the power (not VA) caused an aluminium disc to spin, with the rotation speed determined by the power being used. This then drove gears with pointers that showed the total consumption.
A similar arrangement was used by power meters that used a pointer instead of the aluminium disc, and the meter scale showed the instantaneous power being consumed. While these were are work of art [ 1 ], their frequency response was limited to about 1kHz as the upper limit. Unlike kWh meters, they could also measure DC power. Sadly, if you find one of these meters for sale, it will almost certainly be very expensive, as they are now collectors' items and command a premium price.
Measurement of true power (as opposed to VA) is determined by multiplying the instantaneous value of voltage and current on a continuous basis. This can be done digitally, but requires ADCs (analogue to digital converters) and a DAC (digital to analogue converter) to provide an analogue output signal. Alternatively, the whole process can be done using a microcontroller or a PIC to provide a digital readout. This involves a significant amount of programming and the programmer still has to ensure that the incoming voltage and current are measured accurately, and scaled so they don't overload the ADCs or cause 'out of range' errors during calculations.
Analogue multiplier ICs are still readily available, but they are expensive ICs compared to most opamps and other ICs used in audio. The multiplier is quite capable of the necessary maths, and the formula for the operation of the recommended AD633 multiplier is ...
Vout = (X1 - X2) × (Y1 - Y2) / 10
So, an X voltage of (say) 5V (instantaneous value) and a Y voltage of 4V will give an output of 2V. The pin configuration of the AD633 is shown below, and for our purposes the X2 and Y2 inputs are grounded, so there's nothing to subtract in the above formula. The outcome is based on the instantaneous values of voltage and current, so phase angles are accommodated to derive 'true' power, not volt-amps.

The AD633 is a 4-quadrant multiplier, which means that both inputs and the output can be either positive or negative. This is an absolute requirement, so 'lesser' multipliers (e.g. 2-quadrant types) cannot be used. Not that there are many still available, and even the AD633 is an expensive IC, selling for around AU$22.00 each. There are others available, but they are all much more expensive!
For what we need, the X2 and Y2 pins are grounded, as is the Z pin (which can be used in the final circuit to null any residual offset). Individual inputs (X and Y) can be nulled by not grounding the X2 and Y2 pins, but using multiturn trimpots to null any DC offset that might be present. The pin marked 'W' is the output. Note that there are several variations on the basic AD633, and not all share the same pinouts. If you use something other than the 'JN' version, be aware of this. There is also an 'AN' version, but it's specified for a much wider temperature range and is usually significantly more costly.
The fact that the AD633 is a 4-quadrant multiplier is important, because when a signal has the voltage and current out of phase, the voltage can be positive while the current is negative (and vice versa), and this is precisely what a reactive circuit (such as a loudspeaker) will produce at various frequencies. The output of the multiplier is averaged (using an integrating circuit), and when measuring a speaker the result (the multiplier output) will always be a positive figure. If you measure the output of the amplifier (the source), the result will (or should be) always negative, because it is sourcing power, rather than accepting power. You may also measure a negative power if the current transformer is out-of-phase, so simply reverse either the primary or the secondary winding polarity.
The difference between sourcing and sinking power is subtle, and the idea here is to determine the power absorbed by the speaker, so we expect an overall positive output. Prior to integration, the voltage will be negative at some parts of the waveform, because the speaker is returning power to the amplifier. This rather unlikely scenario is due to the reactive nature of a loudspeaker, and is the key to obtaining a 'true' power measurement. This does not happen with a resistive load.
The AD633 can accept a peak input on either input of ±10V (7V RMS for a sinewave), and it's essential that this isn't exceeded. Because the IC internally divides the output by 10, if 10V is applied to both inputs, the output will be 10V (100/10). Interestingly, the Y inputs are more accurate than the X inputs, but this need not concern us greatly. However, it makes sense to use the Y1 input for current, as its better accuracy allows an accurate measurement of the lower current output level.
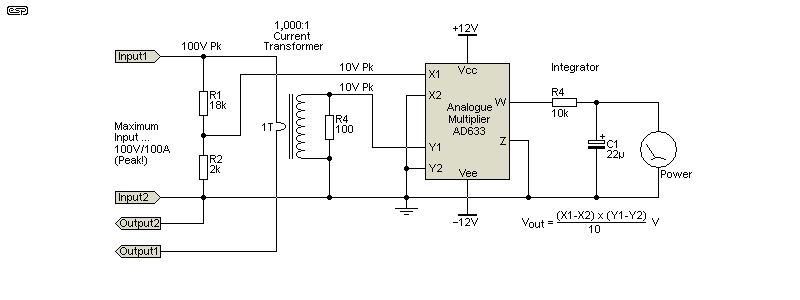
The basic arrangement is shown above. The current is monitored by the Y1 input (via the current transformer), and voltage by the X1 input. The output voltage is a measure of the instantaneous power at any point in time, and the result is averaged by a simple integrator. If you prefer to use a resistor (e.g. 0.1Ω, 5W minimum) to monitor the current, then that's also possible, but isn't shown above for clarity. It's simply wired in series with the output (ground referenced) and the voltage across it will be the same as for a current transformer. The peak current is overly pessimistic, and in the final circuit it's limited to 10A peak (but this can be changed easily).
Because of the nature of an audio signal, the maximum input level to the multiplier is limited to around 2V RMS, for either voltage or current. This translates to a peak value of around 6-7V for material with a 'typical' peak to average ratio of 10dB. The voltage input is easily arranged with a simple voltage divider, but to monitor current we have to either use a resistive shunt (typically 0.1Ω) or a 1,000:1 current transformer as shown above. Both will produce an output voltage of 100mV/A, so if the speaker draws 5A, the current sense output will be 500mV. You might wonder about my preference being a current transformer. They are ideal because they do not introduce any significant resistance into the speaker line, and they dissipate next to no power. A resistor will not only reduce the voltage (albeit slightly), but it dissipates power itself.
In reality, this probably doesn't matter a great deal. Expecting to measure wide band audio power to better than 5% is unrealistic, because it is so variable by its very nature. Noise measurements are no different, and pink noise has roughly the same peak-to-average ratio as most music, although this can change depending on the exact type of music of course. In addition, there are limits to the accuracy one can expect from any wide band signal. While the theory dictates that the multiplier will give the right answer, it doesn't necessarily follow that the practical application will be accurate. Even a simulation with a 'perfect' multiplier (set up as a 'non-linear transfer function') doesn't always give the right answer. 'Perfect' results are generally possible with a single sinewave, but random noise (filtered or otherwise) gets you close, but it's not exact (there's a typical variation of 1-2W for a 40W load). A hardware solution can't be expected to be better, but it can be expected to be worse.
The process is made harder because there's no easy way to calibrate the system. A resistive load may give an exact figure, but once a complex load (i.e. reactive) is used, there's no longer any reference that ensures that calibration is exact across the frequency range. The 'perfect' multiplier (in the SIMetrix simulator) gives a perfect result with a resistive load, and it's almost perfect with a reactive load but a single frequency. Things can fall apart a little when a random noise signal is used instead, even after it's been filtered to remove the highest frequencies.
This is actually harder than it seems. With the default voltage and current sensitivity obtained from the concept circuit shown in Figure 4, the output level is only 1mV/W. This makes it difficult to get an accurate reading at low power, because there will inevitably be some offset from the multiplier IC (although my test unit indicates that it's very small). Even with the maximum power that can be handled with this arrangement (70V and 70A RMS - current transformer allowing), if a music or noise signal is used, you are limited to a voltage of around 22V RMS, allowing for 10dB peak/ average ratio (10dB). Into a 4Ω load, that results in a current of 5.5A (based on the nominal impedance), which gives a current input of 550mV after the current transformer. This can't be amplified by 10 as that will cause an overload on the current input. Reality is different, because the current drawn near resonance is low, reducing the overall current, but the peaks are still too high.
Devising ranges that make sense and don't require a calculator isn't easy. We need to avoid very low voltages because even a small offset will cause errors, but the peak voltage to either multiplier input can never exceed 10V, which is the design limit of the IC. One thing we can do is ensure that the multiplier inputs are derived from a very low impedance, because the AD633 has a (worst case) input current of 2µA (200µV at 10k). The default ranges are acceptable only if the DC offset at the multiplier can be kept below 1mV (an 'error' of 1W).
By now you should see that the overall concept isn't as straightforward as we might like, and the lowest continuous average power we can measure reliably will be around 10W (with up to 10% worst case error). That means that speakers rated for less than 100W at 4 ohms become a challenge. A high sensitivity range might output 100mV/W, so can handle low power speakers, with a peak power of no more than 10W (around 1W average with music). A high range is also possible, allowing measurements based on a 1mV/W output, which can handle a peak power of 1kW.
As shown below, the ranges are 1mV/W (high), 10mV/W (mid) and 100mV/W (low). It's possible to include a very high range (Max!), with 0.1mV/W (100µV/W), but the usefulness of that is likely to be rather limited. It's shown in the table below, but it is not included in the circuit diagram. The ranges I've included are shown without the asterisk (*). The schematic below utilises the ranges shown in light yellow. The most useful range for most amplifiers will be 'Medium' - up to 70V RMS at up to 7A RMS (sinewave).
| Range | Readout | Peak Power | Avg. Power * | Peak Voltage | Peak Current |
| Max! | 100µV / W | 10 kW | 1 kW | 1,000 V | 100 A * |
| High | 1mV / W | 1 kW | 100 W | 100 V | 100 A |
| Medium | 10mV / W | 100 W | 10 W | 100 V | 10 A |
| Low | 100mV / W | 10 W | 1 W | 10V | 10 A |
The average power is based on a signal with a 10dB peak to average ratio. If you are testing with noise (typically pink noise), the peak amplitude has to be trimmed with zener diodes or some other means to ensure that the peak to average ratio does not exceed 10dB (a voltage difference of 3.16:1, peak to RMS). If you don't do that, there is a risk that the peak input to the multiplier will be exceeded, leading to erroneous results. Without any limiting, a noise signal may have a peak to average ratio of up to 15dB, with the statistical probability of some peaks exceeding that.
In reality, the peak current is limited to somewhat less than 100A, depending on the current transformer. I've tested a 5A CT to 20A (down to 30Hz) and it was fine, but this is something that you must verify before you decide to believe the results. The 10kW range simply won't happen - no known amplifier can deliver 700V RMS (1kV peak), and even if it did, the minimum load would be 7 ohms. However, the high range does allow measurements of average power up to 500W into 4 or 8 ohms.
While intermediate ranges are easy to achieve with appropriate attenuator and gain values, the readout voltages becomes nonsense if the intent is to use a digital multimeter to read the power. Most people will be able to see immediately that when on the 10mV/W range, an average output of 2V (for example) equates to 200W, or that 50mV on the 1mV/W range is 500W. If 'odd' multiplication factors are used then simple mental arithmetic doesn't work so well for most people. While this can be avoided by using a moving coil meter with (say) 0-3 and 0-10 scales (i.e. separated by 10dB), I don't expect that this is something that will interest most constructors.
Having dealt with the underlying theory of power calculations, we can see how that translates to a circuit that can be used. The output can be either a moving coil meter with a sensitivity of not less than 1mA for FSD (full scale deflection), and if you do so a buffer is essential following the integrator. Otherwise you can use your multimeter to measure the output voltage. We don't actually have to use an IC multiplier, since it's possible to build one using logarithmic amplifiers (an opamp with a transistor wired to provide a log output). However, for this to work, the transistors have to be in a single package (a transistor array) to ensure close matching both of the transistor characteristics and to provide thermal coupling. These are available, but usually at considerable cost, and you'll never get the precision available from a multiplier IC.
Voltage ranges are easy, as it only needs a switched attenuator to get the ranges needed. Ideally, measurements should extend to 100V RMS (141V peak, 1.25kW into 8 ohms), but most constructors won't need to go that far. For current, the highest useful range is 25A RMS (just over 35A peak) but 50A (peak) isn't too silly, and is the likely maximum needed in practice. A 100mΩ resistor will work, but if you were to run a sinewave test with 25A output, the resistor will dissipate over 62W. This is clearly unacceptable.
As already noted, my preference is to use a current transformer (CT). While some may consider these to be 'archaic' (i.e. old technology), they are just as useful today as they ever were, and their performance is far better than most people realise. I've tested a 5A CT up to 20A with no sign of distortion, and frequency response extends from below 30Hz to over 20kHz ... flat. There's no ±3dB here, this is the full output response. If you want to know more about these under-rated and mis-understood components, see Transformers, Part 2, Section 17, which explains their usage in some detail. The key to using CTs properly is the burden resistor, which converts the output current to a voltage. The current rating of the CT is important to maintain best linearity, and for this project I suggest a 1,000:1 5A device. These can be obtained from most of the major suppliers for no more than around AU$4.00 each.
The current transformer I used is the same as that shown in Project 139A, and is the AC-1005. Suitable current transformers are also available on ebay, and getting a few is well worthwhile because they are so useful. Although rated for 5A, you can expect good linearity with at least 20A (RMS) down to 40Hz or so. Since that represents up to 1.6kW into 4 ohms it's unlikely that it will be found lacking in any way. If you use a larger CT it will almost certainly not be 1,000:1 ratio, and you'll have to modify the gain of U1B in Figure 5 to get back to 100mV/ A. For example, a 500:1 transformer will need a gain of 2 and 20 for the medium and low ranges respectively.
To improve linearity even further, the current output could be obtained using a 'transimpedance' amplifier - a current to voltage converter. However, no common opamps can handle the feedback resistor that's needed for the unity gain condition, and a simple burden resistor of 100 ohms is a better option. The output of the CT is 1mA/A, so at 20A output, the output current is 20mA. The 100Ω burden resistor converts this to a voltage of 2.0 volts. The voltage input is derived from a simple switched voltage divider. Determining the most appropriate ranges isn't easy, and ideally the output should be sensible, with an output of not less than 1mV/W. That means that with (say) 50W into a speaker, the output will be 50mV which is easy to measure with a multimeter.
With the maximum designed power input set for 1,200W, the output will be 1.2V DC, but the output can be up to 10V (10kW!), a figure unlikely to be measured in practice. In fact, only a single range needs to be used, which allows for 100V peak and 100A peak. The peak current won't be used, as that represents a load of 1Ω which few amplifiers can tolerate. The vast majority of measurements will be with less than 50V RMS and up to 12.5A RMS (625W into a resistive load). While a single range is tempting, including the three ranges suggested does make sense to allow larger and smaller amplifiers (and speakers) to be tested. The 'Low' range lets you take representative measurements at lower power, and the results can be extrapolated to the actual power that will be used. The 'Medium' range then lets you measure power compression (the reduction of speaker efficiency as the voicecoil heats up). This is usually done acoustically, but using a wattmeter is just as valid - you'll be able to measure the power loss as the voicecoil is heated.
With any range, you cannot exceed the maximum peak input into the multiplier, so it's worthwhile to include an overload detector. This will alert you to an over-voltage or over-current condition, either of which will produce a very inaccurate reading. While this obviously makes the Wattmeter circuitry more complex, without it you could be blissfully unaware that there was a problem, leading to erroneous results. IMO, it would be folly not to include this, as this is intended as a test instrument and it needs to be as accurate as possible.
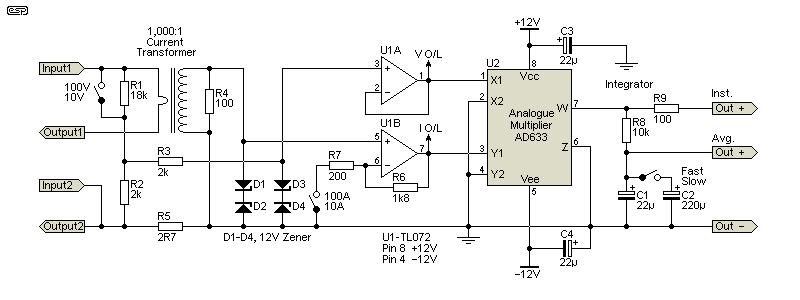
The wattmeter itself isn't particularly complex. The ranges use individual SPST toggle switches to change voltage and/ or current ranges to a higher sensitivity. For each switch, the upper value is with the switch open, and the lower value is with the switch closed. There's also a 'fast/slow' switch, which changes the integration time. Note the four zener diodes (12V, 400mW or 1W) which will protect the circuitry against over-voltage or over-current. A serious over-voltage condition will probably smoke R2 and R3 (this can happen if the 10V/ 100V switch is in the 10V position and a high voltage is applied). Resistors are cheap, and provided the unit is operated sensibly it won't happen anyway. The overload indicator will alert you well before any damage occurs.
For anyone who thinks they need the 'Max!' power capacity, the CT burden resistor (R4) is changed to 10 ohms, and R1 needs to be increased to 200k (there is a 1% error, but that not likely to be important at such high power levels). You can fabricate a 198k resistor if desired, using a 20MΩ resistor in parallel with 200k. The usefulness of this is doubtful at best, since mainly I expect that 1% resistors will be used anyway.
There are two outputs, one being instantaneous (Inst.) so that peak power can be observed on an oscilloscope, and the other is averaged (Avg.) so it can be displayed on a meter (preferably analogue, as a digital meter will show rapidly changing digits that can make the reading useless). The instantaneous output is interesting, because it shows the peak power delivered, while the average is (naturally enough) the average power over a longer time frame. Both are useful, and the ability to see the two is worth the minimal outlay of an additional output connector.
You may have noticed that there is no provision as shown for offset null. In the test circuit I built, I measured the offset at 0.7mV, which for most measurements is inconsequential. If you do want to remove any residual DC voltage, it's simply a matter of feeding a very small correction voltage into Pin 5 ('Z' input). You'll probably need no more than ±5mV or so, and this is easily done using a 10k pot between +12V and -12V. Pin 5 returns to ground with a 10Ω resistor, and the pot's wiper connects to the 10Ω resistor via a 33kΩ resistor. This allows ±4.5mV offset correction which should be more than enough. While the circuit is capable of reasonable accuracy, that's not really the primary purpose. It's more about understanding the relationships between voltage, current and power with a reactive load.
One thing that can happen easily is that you get a negative output rather than the positive output expected. If that happens, simply reverse the connections for the current transformer (either the primary or secondary, but not both). That will change the polarity so it's correct. There's a 50:50 chance that you'll get it right first time.
The DC connections to U1A and U1B aren't shown for clarity. Pin 8 is +12V and Pin 4 is -12V. The opamp and multiplier should be bypassed with 100nF capacitors from each supply to ground. The voltage input is protected using a 2k resistor (R3, which can be increased to 10k (maximum) for somewhat better protection if desired) and a pair of zener diodes to ground. No protection is strictly necessary for the current input, because no known amplifier can provide enough current to cause an overload (100A peak, or 4.9kW into 1 ohm!), but the opamp is still protected by another pair of 12V zener diodes. Note the two overload outputs (I O/L and V O/L). These connect to the overload detectors shown next.
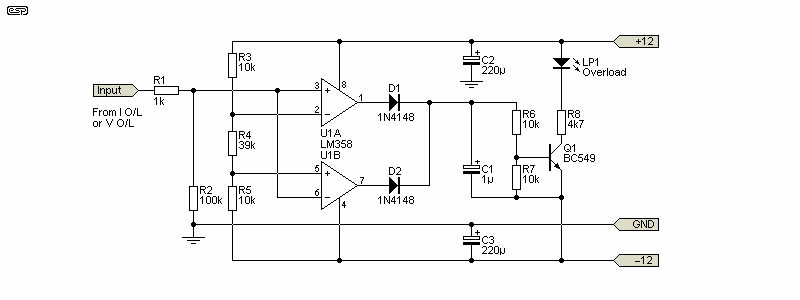
The overload detectors are designed to operate at around 8V. There may be a small variation as they rely on the ±12V supply voltage for the reference. Small variations should not cause any problems, because there is enough of a buffer to ensure that an overload will be caught. There are two LM358 dual opamps used, and these are as cheap as chips and ideal for the purpose. You need two, with one for voltage and the other for current. While they could be combined, you won't know which section is overloaded, which will be rather annoying. The cost is small, and they can always be 'up-cycled' to Project 146 if you decide that the power meter isn't worth the trouble.
Note that there is no decoupling for the overload indicators to prevent voltage spikes from affecting the multiplier. It's not needed because the overload LEDs should never come on during a test. If they do, accuracy is impaired anyway, so a bit of supply noise is of no consequence. Unlike a power amp or mixing console, momentary clipping cannot be permitted.
One small issue with analogue multipliers is that they are relatively noisy. The output noise can be minimised by including a filter, with a -3dB frequency of around 22kHz. The circuit shown is an optimised 4th order design for the frequency range necessary, and is only 1.2dB down at 20kHz. There is a very small peak (less than 0.1dB) at 13kHz which will not materially affect the reading. Ultimate rolloff is 24dB/ octave, with a measured -3dB frequency of just under 23kHz. All values are in the most common E12 (12 values/ decade) range, so no odd values are necessary. Of course it's possible to make it exactly 22kHz with the 'right' resistor values, but there is no point - it's more than good enough as shown.
In use, the amplifier is connected to the input terminals, and the speaker to the output terminals (I bet that came as a surprise ). Advance the volume until you have the desired power level going to the speaker (or load). The average power is monitored by a digital multimeter on the DC volts range. With most material, the reading won't be steady, so you can use the 'Slow' setting to get an overall average reading. The slow setting will take a while to stabilise, because the integration capacitor is quite large, and it takes at least five seconds before the final voltage is reached. It will still move around, because the music (or noise) signal is not steady.
A moving coil (analogue) meter is preferred for the readout. It's generally quite easy for humans to determine an average value even when a pointer is moving around, but that's a great deal harder with a digital display. If the meter is used for long-term power readouts, then C2 can be increased from 220µF to something larger (up to 1,000µF isn't unreasonable), but it will take around one minute before you have a realistic measurement. If a high power speaker is being tested, this is long enough to allow for significant power compression to occur, so the reading may be lower than expected.
When you start, unless you are 100% sure of the amp's output power, begin with all switches open. This provides the 1mV/W range, and you can work out fairly quickly which switch can be closed to improve sensitivity. With both ranges switches closed, the sensitivity is at its maximum (low range), allowing up to 10V and/or 10A peak. Probably the most common range will be 100V and 10A. This allows most average power amplifiers and speakers to be tested. Bear in mind that with a peak voltage of 50V, the peak current may be around 6.25A for an 8Ω speaker, but can be up to 12.5A with a 4Ω speaker. If either overload LED comes on, you need to select a higher voltage or current range.

Please Note: If used with a BTL amplifier, never try to use an oscilloscope to measure the peak power, as scopes are always grounded for safety. Connecting a grounded oscilloscope may cause amplifier failure, and may also damage the oscilloscope and/ or the scope lead. If you have a differential probe that provides total isolation that may be used, but few hobbyists will have one as they are very expensive.
Refer to Table 1 for the ranges provided. I didn't include a 'Max!' range because it's doubtful if it will ever be needed, but the additional circuitry only involves adding another voltage divider to get a division of 100, as well as the divide by 10 and unity gain options shown in Figure 5. You can also provide intermediate ranges, but the output voltage won't be based on factors of ten, so some maths will be needed to calculate the power.
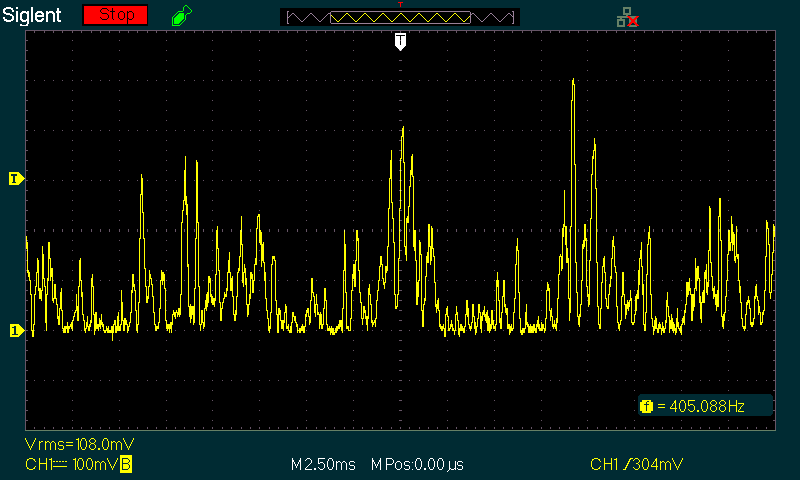
Having gone to all the trouble of writing this article, it would have been remiss of me not to include a scope capture of the output. This was done using the 10V and 10A ranges, so the output is 100mV/W. The trace was deliberately offset to -200mV so I could show the peaks in better detail. The peak power at the time of capture was 5W, but of course it's varying all the time with programme material. The scope also shows the RMS level (not average), but for this the two are passably close. I was unable to watch the waveform and millivoltmeter at the same time (at least not with any precision), but during the test the DC level (average power) was hovering around 70mV (700mW). That's a peak to average ratio of 8.5dB.
Average power will normally be measured using a DC meter, and a moving coil meter is better than digital because it's easier to see the average with a pointer than try to guess the average of numbers that change all the time. There are periods where the output is very slightly negative, indicating that the load (which was a loudspeaker) is reactive. However, the speaker I used is fairly benign, so there are no radical negative excursions. I used the scope's inbuilt low-pass filter to remove everything above 20kHz to ensure that the trace was as clean as possible, because I hadn't built the Figure 7 filter circuit when the test was done.
There are some special precautions that you must be aware of before using the power meter with a BTL (bridge-tied load) power amp. Because both outputs carry a signal, you must not connect an oscilloscope, because the ground clip will place a short on one amplifier output! You can't use a transformer to couple the instantaneous power output to an oscilloscope either, because the output is 'unipolar' (of one polarity) and it basically carries a continuously varying DC offset. While a 1:1 transformer could (in theory) be capacitively coupled, the output as displayed on a scope would be extremely difficult to interpret.
It is possible to provide an optically coupled output that will perform to DC, but that's not a simple undertaking. It is something that I may look into further at some point (I've already done some research and there are several solutions, some better than others). You can buy a complete isolated amplifier, but the cost is considerable. Analog Devices make one, the AD215AY Isolation Amplifier, in a 12-Pin SIP (single inline pin) package, but at almost AU$150 each (at the time of writing) that's probably not something that most people will be prepared to purchase.
So, if you do need to test with a BTL amplifier, you'll be able to read the average power on a meter, but looking at the peak power isn't a viable option. Since the idea is primarily to characterise loudspeakers rather than amplifiers, use a 'conventional' power amp so there are no problems examining the peak output. Using a BTL amplifier that doesn't allow you to measure the peak voltage and current on an oscilloscope is very limiting.
This isn't a project that everyone needs, although it is interesting to see how much power you actually use when listening at your normal level. More than anything else, it's yet another tool that can be used, and, more importantly, you'll learn a lot by building one and using it. It's highly unlikely that PCBs will be available, as it's not likely to be popular enough to warrant having boards made. Of course, I may be mistaken, and if so then I will develop a board to suit.
The circuit needs a ±12V power supply (such as Project 05-Mini, and it must be a linear type. Switchmode supplies are simply far too noisy, especially if you want to use an oscilloscope to look at the instantaneous power. Because the output levels are low (typically only around 50mV or so), any noise picked up makes the display very difficult to read. Linear supplies are very quiet, and will add the least amount of noise to the output signal. The output of the power supply should be floating (i.e. no output connected to earth/ ground).
In all the tests I've run with my prototype unit, the output DC offset is less than 1mV, which represents an error of 1W on the 'High' range. If the wattmeter gets only voltage or current (not both), the output change is small - sufficiently so that it can be usually be ignored. The AD633 is a precision IC, and it's more than good enough for the job. It should be apparent that if you have only voltage but no current, the power is zero.
Ultimately, it's probably quite difficult for most hobbyists to justify building a 'true' power meter unless you have a real need for it. Because I like to ensure that everything I publish is known to work as claimed, I had no choice, but it's highly unlikely that the unit will ever see much use. For many years, people have been quite happy to use the applied voltage and nominal speaker impedance to determine power, and it turns out that it's sufficiently accurate for general calculations. However, if you needed to absolutely quantify power compression (for example), then you probably will need one of these in your toolkit. Of course, you could just use a current transformer and watch as the current falls when the voicecoil heats up under sustained power, but that's less fun.
While the circuit can (theoretically) be used to measure the power drawn by a mains powered appliance (at 50/ 60Hz), that is not just not recommended, it's absolutely prohibited! Everything will be at mains potential, making it extremely dangerous and likely to be lethal. However, it can be used at low voltages derived from a transformer, provided the transformer provides total isolation from mains voltages. If you use it this way, you do so entirely at your own risk. The Project 172 wattmeter is a far better option if you need to measure mains power.
Old Wattmeter Uses Magnetics To Do The Math(s) - HACKADAY
Analog Devices - Multiplier Applications Guide (1978).
| Main Index
Projects Index
|
| Copyright Notice.This article, including but not limited to all text and diagrams, is the intellectual property of Rod Elliott, and is Copyright © 2019. Reproduction or re-publication by any means whatsoever, whether electronic, mechanical or electro-mechanical, is strictly prohibited under International Copyright laws. The author (Rod Elliott) grants the reader the right to use this information for personal use only, and further allows that one (1) copy may be made for reference while constructing the project. Commercial use is prohibited without express written authorisation from Rod Elliott. |