
|
|
| Elliott Sound Products | Project 03 |
 Please Note: PCBs are available for the updated version of this project (P3A)
This amplifier does not claim to be 'state of the art', and in fact the base design dates back to the earl;y 1970s. It is a simple amp to build, uses commonly available parts and is stable and reliable. The design featured is a slight modification of an amp I originally designed many years ago, of which hundreds were built. Most were operated as small PA or instrument amps, but many also found their way into home hi-fi systems. The amp is capable of driving 4 Ohms, but it is starting to push the limits of the transistors, however, even when used at 4 Ohms, very few failures were encountered.
Please note that I do not recommend that you build this version of the amplifier. Project 3A is the version intended for construction, and it is a far better amplifier overall.
Note that although MJE2955 and MJE3055 transistors were shown, the original amps used a version of these transistors that has long since been discontinued. The modern ones come in a TO220 package, and are severely limited in nearly all respects compared to those used in the 1970s. The transistors recommended today are the TIP35C and TIP36C (schematics have been updated), which are better than any TO220 devices.
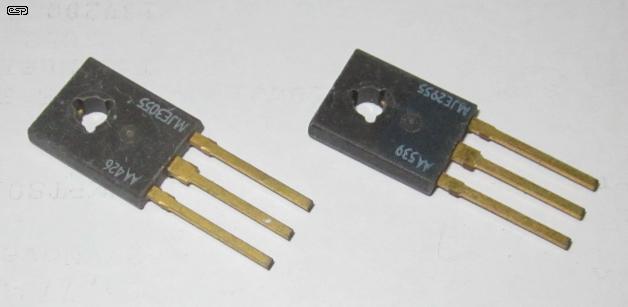
Photo Of Original (Long Obsolete) MJE2955/3055 Transistors
For a bit of history, the photo above shows the transistors that were used when hundreds of these amps were built. These devices were considerably better than the modern TO220 versions, but there is no data on the Net because they are so old. At the time they were 'premium' Motorola devices (note the gold plated leads), and they were remarkably rugged. The package is TO127 which is no longer used by most manufacturers. I have seen similar devices offered on an auction website, but there were no details. As with anything on any auction site, beware of fakes.
Note that there is no output short circuit protection, so if speaker leads are shorted while the amp is working (with signal), there is a very real risk of the transistors being destroyed. Since this amp was built commercially, the savings were worth the risk - most of these amps were installed in the speaker box, so shorting was not likely (unless the loudspeaker voice coil shorted as happened a few times). Because of the cost of the devices used (minimal), it is a cheap amp to fix even if you do manage to blow it up.
Figure 1 - 60W Power Amplifier Original Circuit Diagram (Don't Use This Circuit!)
Basic specs on the amp are as follows ...
Changes made from the original design are ...
** It is conceivable that with some transistors, the value of 560 Ohms may not be correct. If this is found, you might need to 'tweak' this resistor to obtain minimum DC offset. If you really wanted to, you could even use a trimpot (2k), and adjust this for minimum DC offset. Best to wait until the temperature has stabilised first, but it won't change very much anyway.
Apart from these changes, the amp is pretty much original, and with a nominal ±35V supply as shown, will provide around 70W into 8 Ohms quite happily. In its lifetime, many of the mods mentioned above were made anyway, since I could never find the circuit diagram when I needed it, so often made it up as I went along! It is a fair testament to the amp that all sorts of resistor and capacitor substitutions can be made, and it still works fine.
The noise and distortion figures are somewhat pessimistic - there is so little distortion at 1V (or 20V for that matter) that my distortion set has great difficulty in getting a readable measurement. The oscilloscope output indicates that most of what I see is noise - even integrating the output (my scope can do that) to eliminate the noise reveals very little at all.
I have had a few constructors comment on the quiescent current, which is somewhat higher than they expected. Indeed, my test amp (photo below) runs (ran) with a quiescent of about 350mA. This requires a fairly hefty heatsink to keep it cool, but mine is fine as long as it is not lying on the bench top. With little or no airflow, it gets hot.
I have carried out a few more experiments, and have a few values for you. The amp is intended to use 0.22 Ohm emitter resistors in the output stage. With these, Iq (quiescent current) is about 350mA at ±35V supply.
Increasing the emitter resistance will reduce Iq, and with 0.5 Ohm resistors it drops to about 150mA. Although this reduces output power by a very small amount, the reduction is worthwhile from a thermal perspective. Measured distortion and other characteristics are unchanged. A tiny increase in output impedance might occur, but I did not test for this, and it will be far less than that of speaker leads anyway.
I also included a bias servo, using a pot and transistor. This was not mounted on the heatsink, since this would cause an instant negative thermal coefficient - as the amp gets hotter, Iq will fall, potentially so far that crossover distortion will occur. This is not a good thing, and I do not recommend it. The bias servo I used was done for convenience - I had a 20k trimpot to hand (well, a bag full actually), and the transistor is a standard BC549. I know its not elegant, and the values are not worked out properly, and ..., and, ... etc, but it works.
I then tested the amp with Iq from zero mA (crossover distortion was very evident) right up to the new maximum of 150mA - I left the 0.5 Ohm resistors in circuit. The circuit for the bias servo (actually the whole amp, with some of the other mods I have mentioned elsewhere) is shown in Figure 1a - notice that I left the diodes in circuit as a fail-safe, since the servo I used will go open circuit if the pot wiper becomes disconnected (I strongly suggest that you do the same). In practice this works extremely well, and I can set bias current to anything I like.
Figure 1a - Modified Version Of 60W Power Amp (Don't Use This Circuit Either!)
Changes from Figure 1
Overall, these changes effect quiescent current and simplify the circuit a little. There are no discernible performance changes from the original. The variations I was able to chronicle are as follows :
I found that the crossover distortion is very low with only a few mA, and all but disappears at about 40mA, leaving a barely visible 'glitch' on the oscilloscope channel monitoring the output of the distortion meter. (I always use one channel for the output signal, and the other is pretty much permanently connected to the distortion measuring set.) Further increases in Iq made very little difference, but overall I found that at about 50mA the amp seems happiest (or maybe that was me - seeming happiest, that is).
Variations in supply voltage will have an effect on Iq as well. I hadn't actually considered this much (I have never had one of these amps self destruct, and normally didn't even bother measuring the quiescent current when hundreds were made). The variation is caused because the Class-A driver current is not derived from a true current source, but is a simple bootstrapped circuit. Since the current must change with voltage, so must the voltage across the diodes (or bias servo). At about 25 degrees C, I set Iq to 20mA with a supply voltage of ±35V ....
| Supply Voltage | Quiescent Current |
| ± 35 V | 20mA |
| ± 40 V * | 53mA |
| ± 45 V * | 78mA |
| * No signal! | |
Bias current also changes with temperature, so as the amp heats up, Iq will increase. This is not serious, and will only ever cause grief if the heatsink is too small. Grief will ensue anyway if you attempt to use a supply voltage greater than ±35V, regardless of whether the bias current is stable or not.
 |
Please Note: One of the things you will read about on various web pages is that distortion measurements are invalid. Most don't say why, but it's largely due to very early transistor designs where crossover distortion was not uncommon. Most measurements do not usually take into account the very 'spiky' nature of crossover distortion, and simply average it so it looks (on paper) much better than it sounds. This denouncing activity is most common amongst Class-A enthusiasts. I cannot speak for others, but when I measure distortion I look at the residual signal from my meter on an oscilloscope. There are no distortion spikes evident in this design - the distortion is a smooth waveform with no part of the signal able to be misinterpreted by human or instrument. |
I do not propose to provide constructional details for this version of the amp. If you want to build it, see P3A, which includes PCBs and further refinements to the circuit. Layout is not especially critical, and in fact if the components are laid out on a board much as they are seen in the diagram, you should have no problems. 3 Amp fuses should be fitted to each supply rail - these will not prevent output transistors from failing with a shorted speaker lead, but they will prevent further damage (wiring melting, transformer burning out, PCB catching on fire, etc).
100µF 50V bypass capacitors should be installed on the board, as close as possible to the driver circuits. These may optionally be bypassed using 100nF polyester caps. As an indication of the stability of this amp, I have used it with 1 metre power supply leads with no on-board bypass caps whatsoever. Power is reduced because of the instantaneous peak currents causing voltage drop on the leads, but the amp remains completely stable. (Don't do this, because although the amp will work fine, too much power is lost in the leads.)
The input capacitor should be a polyester type. If an electrolytic is to be used, the positive end goes to the amplifier (there is about +230mV on the bases of the long tailed pair transistors).
When wiring, ensure that the feedback connection is taken from the speaker output terminal, immediately before the inductor. Any track which is carrying half-wave audio from one or the other power transistor resistors will cause distortion of the feedback signal, degrading sound quality.
The photo shows one of my test amps (built on a PCB I designed many, many years ago for a bridge / stereo version - these are the ones that hundreds of were made). This is the amp all the tests were conducted on, and it will be noted that there is no output inductor.
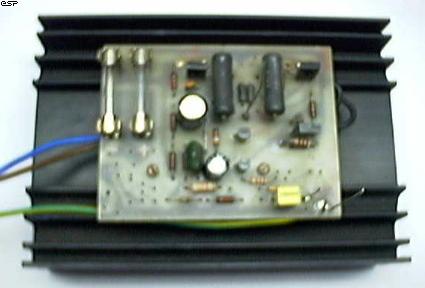
The Complete Amp (My [Now Ancient] Test Unit)
A suitable power supply is presented in the Project Pages. This will also be quite suited to any other power amp of similar specifications (such as the 'New Improved' version of this one, P3A). The power transformer should have 25-0-25V secondaries, and no more! This gives a nominal DC voltage of ±35V.
Only the output transistors (those shown with a '*' are not recommended) must be on a heatsink, which should have a thermal rating of no more than 0.5°C/Watt for 'normal' home listening, or half that if the amp is going to be pushed hard (PA or instrument amp, for example). If you really want to, a small 'flag' type heatsink can be used for the drivers, but this is not necessary. The Class-A driver dissipates only about 1/4 Watt, while the power drivers vary. I have never used a heatsink on any of them.
The TIP2955/3055 and TIP35C/36C have a lower thermal resistance than the MJE types, and are preferred for this reason. Other power transistors may be substituted, but it is up to you to determine their suitability. Aim for devices with a high fT (gain transition frequency), low thermal resistance, and good power ratings. I am using 200W TO-3 case devices in my own biamp system. The TIP35C/36C devices are recommended over all 2955/3055 devices.

Figure 2- Output Transistors in Parallel
If you wish, additional output transistors may be connected in parallel to provide better gain at high current (reducing ''gain droop'), and higher output current capacity. This will also provide lower transistor die operating temperatures, because of the effective doubling of case to heatsink contact area. Figure 2 shows the arrangement (one side only, the other is a mirror image).
Note that if transistors are paralleled, the emitter resistors must be used as shown to force current sharing. If these are ignored, one transistor will provide most of the current while the other does little or nothing. You may then be lulled into a false sense of security until the output stage blows up.
NOTE: Although the silicone pads available are a less messy alternative to mica or Kapton washers and thermal grease, I strongly recommend that you do not use them. Many tests over many years have demonstrated that common silicone washers are far less effective than greased mica or Kapton. If you do use silicone, when/if transistors are replaced, replace the washers as well, or the thermal resistance will be too high if the old ones are re-used.
If you do not have a dual output bench power supply - Before power is first applied, temporarily install 22 Ohm 5 W wirewound 'safety' resistors in place of the fuses. Do not connect the load at this time! When power is applied, check that the DC voltage at the output is less than 1V, and measure each supply rail. They will be different, because of the zener diode feed resistance, but both should be no less than about 20V. If widely different from the above, check all transistors for heating - if any device is hot, turn off the power immediately, then correct the mistake.
If you do have a suitable bench supply - This is much easier! Slowly advance the voltage until you have about ±20V, watching the supply current. If current suddenly starts to climb rapidly, and voltage stops increasing then something is wrong, otherwise, continue with testing. (Note: as the supply voltage is increased, the output voltage will increase - up to about 6V, then quickly drop to near 0V. This is normal.)
Once all appears to be well, connect a speaker load and signal source (still with the safety resistors installed), and check that suitable noises (such as music or tone) issue forth - keep the volume low, or the amp will distort badly with the resistors still there if you try to get too much power out of it.
If the amp has passed these tests, remove the safety resistors and re-install the fuses. Disconnect the speaker load, and turn the amp back on. Verify that the DC voltage at the speaker terminal does not exceed 100mV, and perform another 'heat test' on all transistors and resistors. Turn off the power, and re-connect speaker and music source.
This amp is fairly well behaved for turn on, and should issue (at worst) the smallest click as power is applied. When power is removed, after about 5 seconds or so, there will normally be a low level thump - this is not dangerous to speakers, unless used in tri-amp and directly connected to the tweeters - DO NOT DO THIS - not with any amp. Always use a capacitor in series with tweeters (see Bi-Amplification, Some thoughts on Tri-Amping).
If you got this far, happy listening.
 Main Index
Projects Index
Main Index
Projects Index