
|
|
| Elliott Sound Products | Project 08 |
Please note that this crossover (although it will work very well) is usually not as good as the Linkwitz-Riley alignments. The slope of the filters shown here is 18dB/octave, and in common with all odd-order filters there is a 90° phase shift at the crossover frequency. L-R crossovers are available on the Projects Page in both 12dB / Octave and 24dB / Octave. They are completely phase coherent, and offer better overall performance than this version. PCBs are also available for the P09 (one of the most popular).
An improved version of this crossover is shown in Project 123. The later article also has quite a bit more information and gives you more options than the one shown here. This is a completely traditional circuit, where the P123 alternative uses extra opamps to achieve a better overall result with fewer odd resistor values.
I have had many enquiries, and thought that a good crossover - easy to build and set up - was a worthwhile project. This unit is all of the above, and if properly set up should satisfy the most critical listener. The behaviour is certain to be far more predictable and accurate than any passive crossover in a speaker system, and (with the additional amps) you get a bi-amplified system which will make you wonder how you ever put up with the system before.
The electronic crossover featured here is an 18dB / octave unit, and has the crossover frequency centred on 300Hz. The frequency may be changed by increasing (or decreasing) resistor / capacitor values.
The values of resistance and capacitance (indicated with a * in the circuit diagram) in the filter are critical, and close tolerance components are mandatory. If you cannot obtain close tolerance capacitors, use a capacitance meter to select values within 5% of the indicated value. Use only 1% metal film resistors throughout. The 1µF coupling caps are not critical, and standard tolerance is Ok.
 |
If the crossover frequency is changed, it is critical that the ratios of capacitor and resistor values are not varied. For example, if you wanted to halve the frequency, the
resistors would become 22k and 102k (100k is only just acceptable. If the ratios are changed, the filter damping is also changed, and the behaviour at the crossover point will be
unpredictable (causing a dip or peak in the frequency response). The values you change to alter the crossover frequency are indicated with a * in the circuit diagram |
Do not change the 10k resistors - they set the damping of the filter and strange happenings will befall s/he who fiddles indiscriminately. If you wish to calculate your own values, the formula is ...
f = 1 / ( 2π × R × C )
Where R & C are C1 and R2, C2/3 and R3/4 (and their corresponding values in the low pass section).
The two separate networks shown must be set up for the same frequency, as closely as possible. As shown, 47nF and 11k gives 308Hz, 10nF and 51k gives 312Hz. As the difference is reduced, so too is ripple in the summed output. The first section needs an impedance that's no more than 1/5 of the following stages - that's why there are different values.

Figure 1 - 2-Way Electronic Crossover Network
Figure 1 shows the circuit diagram, and the NE5532 Dual op-amp is used. This circuit can be operated from the same power supply as the Audio Preamp, featured elsewhere on these pages. Other dual opamps may also be used, depending on your preference.
 |
Standard Dual opamp pinouts are shown on the left. These are an industry standard, and are the most readily available and easiest to work with. Make sure that a bypass cap is connected between supplies, as close as possible to the supply pins. Alternatively, use a bypass cap from each supply pin to ground. Bypass capacitors should be 100nF monolithic ceramic types for best performance. |
The input is buffered by U1a (the second channel can use the other half of the op-amp), and fed to the two filter networks. Each filter is a 3rd order section, and has a gain of 2. The output of each section is fed (via a 1µF polyester or 10µF electrolytic capacitor) to the level control and output buffer stage. If you use a 10µF electro, polarity is unimportant because there will be almost zero volts across the cap which doesn't harm them.
In use, the output of the preamplifier is fed to the input of the crossover network, and the outputs are fed to their respective amplifiers. For more information on bi-amping, refer to the article Bi-Amplification - Not quite magic (but close) on these pages.
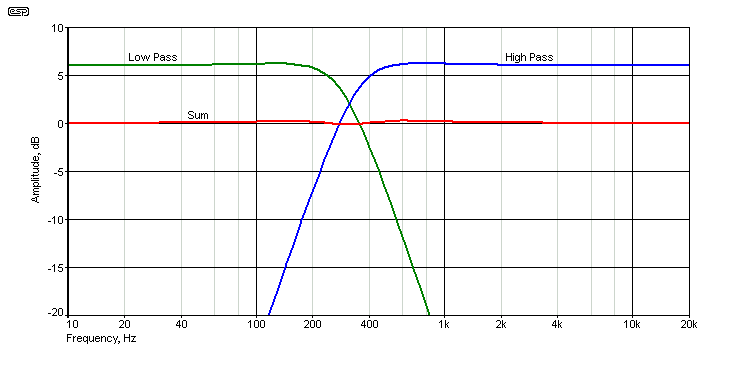
Figure 2 - Crossover Frequency Response
The response is shown above. The crossover frequency with the values given is (nominally) 312Hz, and the red trace shows the summed output (with an offset for clarity). The small deviation around the crossover frequency is caused by minor phase shifts created by the simplified filter networks. Even so, the summed response is within 0.23dB of being flat. No loudspeaker driver made can match that, so it's not worth worrying about.
Be careful when adjusting the level controls, since it is easy to create a mismatch in levels between the amplifiers. I suggest that the controls be mounted on the rear panel, with their shafts cut off really short, and a slot cut into the end with a hacksaw. Once the adjustment is made, it should not require further changes in use. Make sure that the power amplifier volume controls (if fitted) are turned fully up, and try to set the crossover controls so somewhere between midway and 75%. This ensures plenty of scope for getting the levels right, and will ensure that the preamp settings are not radically different from their 'pre-biamp' days.
 Main Index
Projects Index
Main Index
Projects Index