
|
|
| Elliott Sound Products | Amplitude Modulators |
 Main Index
Articles Index
Main Index
Articles Index
'AM' stands for amplitude modulation, the first system used for radio (aka 'wireless') broadcasts. While the AM band may be considered passé for most people, there is still an interest in AM reception, and in particular being able to simulate a waveform that's suitable for testing demodulator circuits. In amongst the articles on the ESP site, there's information in a submitted article for an 'infinite impedance' AM detector, which is capable of much lower distortion than the simple diode demodulator that's common in most receivers. See AM Radio for the details.
The difficulty is that most simulators don't have provision for amplitude modulation in the available signal sources, so it becomes necessary to synthesise a suitable waveform. Those simulator packages that do include AM capability generally require that the details are entered as a formula, which they may or may not include in the help files. There are several versions of amplitude modulators on the Net, but most are completely unsuited to running distortion tests, because the AM carrier has a significant distortion component.
This article shows how you can easily build a very simple modulator circuit, having close to zero distortion. This makes comparisons of the various detection techniques easy, because you have a good starting point. Amplitude modulation seems to be fairly straightforward at first, but the experimenter quickly learns that changing the amplitude of a signal without creating a great deal of distortion is actually very difficult. Voltage controlled amplifiers (VCAs) are a very specialised area, and obtaining good linearity is not an easy task. This limitation extends to the real world as well, so you have to be prepared for some pain if you want to build an AM transmitter circuit.
AM transmitters have used a variety of techniques over the years, but the early ones were both fairly simple and rather clever. This is especially true when one realises that commercial AM transmissions started in 1920, and prior to that there were only a few test transmissions and the idea of 'broadcasting' to a wide audience wasn't considered. The early designs were terribly inefficient, and needed an audio amplifier that could deliver half the power of the transmitter itself (often many kilowatts as broadcasting became popular). This was a major challenge in a time when valves were the only option, and were very primitive compared to what we take for granted today.
However, this article does not cover AM transmitters as such. If you want to know more about them, you will need to do some research of your own. The goal here is to describe methods that can be used to generate a signal in a simulator, so the reader can better investigate the various detectors that are used for AM demodulation.
Firstly, I do show a simplified transmitter, as well as a generalised circuit that seems to be the mainstay of most simulation attempts. Two signals are required for a modulator - the carrier waveform - typically 455kHz to match the common intermediate frequency (IF) of most superheterodyne AM receivers, and a signal source. The latter will usually be a 1kHz sinewave, but it can be any frequency (or waveform) you like, but of course it will always be within the normal AM bandwidth. This is usually only around 5kHz, but it can be up to 10kHz if you happen to think that frequencies above 5kHz might just make it through the IF stage of any commercial receiver.
In reality, most struggle to get much beyond 3kHz, but that's largely an issue with the receiver, not the transmitter technology. However, there are limits placed by the various regulatory bodies worldwide on how much bandwidth an AM transmitter can occupy, and that limits the maximum frequency that can be used for modulation. The frequency spacing between different broadcast transmissions is generally 9kHz, although 10kHz is common in some regions. Because there are two sidebands (one each side of the carrier) and these are directly related to the modulating frequency, the practical limit is around 4.5 to 5kHz. (The issue of sidebands is discussed below.)
While I will simply refer to the modulated signal as 'AM', its full title is DSBFC - Double Sideband Full Carrier. This is the standard modulation scheme used for AM broadcasting. If you are looking for information about SSB (single sideband) or DSBSC (double sideband suppressed carrier) or other modulation systems, this article won't help you much, but you might get a few ideas as a result. That's a hint, by the way  .
.
Before we try to develop a circuit that's suitable for testing in a simulator, it's useful to understand the basic principles involved. The first requirement is the carrier - the frequency used by the radio station to broadcast its programme material. Each broadcast station has a frequency allocated by the relevant authority, and this must be very accurately controlled. Governments usually charge a license fee for each frequency, and they are tightly controlled. Unauthorised use of any frequency is generally considered a serious offence, so I discourage anyone from setting up their own radio station for the fun of it. Most radio stations sell advertising to pay their costs (and hopefully turn a profit), but in some cases the government itself provides broadcast services (which may or may not involve propaganda, depending on the government).
Some older readers will remember the 'pirate' (unlawful in the eyes of the UK government) radio stations that operated from small ships off the coast of the UK in the 1960s. This was to challenge the British government monopoly over all broadcasts at the time. Commercial licenses have since become available, but at the time they didn't exist. Some (usually 'portable') pirate stations are still operating in the UK, but are uncommon in most other regions.
A real transmitter is a fairly complex piece of kit. Considering that typical AM broadcast stations operate at 10-50kW, they are actually quite fearsome beasts, not even considering the 'shock jocks' that blast the airwaves with their vitriol. Modern systems used advanced techniques to maximise efficiency at all levels, but more traditional modulators simply use a very large RF power amplifier, and modulated the DC supply to the RF output stage. A 10kW transmitter needs a 5kW audio amplifier, a significant challenge in the early days of electronics. A simplified version is shown below, and this provides an insight into the process.
The audio transformer used in the simulation is 1:1, and the RF transformer has 1+1:1 ratios - i.e. all three windings are the same. In reality, the low voltage from the transmitter would normally be stepped up to a higher voltage to allow more power to the antenna. This isn't done here for simplicity. The secondary of T2 forms a resonant circuit with C2, and is tuned to the transmitter frequency (1MHz). The antenna load is 50Ω, and the tuned circuit is designed for a Q of 10. A real transmitter will use more sophisticated filters and will also include antenna tuning.

Figure 1 - Simplified High Level Modulation AM Transmitter
The exciter (represented by V2 and an inverter) generates the RF carrier frequency, and in a real transmitter the exciter will be crystal locked and carefully monitored to ensure it remains at the designated frequency. In early systems it was generally a reasonable facsimile of a sinewave, but many systems now use switching (including Class-C, Class-D and Class-E), as well as multiple RF amplifiers that are switched in and out of circuit based on instantaneous demand. However, there will be extensive filtering of the modulated signal before it reaches the antenna to ensure that the carrier waveform is clean, with no significant harmonics other than the sidebands.
The modulated carrier is shown above as well, for 3 cycles of audio at 1kHz. The carrier is at such a high frequency that it looks like a solid block of colour, but it's a continuously varying signal at 1MHz. The next drawing should help ...
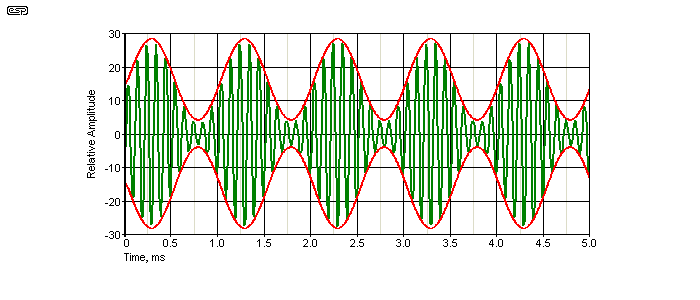
Figure 2 - Expanded View of Amplitude Modulation
In the above, you can see what the waveform looks like if the carrier frequency is reduced to 10kHz so the modulation can be seen clearly. This is not visible in any of the other drawings, because the simulations were all done using a 1MHz carrier. The 1kHz modulation envelope is clearly visible (shown in red), but of course it won't be smooth because the carrier frequency is much too low to be useful. Note carefully that the phase of the carrier remains constant, and this is an important factor with AM. Other modulation schemes can look superficially similar, but the carrier phase reverses as the modulation passes through zero.
The modulation system shown in Figure 1 is 'high-level', meaning that significant audio power is needed, and it works out that you need to provide 50% of the carrier power as an audio signal to achieve 100% modulation. However in reality, 100% negative modulation is never used because if exceeded (even momentarily) it creates interference (called 'splatter' - frequencies at odd multiples of the carrier for a push-pull transmitter). Negative over-modulation also distorts the audio waveform, so there will always be a 'safety factor' of around 10% to prevent the carrier from being reduced to zero. However, positive modulation may be up to 150% (sometimes more), and audio phase switching is often used to ensure that the highest peaks of normally asymmetrical audio signals are phased to ensure positive modulation. In my simulation, the audio power is 4.6W, because the carrier is not fully modulated. As shown, modulation is 71.4%.
To determine the modulation index (m, sometimes referred to as µ) you measure the minimum and maximum amplitude of the modulated waveform. Since the waveform shown in Figure 1 varies between a maximum of 120V p-p and a minimum of 20V p-p, the modulation index (m) is ...
m = ( Vmax - Vmin ) / ( Vmax + Vmin )
m = ( 120 - 20 ) / ( 120 + 20 ) = 0.714 = 71.4%
V1 is a 1kHz sinewave generator, with a voltage of 20V peak (14.4V RMS), with the 1:1 transformer secondary in series with the DC supply. The sinewave generator is replaced by an audio amplifier for high-level modulated transmitters. The voltage at the RF transformer's centre tap varies from 10V up to 50V in this case, which is the 30V supply modulated by ±20V. Power to the antenna is 17W. Could you build this and would it work? Yes, but there's a great deal missing and it's not something that I'd ever recommend.
Using high level modulation was the only viable option in the early days of radio (aka 'wireless'), because it wasn't easy to make a large amplifier to start with, but making it essentially distortion free (or 'linear') wasn't feasible at the time. The disadvantage is as discussed above - a 10kW transmitter needs a 5kW audio amplifier. The alternative is to modulate the carrier at a low level, then increase the power using a linear amplifier - one having very low distortion.
You may wonder why RF distortion is important in a radio transmitter, but if you recall from audio, distortion means you generate harmonics - frequencies that didn't exist before. If you have a transmitter at 1MHz that has distortion, then there will be harmonics at 2MHz, 3MHz, 4MHz and so on (plus the sidebands generated with amplitude modulation), and these cause problems for other radio stations and interfere with reception. This is especially important when you transmit at high power, because the distortion products will be at levels equal to (or possibly greater than) many legal low power transmitters that operate at affected frequencies.
To put the transmitter power levels into perspective, consider that for a transmitter output power of 10kW (carrier only), the voltage fed to the antenna (50Ω) is 707V RMS at a current of 14A. This is at the radio frequency used, which will be between 526.5 and 1,606.5 kHz in Australia, and similar for medium wave AM broadcasts elsewhere as well. If that sounds a bit scary, work out the voltage and current for 50kW (not at all uncommon for AM broadcasters). Of course there are smaller transmitters as well, but you get the idea.
Many modern transmitters use low-level modulation, and this is not covered in detail here. There are some important differences (especially with over-modulation - but it's still a no-no), and low level modulation usually involves the use of a multiplier, where the audio and carrier signals are fed into a linear multiplier IC, providing an amplitude modulated output. Analogue VCAs (voltage controlled amplifiers) are an example of simple multipliers. Linearity is important for both the RF and audio signals.
For the remainder of this article, we will concentrate on circuits that are suitable for simulations, so that detectors can be evaluated. For that we need very low distortion so the performance of the demodulator can be measured, with some degree of confidence that the measured distortion is purely from the detector, and not the modulation source.
The first method shown is based on that used in many of the simulations that you'll see on the Net, and it relies on a transistor to modulate the carrier with the audio waveform. There are simple and complex versions, but most miss out in one important area - there is no tuned circuit to produce a reasonably undistorted carrier wave. This makes any further processing much less accurate, because the result will never be a 'proper' double-sideband AM waveform. The greatest problem is waveform distortion, usually of both the carrier and the modulating waveform. In the drawing, the voltages shown for the two generators are peak values, so the 1MHz carrier is 7.07mV RMS, and the 1kHz modulating voltage is 3.54V RMS.
Despite appearances, this circuit would not work at all well as a modulator suitable for sending audio to an AM receiver. It's intended for use in a simulator. The basic idea could be adapted as a 'real' low-power transmitter, but given its high distortion and generally poor performance it's not worth wasting time on.
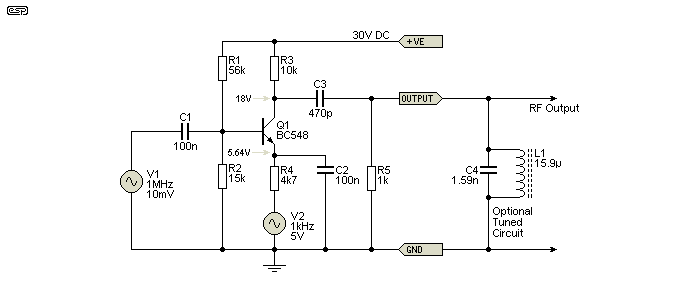
Figure 3 - Simple Transistor Modulator
There are countless versions of this circuit on the Net, but only one has been referenced below. Some are (slightly) more advanced, some are incomplete, and all show high distortion. It's certainly simple, but the results are not good enough to test a detector for linearity using a simulator. The voltages are shown so you can check your simulation, and you may need to change R1 to get the optimum collector voltage. Note that the upper modulation frequency is 338Hz (-3dB) set by R4 and C2.
There are also demonstration circuits that use a diode, but that technique only gives a passable AM waveform if a tuned circuit is included - a diode modulator is useless without it. The addition of a simple tuned circuit is easy enough, and the one shown above suits the 1k output resistance to give an acceptable filter Q. Diode modulators also suffer from high distortion of the audio signal, as well as carrier distortion. They are not good enough for a simulation to test demodulators.
The transistor circuit works because the gain of Q1 is changed as its emitter current changes, caused by the audio waveform appearing at the emitter. The amplitude of the carrier waveform is modulated by the transistor's non-linearity. However, the circuit - whether simulated or built with real parts - has poor distortion performance, so the audio and RF waveforms are both distorted. If one does a FFT (Fast Fourier Transform) of the waveform, there are countless harmonics, and it's not really a viable option if you need a nice clean AM waveform. It's obviously pointless trying to determine the distortion from a detector if the audio waveform is already distorted. The tuned circuit is optional, and is described below.
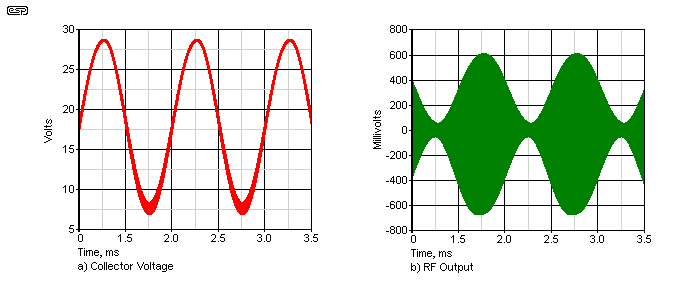
Figure 4 - Transistor Modulator Waveforms (No Tuned Circuit)
In the above, a) shows the waveform at the collector of Q1. The 1MHz RF carrier is at a low level, and only shows up as 'fuzz' on the audio signal, with the amplitude of the fuzz varying over the audio cycle. C3 and R5 are used to filter out the low frequency (audio) component so only the RF gets through to the output. The AM output is shown in b) and you can see that it is distorted - note that this is without the tuned circuit. The distortion is subtle, but the modulated waveform isn't as clean as it should be. In particular, note that the positive and negative peaks are offset slightly. In reality this doesn't matter, because only one sideband is normally detected, but it still demonstrates imperfect modulation.
The missing link is the tuned circuit (a bandpass filter), and when that's added the RF waveform is improved (the symmetry of the RF envelope is greatly improved), but it's still far from ideal. While the tuned circuit makes the RF waveform a lot cleaner, it doesn't help the audio component, so the distortion after detection won't be as low as you need to be able to accurately measure the results from the detector you are working with.
To include a tuned (resonant or 'tank') circuit, you add a capacitor and inductor, with values selected to suit the carrier frequency. For the example shown, we have a 1MHz carrier, and the circuit's output impedance is 1k (determined by R5, although it's really 909Ω for RF). The circuit will have an acceptable Q (quality factor) if the reactance of C4 and L1 is around 100Ω (a nominal Q of 10 with a 1k source impedance). Inductance and capacitance are calculated by ...
L = XL / ( 2π × fo )
C = 1 / (2π × fo × XC )
fo = 1 / ( 2π × √ L × C )
Where L is inductance, C is capacitance, XL is inductive reactance, XC is capacitive reactance, and fo is resonant frequency
The values of 1.59nF and 15.9µH are close enough to 1MHz (actually 1.00097MHz, but the small error is of no consequence). The spectrum of the waveform with the tuned circuit in place is shown below. For an ideal AM waveform, there should be sidebands at 999kHz and 1.001MHz (exactly 1kHz from the carrier), and the presence of the additional sidebands shows that the audio waveform is distorted.
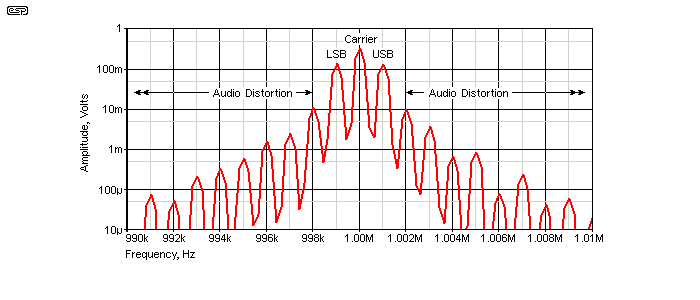
Figure 5 - Spectrum of Figure 3 Modulator With Tuned Circuit
As you can see, there are many sidebands, all at multiples of 1kHz. This shows us that the 1kHz waveform has second, third, fourth, fifth (etc.) harmonics, created by the AF waveform distortion. If you wish to evaluate a detector, this is clearly unacceptable. The upper and lower sideband (USB and LSB) should stand alone with the carrier. Everything beyond these is distortion of the audio signal. As you can see, the distortion components are significant out to the 4th harmonic (4kHz). Beyond that they are more than 60dB below the carrier so they're not a problem - for a 1kHz signal. At higher modulating frequencies the harmonics present more of an issue as the allowable AM channel bandwidth can easily be exceeded.
One way that a fairly good amplitude modulator can be simulated is by including a sub-circuit of a complete low distortion VCA (voltage controlled amplifier), but this is a serious undertaking. If there isn't a model for one already, you need to find the circuit for a commercial VCA chip or design one yourself, and build a complete model in your simulator package. If you are using a free version, you may find that the final circuit has too many parts and you can't run an analysis.
There are other methods used for simulations, some which work fairly well and others that are pretty much pointless, and it's obvious that this is not as easy as it first seems. There are variations on the transmitter circuit shown in Figure 1, and while this does work well, it's still not perfect. If the tuned circuit (aka 'tank' circuit in RF parlance) is omitted, the results are poor, and there will inevitably be some degree of audio distortion unless you build a complex and accurate model of a 'real' transmitter circuit.
In this respect, the circuit shown in Figure 1 is somewhat better (actually a lot better) than you might imagine, but it adds complexity to the simulation.
All modulators are imperfect, some more than others. Using a simulator, you may need to get as close to perfection as possible so detectors can be simulated to determine distortion characteristics (for example). The last thing you need is a modulator that creates so much distortion that the end result is impossible to determine. With this in mind, you can get a perfect amplitude modulated waveform. Any distortion measured is due to the detector, as you can be sure that the RF waveform is blameless.
Of course, actual AM transmitters are also imperfect, but no commercial operator will run a modulator that can't do better than 1% THD, with most (probably) being better. Getting useful information isn't always easy.
There is actually a small clue in the above description of the sidebands that might give you a clue as to how you can create a perfect modulated carrier waveform. An ideal AM spectrum shows the carrier, plus an upper and lower sideband, spaced at the audio frequency. So, if you use three voltage sources and simply sum their outputs, will this work? The short answer (and the only one we need worry about) is "yes".
In your simulation, add a signal source, with an amplitude of (say) 2V as shown, set for a sinewave output at 1MHz or other frequency of choice (such as 455kHz, the intermediate frequency of most typical AM receivers). If you need 1kHz modulation, add two more generators, each with a voltage of 800mV, with one set to 1kHz below the carrier (i.e. 999kHz) and the other set to 1kHz above the carrier (i.e. 1.001MHz). Sum the 3 generators using 1k resistors as shown. Add a resistor (R4) to allow you to change the overall level without having to modify the values of the 3 generators. This produces an AM waveform with 80% modulation, that is - or should be - perfect in every way (simulator dependent). If you only need 50% modulation, set the sideband generators for 500mV output. Any modulation depth can be produced, and any audio frequency can be synthesised by modifying the frequency spacings of the two sideband generators.
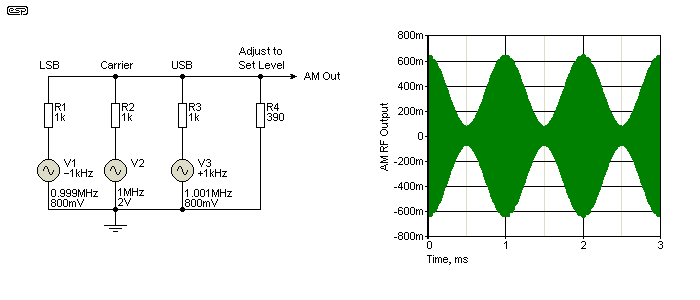
Figure 6 - 'Ideal' Amplitude Modulator And Output Waveform #1
Yes, it really is that simple. The voltages shown for the generators are all the peak value, so divide by 1.414 to get RMS. The three generators are all set for 0° phase - no phase shift on any of the three generators is required. You can get an audio sinewave (after detection) that is almost completely distortion free ... for an ideal detector). You can now test any detector that takes your fancy, and can be confident that there is zero distortion from your RF source, so any measured distortion is due to the detector you are experimenting with. This takes the guesswork out of simulations, and is a very easy way to generate AM. As shown above, the RF level is 285mV RMS with R4 set to 390Ω.
This arrangement should work with any version of Spice, regardless of the type or price. It requires no 'special' techniques, just the three generators and mixing resistors. While some versions of Spice allow you to create various types of modulation, this generally requires that you provide the 'generator' with a suitable formula, and there's no guarantee that the version you use will allow you to insert the formula.
No FFT is included for this modulator, simply because it's rather boring. All that's present (apart from a few simulation artifacts at around 98dB below the carrier) is the carrier, lower sideband and upper sideband, at the exact levels that were used for the three generators. The degree of 'perfection' of the waveform is entirely up to the simulator you use though, and while there are essentially zero distortion components, that doesn't necessarily mean that the simulator you use will provide a perfect audio outcome. This depends on the simulator's resolution and how it's set up.

| When you set up a simulation for RF + AF processing, if possible you need to set the maximum 'time-step' to a very small value. For a 1MHz carrier, you need a minimum of 50 to 100 samples for each cycle to get a good result. I suggest a maximum time-step of 10 to 20ns. This makes the simulation rather slow, and in many cases you may prefer to use a lower modulation frequency so the simulation doesn't take too long to complete. This limitation isn't specific to the 'perfect' modulator though - it applies for all simulations that involve RF and audio. |
Note that this process is almost identical to using an ideal multiplier (as used for low-level modulation), and negative over-modulation does not cause the carrier to disappear. Instead, it reverses phase and produces a small 'bump' where the carrier would otherwise be reduced to zero. However, it still distorts the audio waveform, so the relative levels of the carrier and sidebands have to be adjusted to ensure that the modulation index never exceeds unity (100% modulation).
The second way you can create a perfect modulator is to use the simulator's 'Arbitrary Source'. That's what it's called in SIMetrix, but other simulators will have something similar that you can use. When it's defined, you only need to specify that the output is derived from 'Input1' multiplied by 'Input 2'. I don't know the specific name or syntax for other simulators, but for SIMetrix it's ...
V ( In1 ) × V ( In2 ) Note: The spaces are added for clarity - the formula may not work in some simulators if the spaces are included.
This creates two inputs called 'in1' and 'in2', with 'V' specifying that the inputs are voltages. The output is the product of the two inputs, i.e. the two input voltages multiplied together. The bias voltage is essential, as that sets the carrier level. In the case shown, with only the 2V bias and 2V peak carrier wave present (unmodulated carrier) the peak amplitude is 4V (2V DC multiplied by 2V peak carrier wave).
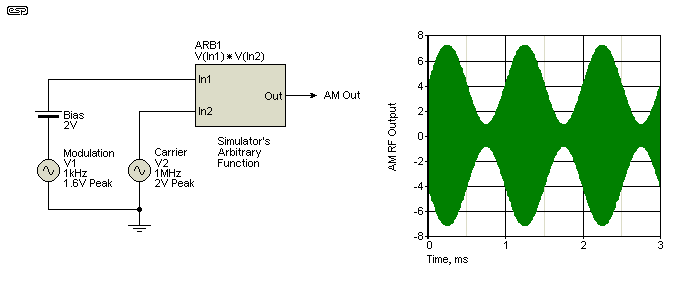
Figure 7 - 'Ideal' Amplitude Modulator And Output Waveform #2
Despite your expectations (and mine I must admit), the waveform is not as pure as that from 'Ideal #1', but it is substantially better than anything you'll get trying to use simple circuitry such as the schemes shown in Figures 1 and 3. The imperfections are simulation artifacts, and (probably) caused by sampling. At more than 90dB below the carrier level, it's quite safe to ignore any artifacts you may see in the output.
It's a great deal easier to experiment with different frequencies or waveforms with this arrangement because the modulating waveform is simply a signal source. There's no need to mess around with sidebands and levels. The peak output level is exactly as specified by the formula, so is 3.6 × 2 = 7.2 volts. (3.6 is the sum of the 2V Bias signal and the peak Modulation amplitude of 1.6 volts.) The minimum peak (maximum negative modulation) is 800mV.
It is important that the modulating waveform never exceeds the bias voltage, as this will cause over-modulation. However, this is not the same as you get with a real AM transmitter, so is not usable to simulate 'splatter' - the wide bandwidth signals created by an over driven AM transmitter. The multiplier is what's known as a '4-quadrant' type, and can produce negative output voltages, which a transmitter cannot. If the modulation signal is kept below 1.8V peak (1.27V RMS) with the values shown, modulation is very close to ideal (i.e. 'perfect').
There are several ways you can change the output level. One is to use a simulated potentiometer (pot), or the output can be scaled within the formula for the arbitrary function. For example, if you use the following ...
( V ( In1 ) × V ( In2 ) ) / 10
The output is simply the product of the two inputs, but divided by 10. This will give a peak output level of 720mV. For most RF simulations the voltage will usually be fairly low, and it's easier to scale it in the arbitrary function than messing around with the generator levels, although a voltage divider can also be used if preferred. As with most functions in a simulator, input impedance of the arbitrary function generator is infinite, and output impedance is zero.
If you wanted to build an amplitude modulator, you can use one of the methods shown earlier, but it's a great deal simpler to use a dedicated IC that does most of the hard work. The MC1496 is a balanced modulator/ demodulator, and the IC has been around almost forever (ok, that may be a small exaggeration ). These are available in DIP and SOIC (through-hole and SMD respectively) packages, and are usually under AU$2.00 each from most major suppliers. A suitable modulator is shown below, adapted from the MC1496 datasheet. C3 and C4 will ideally be multilayer ceramic capacitors for good RF performance, and the incoming supplies should also be bypassed with 10-100µF electrolytic caps (not shown).

Figure 8 - MC1496 Amplitude Modulator
The circuit shown is pretty much 'as-is' from the datasheet, and it would need to be optimised to ensure that input levels are within the range you need. There are several application circuits in the datasheet, including one that uses a single 12V supply which may be more convenient. Since the IC is well known and has been in production for many years, you'll be able to find any number of suitable complete circuits that allow you to build a low power AM transmitter that can be used for your own local broadcast. Be aware that in most countries this will be illegal unless the output power is limited to a few milliwatts at most.
The levels of both RF (carrier) and AF (audio modulation) must be well within the maxima that the IC can handle, or the output will be distorted. Note that the modulation input has a very low input impedance, set by R6, and is 51Ω as shown. An input resistor will generally be necessary to reduce the signal level to a few millivolts at most - an initial value of around 1k is suggested. This will provide 100mV at the IC with an input voltage of around 2.5V RMS. The RF level needs to be around 300mV RMS (according to the datasheet). The output level will be very small without additional amplification - expect no more than around 500µV peak between +Out and -Out.
The AF and RF levels need to be set carefully, using an oscilloscope and (ideally) a frequency analyser. The latter is a fairly serious piece of kit, but the FFT function of a digital oscilloscope will probably be sufficient for basic tests. The output is monitored using an AM radio. You'll probably need to include a (very) small 'power amplifier' to feed the aerial, which should include a broadly tuned circuit if you need to tune the carrier frequency, or a high Q filter for a fixed frequency.
Selection of a suitable carrier frequency depends on how crowded the AM band is in your area. You need to find a frequency that's not in use, and ideally that's separated by at least 18kHz from adjacent AM broadcasts. Since few AM radios have much response beyond 5kHz, you may find it useful to limit the top end of the audio input. Anything beyond 9kHz is usually wasted.

Figure 8A - Discrete Amplitude Modulator
A discrete modulator is shown above. This uses a Gilbert cell, which is the basis for analogue multipliers, including the MC1496 shown above. The tuned circuit is designed for a frequency of 1MHz, and with the paralleled 1k resistor, it has a Q of 10. L1 and C3 both have a reactance of 100Ω at 1MHz. It's to be expected that a discrete modulator probably won't be quite as good as a dedicated modulator IC, but (at least in a simulation) it works well.
The main reason to use a simulator to generate an AM waveform is so that one can experiment with detectors (demodulators). It's therefore worthwhile to briefly examine 'detection' - the recovery of the original audio modulating frequency. You will almost certainly have a preferred circuit or have something you want to experiment with, but we can start with a simple example. There are many different types of AM detector, including the 'infinite impedance' detector described in the article High Fidelity AM Reception. For this exercise, only a simple diode detector will be covered.
This type of detector was one of the very first ever used to detect RF, and although there were other, earlier, detectors they weren't linear and were often insensitive. By selecting a point on the surface of a natural semiconductor (commonly a galena (lead sulphide) crystal), it was possible to listen to AM through headphones. Finding the optimum point on the crystal was done using what was known as a 'cat's whisker' - a fine piece of wire in a special holder that allowed the listener to find a point on the crystal surface that gave the best signal. This was known as a 'crystal set', and they work just fine to this very day with some care. 'Crystals' were followed by the valve (vacuum tube) diode, then germanium diodes, and now Schottky diodes. If you can get them, germanium diodes are still a good choice.
The circuit below shows a simple Schottky detector, with 800mV of forward bias applied to improve linearity. The tuned circuit and antenna shown are for the sake of completeness, but would not normally be included in a simulation. Note that C2 is essential if the source (your modulator) is DC coupled. If you leave out C2, the diode detector won't have any forward bias, and that increases distortion dramatically. The anode of D1 must have a DC return path or it won't work at all.
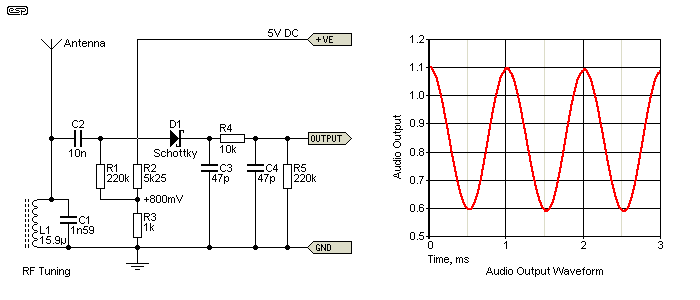
Figure 9 - Diode Based AM Detector/ Demodulator
All diode detectors have a well known problem, namely the distortion caused by the diode conduction voltage. For conventional small signal silicon diodes, this is 650mV, and around 200mV or less for germanium. Schottky diodes vary from 150mV to 450mV, depending on their intended purpose. At low RF signal levels, the diode may not conduct at all so (almost) nothing will be heard at the output. This can be overcome (at least to an extent) by applying forward bias to cancel the diode's forward voltage. This is shown in the above circuit. It's generally difficult to achieve less than 1% distortion with most common demodulator circuits.
When tested using the output of the ideal modulator (Figure 6) at an RF signal level of 285mV RMS and 80% modulation, the distortion from the circuit shown is 1.6% at a level of 180mV RMS. The diode is a Schottky type, and the bias voltage is 800mV. Not all of the distortion is due to the diode though, as some of the RF carrier is still present. As you can see, there is also a DC voltage, with the average value being proportional to the amplitude of the RF. There is also a fixed offset due to the diode bias voltage.
With any diode detector, the time constant (C3 + C4 and R5 in the above drawing) is important. If there's too much capacitance or the resistance is too high, the cap will be unable to discharge quickly enough to follow the AC (modulation) waveform, leading to greatly increased distortion on the negative-going parts of the audio waveform. There's plenty of info available on this topic, and it's not part of the analysis here. For the record, the values shown will provide reasonable filtering, with acceptably low distortion up to 5kHz.
In most radio receivers, the average DC level is used to activate the circuit's AGC (automatic gain control). This is designed to keep the intermediate frequency amplitude reasonably constant at the detector's input as different stations are tuned in, so that the audio level remains fairly steady. Without AGC, the audio level is entirely dependent on the strength of the received signal. The DC must be removed from the audio signal before being passed to the audio amplifier stage, and this is done simply with a coupling capacitor.
An ideal detector will perfectly half-wave rectify the RF envelope, so that the audio waveform is preserved intact. It makes no difference whether the positive or negative half cycles are demodulated, since the same audio information is present in both. The RF component is then removed with a low pass filter, leaving only the audio and a DC level that depends on the RF amplitude. The DC is easily removed with a capacitor, leaving only the audio, which will hopefully be an exact replica of the signal used to modulate the transmitter. While the concept is simple in theory, it is very difficult to achieve in practice, and there are many different solutions (including applying forward bias as shown above).
There are many different types of AM detector, so if you wish to know more a web search will provide endless hours of reading.
The method described here to obtain a 'perfect' AM waveform seems to be virtually unknown. I saw one oblique reference to the method (that told students to "think about it"), but the details were not provided in the text (and I can't find it again, or it would be included in the references). Once you do think about it, it's quite obvious and will almost certainly invoke cries of "why didn't I think of that" from quite a few people who read this. When I saw the brief reference mentioned above, that was certainly my reaction .
The multiplier idea came from messing around with the details for another project. I doubt that SIMetrix is the only simulator to offer an arbitrary function that can be 'user defined', and it's a little puzzling that no mention of this method was found during my original research. Since writing this article and searching a little more specifically, I did come across a few forum posts and some academic work that suggested the use of a simulator's 'special' functions, but found no specific information.
Overall, this is an interesting exercise, even if you're not remotely interested in the rubbish that one normally hears on AM radio. I certainly learned a great deal as I was preparing the article and running simulations so the waveforms could be demonstrated. It's a long time since I did anything serious with AM, and looking at some of the offerings on the Net is rather depressing. In many cases, the student will learn bugger-all about AM, other than running pre-arranged or pre-configured simulations, or delving deep into a mathematical minefield.
This isn't to say that the maths aren't potentially useful, or that messing with analogue multiplier simulations isn't interesting. Both are valuable, but not if all you want to do is test ideas for AM demodulation. If this is the case, you need something that's as close to perfect as you can get so that demodulator flaws are exposed. Having something that will work in almost any simulation package is especially useful, because different versions have differing capabilities and may not allow you to do what you need easily - if at all.
One thing that is important is to understand that simulators have limitations, and some may be incapable of resolving the end result without adding artifacts that are essentially the result of simulator resolution. While it's possible in many simulators to specify the maximum 'time step' (and therefore the resolution), this can make simulations run very slowly. For example, to properly resolve a 1MHz waveform, the 'sampling rate' or maximum time step has to be no more than a few nanoseconds, and that means the simulation will be very slow. Naturally, this also applies for simulations using other techniques.
You can also use this technique to produce double sideband suppressed carrier AM (simply reduce the carrier level to some suitably small voltage). SSB (single sideband) waveforms can be created by reducing the amplitude of one sideband and the carrier to suitably low voltages (typically they will be around 5-10% of the main sideband voltage). Unfortunately, there does not appear to be an equivalently simple method to produce FM (frequency modulation), but many simulators include that facility for 'advanced' signal sources.
Please note that two of the references provided here show a sub-optimal technique as shown in 'Method 1', but this is not intended to denigrate the authors in any way. The circuits are reproduced on many other sites, and the original source is unknown. While many circuits you will find may not be ideal, the authors are still providing an invaluable service by showing beginners (and others) ways to accomplish something that is not as easy as it seems at first.
Main Index
Articles Index