
|
|
| Elliott Sound Products | AN-014 |
 Main Index
App. Notes Index
Main Index
App. Notes IndexPrecision rectifiers have been discussed in AN001, and here is another common circuit is used to detect the peak of an AC waveform. If the peak detection is to function on both positive and negative half cycles (and they can be very different), a precision rectifier is used in front of the peak detector. This is usually necessary when the signal is asymmetrical, something which is very common with audio signals. The circuits shown here all work on the positive peak only.
Peak detectors come in many different types, from very simple to rather complex. It all depends on the application, and how long the peak value needs to be retained. In some cases, it's just a matter of using a resistor (or current sink) to discharge the capacitor that holds the peak value, but in some cases the value has to be retained for a significant period with very low droop (slow capacitor discharge), and a separate discharge circuit is then necessary. This can be an electronic switch or a manual push-button, depending on the application.
The question that is most likely to be asked is "why?". It is a good question, because most electronics enthusiasts may never have a need for a peak detector, or have already used one without realising they've done so. Peak detectors are often used to capture transient events that may otherwise remain undetected, but can cause circuit malfunctions. They are also common in audio processing systems, in particular audio peak limiter circuits.
They can also be used to capture the instantaneous voltage peaks from a power amp, and may be used for analysis ("is my amp powerful enough?") or to activate a clipping indicator. They can be used in power engineering (e.g. mains powered circuits) to monitor the worst-case inrush current of a power supply, or to see if mains voltage transients exceed a given threshold.
So, while many readers will never need one, others will see an immediate application for a peak detector. The purpose of this application note is to provide some info so that the optimum circuit can be determined for any given requirement. Like other ESP app. notes, this is not intended as a project article. The circuits will work as intended, but changes will be needed to ensure that the circuit suits your needs.
While there are many circuits on the Net that claim to be peak detectors, many (if not most) are primitive, and cannot be considered to be precision circuits in any way. That's fine for non-critical applications, but it's not useful if you actually need a circuit that has predictable performance and an output that accurately represents the peaks of the input waveform.
There are many things that need to be considered when building circuits that hold a voltage for more than a few milliseconds. Where things like PCB surface leakage and/ or capacitor leakage are rarely an issue with audio, they become critical when a voltage is stored in a capacitor. High values generally can't be used because they require too much energy to charge, and the characteristics of high value caps are largely inconsistent with the requirements of peak detectors or sample-and-hold circuits, which are similar in many respects.
In cases where the peak value needs to be retained for even a couple of seconds, extreme care is needed to minimise the capacitor discharge. Even the surface resistance of a printed circuit board is enough to discharge a capacitor given enough time. For example, the time constant of a 100nF capacitor and 1 GΩ (1,000 Megohms) is 100 seconds, or 1.67 minutes. At this time, the voltage has fallen to 0.632 (63.2%) of the original value stored. This combination is only suitable for a hold-up time of around 4 seconds for 2% accuracy. If you use a 10nF cap, these times are reduced to 10 seconds and 400ms respectively.
We also need to be careful about the type of capacitor used to store the peak voltage. Dielectric absorption (aka 'soakage') isn't an issue with an audio circuit (despite what you may see elsewhere), but it's critical in peak detectors, sample & hold circuits and anywhere else that an accurate and consistent voltage has to be retained. Polyester caps are suitable in this role for non-critical applications, but polypropylene is the cheapest affordable alternative to otherwise very expensive/ exotic dielectrics. There's more information about this property of capacitors in the Capacitors article on this site. Dielectric absorption manifests itself as a voltage 'rebound' after the capacitor is discharged, which can mask low level signals making their detection either unreliable or useless.
| Type of Capacitor | Dielectric Absorption |
| Air and vacuum capacitors | Not measurable |
| Class-1 ceramic capacitors, NP0 | 0.6% |
| Class-2 ceramic capacitors, X7R | 2.5% |
| Polystyrene film capacitors (PS) | 0.02% * |
| Polytetrafluoroethylene film capacitors (PTFE/ Teflon) | 0.02% * |
| Polypropylene film capacitors (PP) | 0.05 to 0.1% |
| Polyester film capacitors (PET) | 0.2 to 0.5% |
| Polyphenylene sulfide film capacitors (PPS) | 0.05 to 0.1% |
| Polyethylene naphthalate film capacitors (PEN) | 1.0 to 1.2% |
| Tantalum electrolytic capacitors (solid electrolyte) | 2 to 3% |
| Aluminium electrolytic capacitors (fluid electrolyte) | 10 to 15% |
Some common types of capacitor are tabled above [ 1 ]. Those indicated with * are unverified, as little information could be located. Once upon a time, you could buy polystyrene caps in high values (100nF or more), but sadly they are no longer made other than as a special order for very exacting requirements. Polystyrene has very low temperature tolerance and they are much larger than other types for the same value. Low value (up to 10nF) polystyrene caps are still available. PTFE (Teflon) is also supposed to be good, but I could find little information.
The capacitor value is important. If it's around 10nF, it's easy to charge quickly even from opamps with low output current, but hold-up time is limited due to leakage resistance. A 100nF cap requires 10 times the energy to charge to the same voltage, so the current may be limited by the opamp if a very fast transient is to be captured, as the opamp may current-limit and not be able to charge the cap to the peak value in a high speed circuit. For a long hold-up time, C1 should be polypropylene, as that has a higher dielectric resistance than Mylar (polyester/ PET).
A diode is the basis for all peak detectors, but if used alone the forward voltage means that any signal below 0.7V can't be monitored. An 'active diode' (using an opamp) as used in precision rectifiers solves this problem, but there are many other considerations. It may seem appropriate to use Schottky diodes to reduce the forward voltage, but these have comparatively high leakage and are unsuitable, although 'low leakage' Schottky diodes may be ok for circuits where droop of the stored voltage isn't an issue. The venerable 1N4148 has a rated reverse leakage current of 25nA at 20V, an equivalent resistance of only 800 MΩ. While that may sound like a high resistance, remember that 100nF and 1 GΩ has a time constant of 100 seconds, but the voltage will fall from 5V to 4.9V (2%) in just over 4 seconds.
That means that the total impedance needs to be a great deal higher than 1 GΩ if the value needs to be stored for more than 5 seconds or so. The voltage across the storage capacitor can't be measured with a multimeter, because even a digital meter with 10 MΩ impedance will discharge the cap in a few milliseconds. With a 10 Meg load, a 100nF cap discharges from 5V to 4.9V in just over 20ms. An opamp needs to be used as a buffer to enable the stored peak voltage to be measured or processed. FET input opamps are necessary in anything but the most rudimentary circuits. In the following schematic, the signal source must be a low impedance, because it has to charge C1 directly via D1.

Figure 1 - Simple Diode Detector
The simple detector is probably just fine if the voltages are fairly high, where the diode conduction error is small compared to the voltage being sampled. However, the voltage must not exceed the input range of the opamp, so that usually means a maximum of around 12V (assuming ±15V supplies). Unfortunately, this is rarely an option other than for very simple circuits where accuracy is not a major concern.
The opamp must be a FET or MOSFET (CMOS) input type, so input current doesn't discharge (or charge !) the storage capacitor. All opamps with BJT (bipolar junction transistors) inputs are unsuitable as a buffer. The venerable TL071 has a claimed input impedance of 1 TΩ (1012 ohms), far higher than any bipolar transistor opamp. CMOS opamps such as the TLC277 offer the same, and it will be difficult to improve on this without using specialised (and expensive) parts. Impedances at this level require highly specialised PCB layout to minimise stray leakage which may be far greater than the opamp's inputs.
The circuit is reset by pressing the button. This can also be done using an electronic switch, but the leakage resistance of that needs to be considered too. A CMOS switch (such as the 4066) would be alright for most circuits, but they do have a limited voltage range and the on resistance is fairly high, so the reset would need to be activated for several milliseconds to ensure a full discharge of C1. The leakage current of the 4066 is claimed to be 0.1nA at 10V (typical), representing a resistance of around 100 GΩ. In this (and many other) peak detection circuits, the limitation is the diode. The BAS45A suggested is a far better alternative than the common 1N4148, having an effective reverse resistance of 75 GΩ at 125V.

| Note: Most glass diodes will show increased leakage if they are illuminated, so a lightproof cover may be necessary to ensure the leakage is
maintained at its claimed figure. This is not something you normally have to worry about, but it becomes critical in high impedance circuits. The effect is not widely
known for normal small signal diodes, so feel free to be a little surprised. 
|
I ran some tests on a 1N4148 diode with a reverse voltage of 10V. At low light levels (below 10 lux) the resistance was 10 GΩ, and at my normal bench light level (1,200 lux) this fell to 2.5 GΩ. When the light level was increased to 18,000 lux, resistance fell to 670 MΩ. By way of comparison, autumn direct sunlight (in Australia) measured over 80,000 lux at 2pm on the day I ran the tests. Philips/ NXP rate the BAS45A leakage current at light levels of 100 lux or less.
You can use a typical 10 MΩ digital multimeter to measure very high resistances easily. Place the meter in series with the DUT (device under test), and apply a suitable voltage (say 10V). The meter may show 1V, so the current through the device is calculated using Ohm's law. 1V across 10 MΩ is 100nA, so the resistance of the external device can be determined using Ohm's law again. If the supply voltage was 10V, there must be 9V across the DUT, with a current of 100nA. Therefore, the resistance of the DUT is 90 MΩ.
An active diode uses an opamp to effectively remove the diode offset. However, unless care is taken, the circuit has an undesirable characteristic, in that the opamp used will swing to the negative supply rail when the input voltage is lower than the stored voltage on the capacitor. This has two undesirable effects. Firstly, it means that the opamp must swing for a minimum of half the total supply voltage before it can do anything (such as recharge the holding capacitor), and this seriously limits the high frequency response.
Secondly, it means that the diode has a much higher than necessary reverse voltage, which increases the leakage current. It might not be very much, but we are generally looking for the lowest leakage possible so the hold-up time can be extended. High leakage anywhere means that hold-up time is reduced dramatically. In many cases, it's necessary to use a smaller capacitor than might be imagined, especially if very fast transients need to be captured. The following circuit assumes ±15V supplies.
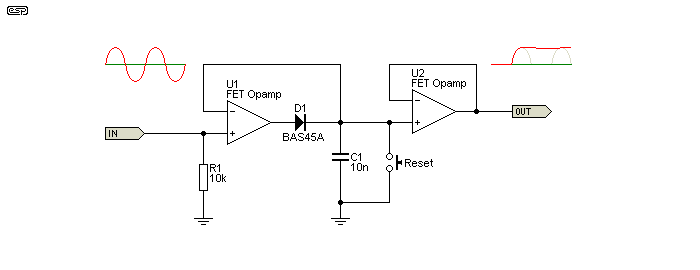
Figure 2 - Active Diode Detector
The active diode circuit shown uses the diode inside the opamp's feedback loop to effectively remove the 0.7V offset that happens with the simple version shown above. This is a common circuit, and it works well enough in practice if long hold-up time and high speed are not essential. In some cases it will be advisable to include a resistor in series with C1 to limit overshoot that can occur if the input signal is too fast for the opamp. This means the opamp operates open loop (without any feedback) until the output can 'catch up' with the input. This can be a very real problem with measurement circuits where inputs may be a great deal faster than any audio signal.
There are still some minor issues with the circuit, with the main ones being the limited capacitor charge current and the fact that speed is restricted because the output of U1 swings close to the negative supply rail when the input voltage is negative. The opamp's slew rate means that it takes time for the output to swing from -13V or so up to the peak voltage, plus diode voltage drops. The opamp operates open-loop until the output voltage is the same as the instantaneous (positive) value of the input.
This version includes all the necessary extras to improve speed and minimise diode reverse current. The cap is charged directly from the opamp's output. This can supply enough current unless the input signal is particularly fast. In most cases, this would be the most appropriate version of a peak detector for audio frequency signals, and when the hold-up time doesn't need to be more than a couple of seconds. U1 does not need to be a FET input type because its input is not connected to the storage cap.
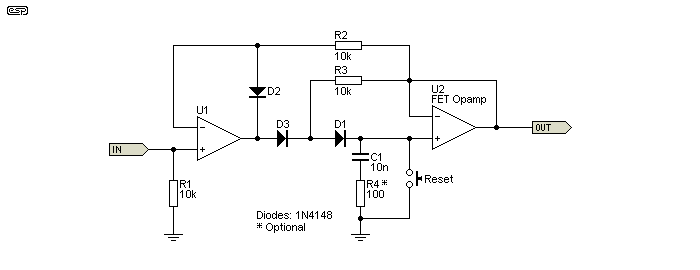
Figure 3 - Improved Active Diode Peak Detector
The additional diode (D2) ensures that the opamp's output cannot swing below the negative input voltage (plus the diode voltage drop), which improves the speed of the detector and minimises the voltage across the peak detection diode (D1). This helps reduce reverse leakage current, but it is not a real cure. The final piece of the circuit is R3 and D3, which bootstrap the detection diode. During the hold period, the same voltage exists on both ends of the D1. Under that condition, there can be no leakage through the diode and a 1N4148 will work perfectly even with several seconds of hold-up.
The values of R2 and R3 aren't entirely arbitrary. The 10k shown work well in the simulations, but in a real-life circuit it may be necessary to adjust them for best accuracy. The effects are fairly subtle, so (for example) increasing R2 to 100k means the output will be ever so slightly greater than the input peak, and 10k means it's a similar amount lower. 10k is a fairly generalised value (and a nice round number ), but 47k proved 'perfect' (at least as simulated), but the differences are a fraction of 1% and will be extremely hard to measure. The value of R3 makes little difference, but for convenience 10k was chosen.
Note that because the two opamps are within a feedback loop (via R2), the probability of transient overshoot must be considered if the input signal has a very fast risetime. If this is expected, you may use a resistor (R4) in series with C1. The value will need to be selected to allow you to capture the pulses expected, but minimise overshoot. The combination shown (10nF and 100 ohms) allows a pulse of 5µs or more to be captured accurately (better than 1%), but this is dependent on the opamps used and must be optimised to suit your needs. If U2 can provide the current, R2 can be reduced in value to improve speed (less than 2.2k is probably ill advised). Expecting extreme accuracy with high frequencies is unrealistic unless very fast opamps are used.
The idealised case for the output waveform is shown next. The circuit's reaction is fast enough to ensure that the voltage reaches the peak value on the first cycle. Direct drive from the opamp's output is only usable at relatively low frequencies (typically below 10kHz sinewave or a pulse wave with slower than a 15µs risetime). A high-current. high-speed charge circuit is shown in Figure 5 if a large storage cap is required, or where very high speed peak detection is necessary. An opamp with a fast slew rate will be required for U1 to allow high speed operation.
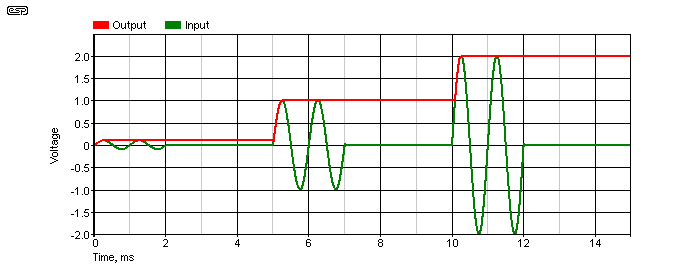
Figure 4 - Peak Detection Waveform
There are 3 bursts of a 1kHz sinewave signal, each lasting 2ms (2 cycles), and with each having a gap of 3ms before the next input burst. Negative values are not processed. Inputs are at 100mV, 1V and 2V peak. You would not expect the stored voltage to change during the gap (no signal), but a simulation shows that there is a very small drop in voltage over the period where there is no signal. It's only about 30µV from a 1V input, and that can be ignored. Naturally, if the charge is stored for longer the voltage will fall further.
Based on the simulation, which includes diode and opamp leakage, but not capacitor, PCB or switch leakages, a 2V peak stored by a 10nF cap will fall by less than 10mV over a 2 second period. With careful design this should be realised in practice. That is an overall accuracy of just under 0.5% for a 2 second holding time. A larger capacitor (e.g. 100nF) can be used to improve this.
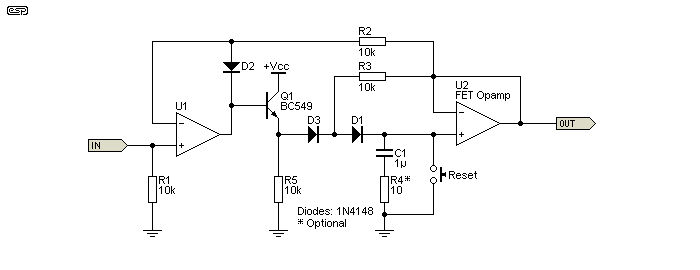
Figure 5 - High Current Peak Detector
There may be occasions where you need to provide a high capacitor charging current. This will be the case if you are attempting to catch very fast transients, of if the storage cap has to be much larger than normal to obtain a long hold-up time. Adding the transistor allows the peak current into C1 to be far greater than most opamps can provide. The diode (D3) is required, because without it the transistor's base-emitter junction may be forced into reverse breakdown.
The transistor is not necessary in most cases, even with relatively large values for C1. However, the circuit will be restricted to low frequency operation only, with a typical upper limit of around 1-10kHz sinewave, depending on capacitor size. The output waveform doesn't change with or without the transistor, but R4 needs to be chosen carefully to ensure minimum overshoot. You should normally expect around 1% or better accuracy, but that means that optimal component selection is needed, and lots of testing to verify performance.
Note that the connection point of C1, D1, U2+In and the reset switch should either have a PCB guard ring connected to U2Out, or be joined in mid-air to minimise surface leakage. There is information in the LF13741 BiFET Opamp data sheet [ 3 ] on how to add a guard ring if you don't know what that is or how to go about it.
It's not every day that you will need a peak detector that can retain the peak voltage captured for an extended period. In most cases, the Figure 1 circuit may be all that's necessary, and although it has a 700mV offset, that often doesn't matter. The other circuits all have better performance, and the version shown in Figure 3 is sufficient for the vast majority of precision applications. In all cases, you will need to verify that the circuit performs appropriately for your needs, and a precision rectifier may be needed in front of the peak detector for asymmetrical (or unknown) waveforms.
Where FET input opamps are required, the TL071 is recommended for most low speed applications, as it's difficult to beat without spending a great deal more for a precision part. You need to be aware that all opamps have some input DC offset, and for high precision it will be necessary to use opamps that provide an offset null facility. For example, this is available in the TL071, but not the TL072. The datasheet for your chosen opamp will provide the details of how to connect the offset null. In most cases, opamps with offset null facilities are single types, although some 14 pin dual opamps also provide the connections.
In all the examples shown, the 'attack' time (the time needed to charge C1) is close to instantaneous (opamp permitting), but this is not always desirable. Where a slower attack time is needed, the resistor (R4) in series with C1 as shown in Figures 3 and 5 can be increased in value to slow the charge rate. For very fast risetime input signals, R4 is essential to minimise overshoot that may cause the stored value to exceed the actual peak value by 5-10% or more. The resistor value needs to be selected based on your specific requirements, and you can use a pot (or trimpot) to adjust it for the optimum attack time. Overshoot is caused by the finite speed of the opamps, which are in a feedback loop.
No discharge resistor has been shown, because these circuits are true peak detectors with an intentionally long hold-up time. Where a defined voltage decay is needed, a resistor is placed in lieu of (or in parallel with) the 'Reset' button. The value depends on your application. The time constant can be worked out for both attack and decay using the standard formula ...
t = R × C Where t is time in seconds, R is resistance in ohms, and C is capacitance in farads
Remember that 1 'time constant' means that the voltage has risen to 63.2% of the maximum, or fallen to 36.8% of the peak. To make it easier to work out, use resistance in megohms and capacitance in microfarads. This gives you the answer in seconds. For example, 1 MΩ and 220nF (0.22µF) has a time constant of 220ms. In some cases, the resistor value needed may be extremely large (10 MΩ up to 1 GΩ or more). If this is the case, it is usually better to increase the value of C1 so a lower resistor value can be used.
As with all the Application Notes on the ESP site, this is intended to provide you with the basics, alert you to potential problems, and give you a starting point for further research. These are not construction projects, so opamp types (and pin numbers) are not shown, and nor are power supplies or supply bypass caps. The latter are essential in any real circuit, and the value depends on the demands made of the electronics.
Main Index
App. Notes Index