
|
|
| Elliott Sound Products | AN-012 |
 Main Index
App. Notes Index
Main Index
App. Notes IndexThere are countless reasons to measure an AC voltage, and the type of measurement used can be critical in many cases. With few exceptions, the AC component of the waveform will have any DC removed by means of a capacitor, and the voltage is then rectified. For most measurement systems, this will be done using one of the full wave precision rectifier circuits described in AN-001. This part of the process is critical, and the type of circuit used is determined by the required accuracy, signal frequency and the level.
Even the very best precision rectifier will give poor results if the signal level is too low, so a preamp is often needed. High frequencies (above 1MHz) create additional problems, and these will not be covered here. I will concentrate on systems that work at normal audio frequencies, which includes mains frequencies (50 and 60Hz). The range covered can often be very limited - especially when a system is designed specifically for mains and other frequencies below around 1kHz or so.
When the signal is to be digitised, there are two options. The signal can be and fed directly to an ADC (analogue to digital converter) without rectification, and all calculations are done digitally. The incoming signal has to be level-shifted (typically so that zero is represented by 2.50V DC), and the digital sampling frequency has to be an absolute minimum of double the highest frequency of interest. For example, frequencies up to 20kHz require a minimum sampling frequency of 40kHz, and as we know, a common standard is 44.1kHz as used for CD quality audio.
The second option is to remain within the analogue domain, and the signal can be displayed by a moving coil meter movement, or digitised using a low frequency ADC as used in most multimeters. In some cases, the rectified AC is not used to drive any form of metering, but may be used to provide automatic gain control (AGC), compression, limiting or other functions in an audio processing system.
The circuits described below assume the second option. The incoming AC will have any DC component removed with a coupling capacitor, and will be rectified with a precision rectifier. The pulsating DC output from the rectifier is then processed to obtain the desired type of measurement - peak, RMS or average. The output can vary widely depending on which method is used, and some of the results can be surprising.
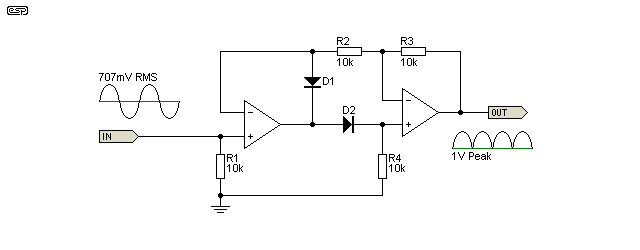
Figure 1 - Precision Full-Wave Rectifier
For the sake of consistency, I will assume the rectifier shown above. This is taken from AN-001 Figure 6, and was chosen because it's a simple circuit that works well. Any of the other circuits can be used, but for peak detection, they all require a half wave rectifier after the main rectifier because the cap has to be charged via a circuit that doesn't discharge it again.
In some cases you can get away with highly simplified circuits, but it all depends on the application and the degree of accuracy you expect. In a few cases (such as audio processing), accuracy is not needed, and non-linear behaviour can be an advantage rather than a limitation.
It's important to understand that all methods of measurement can introduce errors, and that there is no one detection technique that's suitable for all waveforms. Errors and limitations are discussed in further detail in the conclusions at the end of this article.
Obtaining the peak value of the waveform is pretty easy if extreme precision isn't needed, and is one of the most common - especially for audio processing circuits. For example, an audio peak limiter should, by definition, apply limiting based on the peak value of the waveform. Most compressor/ limiters work on this basis, but some may also use the average value, and a small number use RMS converters to derive the control voltage.
This article is not about audio compressors or limiters though, so if you want more on that topic you'll have to look through the various ESP projects (see the ESP Project List and search for 'limiter'). There are many other circuits on the Net of course, and you will see a great many variations.
In many cases, when an AC voltage is rectified, the peak voltage may be used because it's the fastest measurement method. If the input signal is a sinewave, the meter can be calibrated for RMS if desired. Under these conditions, the meter is simply calibrated so that when the input is 1V DC, the meter is set to display exactly 707mV. This is based on the square root of 2 (√2) which is 1.414 (and 0.707 - its reciprocal). Most readers will be aware that the peak value of a 1V sinewave is 1.414V, but may not be aware of the limitations of this measurement method.
All that's needed in some cases is a capacitor, but that depends on the precision rectifier circuit used. The majority of full-wave rectifiers need an output diode (ok if precision isn't necessary) or a precision half wave rectifier as shown below. The added diode/ half wave rectifier is needed so the cap is not discharged back through the rectifier's output opamp. A highly simplified version is shown in Figure 2, and this could be used for a peak limiter circuit for example. It's not useful for accurate measurements though. If R4 is not included, some means to discharge C1 is necessary, otherwise it will retain the voltage indefinitely, but subject to drift due to diode and capacitor leakage.
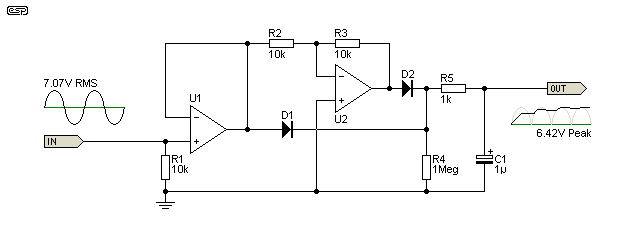
Figure 2 - Simplified Peak Reading Detector
The most basic half-wave peak detector uses nothing more than a diode, a pair of resistors and a capacitor. A full-wave version of this is shown above, but because the diodes are not within a feedback loop it suffers from high non-linearity because of the forward voltage of the diodes. This arrangement is suitable if you don't need absolute accuracy, or if the range of voltages to be measured is limited. For example, if you only need to detect a voltage of between 5V and 10V (peak), the error introduced by the diode is minimal and easily compensated, but for a precision circuit that's not good enough. The circuit is full wave because there is a direct and inverted driver for the diodes.
The two resistors (R4 & R5) determine how quickly the capacitor charges (R5) and discharges (R4). They are wired as shown so they don't create a voltage divider as would be the case if R4 was directly in parallel with the storage/ smoothing cap (C1). The charge (attack) time is determined by the ratio of the values of R5 and C1. If R5 is 1k and C1 is 1µF, the charge time (with DC, and to 63.2% of maximum, aka time constant) is 1ms, and the full voltage (within 1%) will be available in around 5ms. The decay time is determined by the ratio of C1, and R4 plus R5 in series. It's close enough to 1 second with the values shown. With an AC input it depends on the frequency.
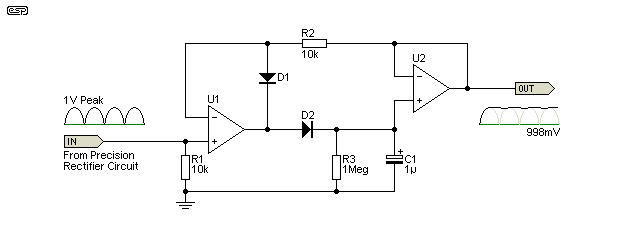
Figure 3 - Precision Peak Reading Detector
When a true precision peak detector is used, the cap will always charge almost instantaneously, because it's within the feedback loop of an opamp. This isn't always convenient, especially for audio processing where the attack and decay times need to be programmable. For measurements, it provides the fastest possible reading, with a stable voltage available within as little as a single cycle, but more typically within couple of cycles of the input waveform.
For a variety of reasons (based on simple reality and physics), the voltage across C1 may be a little lower than expected. It will typically be around 0.4% low with a 100mV input, but the error increases as the level is reduced, and vice versa. If there is any overshoot of the input signal, the voltage across C1 will be higher than expected. Careful layout is essential if you want an accurate circuit.
Peak reading is not common in metering circuits other than Peak Programme Meters (PPMs), where their use is essential (by definition). Peak detection - usually non-precision - is far more common with audio processing systems. If you use peak detection as described here for conventional metering (RMS calibrated), the 'RMS' reading is only accurate when the input is a sinewave. Serious errors will be apparent for other waveforms.
When you need to monitor the amplitude of the highest peaks of a signal (usually audio, but not always), you also need to decide on the decay time. If it's too short, you won't have time to see the peaks (and an analogue movement's pointer can't move fast enough). If the decay time is too long, you won't be able to see other (smaller) peaks until the pointer has fallen to the level of the new peaks. The ballistics of professional PPMs depend upon the standard(s) used - there are several different versions.
With most measurement systems, it's more common to use the average reading than the peak. This happens 'automatically' if a moving coil meter movement is used following a precision rectifier, because the pointer deflection depends on the average current. As with a peak measurement, the RMS value for a sinewave is obtained simply by scaling the rectified voltage, and in this case a meter would be adjusted to read 707mV with an input of 637mV. The average value of a sinewave is determined by ...
2 × V(peak) / π = 0.6366 (0.637) for a 1V peak sinewave (707mV RMS)
It is important to understand that the average value of a sinewave (as described above) can only be used after rectification. If the signal isn't rectified, the average is zero! This is because the positive and negative voltages are exactly equal, so they cancel. For speech or music signals, there can be a wide variance between the RMS and average values after rectification, but most analogue meters use averaging because true RMS measurement was difficult to achieve until comparatively recently.

Figure 4 - Precision Average Reading Detector
Although Figure 4 shows both input and output buffers, they may not be needed depending on the application. The time constant of R2 and C1 needs to be selected to give a reasonable averaging time, depending on the input frequency. Unless very low frequencies need to be measured, the values shown will usually work well. The time constant is 1 second, so an accurate voltage cannot be obtained for around 5 seconds.
The output from Figure 4 can be used to drive a moving coil meter (even though the meter movement would have performed the averaging by itself), or can be digitised for display on an LCD or LED screen. Most cheap digital multimeters use this type of circuit to obtain the reading for AC signals, and the meter is calibrated for RMS. All that's needed is to provide a small amount of gain, so the meter reads 707mV when the DC output from the averaging filter is 637mV (or any multiple or sub-multiple of these voltages).
The 'RMS' reading is only accurate when the input is a sinewave. The error can be significant, as described in the next section.
However, the vast majority of multimeters (analogue and digital) use the average reading, RMS calibrated method. To avoid the inevitable errors with non-sinusoidal waveforms you have to use a 'true RMS' meter. If you only measure sinewaves (or reasonable facsimiles thereof), the errors are not significant and an average reading meter will be perfectly alright for your needs.
Early 'true RMS' meters were extraordinarily expensive, and they used a variety of means to get the RMS value of the input waveform. One popular method used a thermocouple, measuring the temperature of a sensing element, which was in turn driven by a suitable amplifier. The RMS value of a waveform is defined as that AC voltage (of any waveshape) that provides exactly the same power (heating effect) as an equal DC voltage. So, it you were to measure the temperature rise of a resistor fed with 10V DC and 10V RMS AC, it would be the same for both. It wouldn't matter if the AC was a sinewave, squarewave, or a complex waveform such as an audio signal - provided the signal was steady while the measurement was taken.
Up until the advent of the first ICs that could perform the conversion, very few workshops had access to a true RMS voltmeter because of the cost, and even the early IC based versions were far more expensive than the 'average-reading, RMS calibrated' versions. These are still the most common, and all meters should be assumed to use average reading unless they are specifically stated to be true RMS.
Before we go any further though, it's important to understand exactly what 'RMS' means. It's an abbreviation of 'root mean squared', where we take voltage samples, square them, obtain the mean (average) value of the squares (the sum of values divided by the number of samples), and finally take the square root of the mean, giving us the RMS value. Let's look at a cycle of a sinewave to see how this works ...
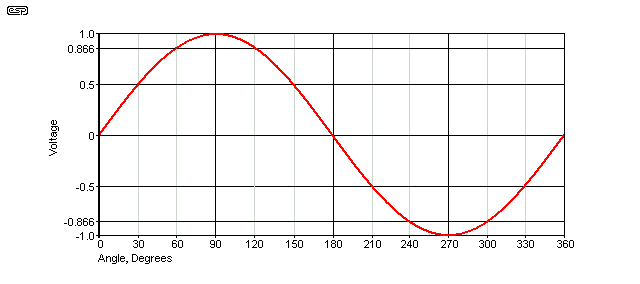
Figure 5 - Sinewave, Measured At 30° Intervals
The sinewave can be measured at as many points as you like, with four points being the minimum (0, 90, 180, 270 degrees), but 30° intervals were used for this example as it makes the process easier to understand. With other wave shapes you need enough data points to get an accurate representation of the instantaneous voltages at each point of the waveform. From these measured voltages (which can easily be calculated for a sinewave, triangle or rectangular ('square') waveform) you can then calculate the true RMS voltage for the sinewave.
Mathematically, the voltage is simply the sine of the phase angle multiplied by the peak voltage. Sin(30) is 0.5, sin(60) is 0.866 etc. Note that 360° is not included in the calculation, because that marks the start of the next AC cycle, and not the end of the current cycle. In the table below, a peak voltage of 1V is used (0.707V RMS).
It is usually impossible to calculate the voltages at relevant points of a complex waveform, so it could be printed on graph paper and measured, or digitally sampled and calculations made based on the value of each sample. This is the technique used for fully digital measurement systems. I doubt that many people will want to use graph paper these days, but it certainly works if you have the patience.
| Measurement # | Degrees | Voltage | Square |
| 1 | 0 | 0 | 0 |
| 2 | 30 | 0.5 | 0.25 |
| 3 | 60 | 0.866 | 0.75 |
| 4 | 90 | 1 | 1 |
| 5 | 120 | 0.866 | 0.75 |
| 6 | 150 | 0.5 | 0.25 |
| 7 | 180 | 0 | 0 |
| 8 | 210 | 0.5 | 0.25 |
| 9 | 240 | 0.866 | 0.75 |
| 10 | 270 | 1 | 1 |
| 11 | 300 | 0.866 | 0.75 |
| 12 | 330 | 0.5 | 0.25 |
| Sum | 6.0 | ||
| Average, aka Mean ( sum / 12 ) | 0.50 | ||
| Square Root of Mean | 0.707 | ||
Now that you know the exact way an RMS value is calculated, it's obvious that an IC version has to perform similar functions. The next question might be "why?". People have used average reading meters that are calibrated to show 'RMS' for years, so why bother with true RMS converters. It's all about accuracy, and errors introduced by the averaging process. The following table list the error with different waveforms - as you can see, they can be extreme in some cases.
| Waveform - 1 V Peak | Crest Factor VPEAK / VRMS | True RMS | Avg/ RMS meter¹ | Error (%) |
| Undistorted Sine Wave | 1.414 | 0.707 | 0.707 | 0 |
| Symmetrical Square Wave | 1.00 | 1.00 | 1.11 | +11.0 |
| Undistorted Triangle Wave | 1.73 | 0.577 | 0.555 | -3.8 |
| Gaussian Noise - 98% of Peaks <1V | 3 | 0.333 | 0.295 | -11.4 |
| Rectangular | 2 | 0.5 | 0.278 | -44 |
| Pulse Train | 10 | 0.1 | 0.011 | -89 |
| SCR Waveform - 50% Duty Cycle | 2 | 0.495 | 0.354 | -28 |
| SCR Waveform - 25% Duty Cycle | 4.7 | 0.212 | 0.150 | -30 |
When measuring AC voltages and currents, we tend to assume that they are RMS, and make power calculations accordingly. Average power (commonly - and incorrectly - referred to as 'RMS power') is simply the product of RMS voltage and RMS current, but if the waveform is not sinusoidal, the error can mean that the answer we get may be way off the mark. Measuring the signal level of music or speech is no different - a high crest factor (Vpeak / VRMS) will always give an answer that is well below reality. It is the crest factor of waveforms other than sinewaves that causes the problems, and very high crest factors will even cause problems with many RMS converter ICs. Crest factors up to 5 are usually ok with common RMS converter ICs, but higher than that can cause an internal overload and the measurement may still have a significant error.
The AD737 is pretty much a complete system on a chip. The only thing you need to add is a resistor and a few capacitors, and the data sheet has many examples and other info to help you to create a working RMS to DC converter. C2 (the averaging capacitor, Cavg) and C3 (the output filtering cap) should be low leakage types.

Figure 6 - True RMS To DC Converter
The drawing above is simplified, and shows only the basics. Note that the output is inverted, so a 1V peak 707mV RMS) input will give an output of -707mV. The output is also a high impedance and should not be loaded by the external circuit, so ideally the output would be connected to an output buffer as shown in Project 140. The project circuit also includes provision for a gain trim and DC offset adjustment, both of which will be necessary if you need to measure low voltages (less than 10mV RMS). Although Figure 6 shows an input of 1V peak, the AD737 input should ideally be limited to around 200mV RMS, or internal overload is likely with some waveforms.
The values of C2 and C3 are a compromise, and C2 (Cavg) in particular determines the settling time. With a low input voltage of (say) 1mV), the circuit will take roughly 30 seconds to stabilise, falling to about 150ms with a 200mV input. If a smaller value is used for Cavg, the settling time is reduced, but the low frequency error increases with higher crest factors. The values shown (100µF for each) were determined after much experimentation with the IC, and give good results overall.
The three main measurement techniques are shown here, and which one is best for the task depends on your application. For accurate power measurements, true RMS is almost always the preferred measurement, but if you only work with sinewaves then an average reading meter (RMS calibrated) will be fine. For measuring complex waveforms such as speech, music, total harmonic distortion (THD) and the like, you really need true RMS (although most distortion meters are average responding, unfortunately).
For audio processing (compressors, limiters, etc.), peak detection is the most common, although some compressors include an average responding circuit as well. Sometimes it may be claimed that it's 'RMS', but that is rarely the case in practice. It's also unlikely that there will be any audible difference, so the extra cost of an RMS converter is usually not warranted. This is especially true since compression and limiting are so often used to make everything the same level, so it sounds flat and lifeless. 
Peak reading meters are not uncommon in recording and broadcast studios, and many people will know about the so-called PPM (Peak Programme Meter) that is used to indicate the absolute peak reading of the speech/ music signal. This is particularly important with digital recordings, because they have a 'hard' limit - commonly referred to as 0dBfs (full scale) - the absolute maximum input level to an analogue to digital converter (ADC) before it clips. Unlike analogue tape (for example), there is no 'soft clip' behaviour, so the PPM is used to indicate the waveform peaks. The PPM is also common in broadcast studios, because the maximum modulation depth (AM) or deviation (FM) allowed must never be exceeded. A full discussion of PP Metering is outside the scope of this article, but there is plenty of info on the Net for those who want to know more.
Fully digital systems such as audio test sets and other measurement systems (oscilloscopes in particular), the peak, average and RMS values are generally calculated, based on making a calculation on each sample, and providing an accurate result with even very difficult waveforms. My digital oscilloscope can be relied upon to give an accurate RMS value with very high crest factors (greater than 20 in some cases), where a true RMS meter using analogue processing (perhaps an AD737) will give the wrong answer because crest factors above 5 can cause internal overload.
The purpose of this application note is to demonstrate the various different measurement types, so you can choose the one that is most likely to satisfy your needs. While true RMS for everything may initially seem like a good idea, it's not always the best choice. Cost is one potential issue, but settling time (especially for low-level signals) may mean that the only sensible choice is to use averaging. Then there are the times when you must know the peak value, and a peak detector is the only thing that will display the voltage peaks.
Main Index
App. Notes Index