
|
|
| Elliott Sound Products | Project 49 |
Vibrato is used to obtain a variation in pitch (as opposed to tremolo, which varies the amplitude). This unit was inspired by the Vox AC-30 guitar amp, but the resemblance stops there. I was originally going to emulate the valve circuit using opamps, but I since saw a 'new' Vox circuit where they had done just that (except transistors were used). I was not impressed - especially after doing a few tests, so decided to do it more or less conventionally, but have added a new feature which gives more scope for different sounds.
Well, when I say 'new' feature, this is pushing the limits a bit, because 'phasers' have had the same facility since the beginning of guitar effects pedals. The difference is that this is adjustable, and is applied to a unit with only two phase shift networks. So it can act as a limited phaser, but the effect is good - it is a simple variation on what various makers of phasers have been doing all along, except it is adjustable. I can't recall having seen this done before - although it is so simple I don't know why.
The circuit of the unit is fairly simple, but is a bit irksome to set up. The reason is that obtaining matched FETs is not easy, so I had to make sure that the circuit would work with off-the-shelf FETs. Figure 1 shows the circuit for the vibrato system, and consists of an input buffer and two phase shift (all pass filter) networks. I suggest that the reader looks at the article Designing With JFETs, as that may be useful.
The phase shifter is a standard opamp circuit, and has been used for this sort of application many times. After experimenting with alternative variable resistors, I decided that the FET was still the best choice, although they are fairly critical to set up, and have linearity problems. Most vibrato circuits use only one stage, but the effect is not as good (especially at low rates), and the EFFECT control is completely useless with a single stage.
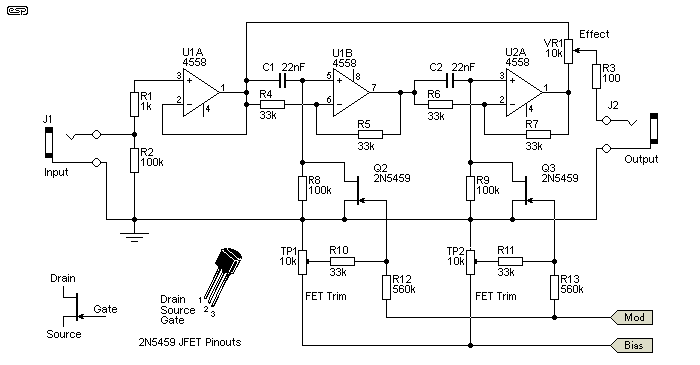
The circuit is conventional, except for the EFFECT control. With this, you can select the clean signal direct from the buffer stage, the fully phase (and hence frequency) modulated signal from the output of U2A, or a mixture of the two. With the pot centred, there is a loss of bass, but a very strong vibrato effect with an interesting tonal change. The 100 Ohms resistor prevents the opamps from oscillating with long guitar leads.
The FETs are used as a variable resistance, and although they introduce some 2nd harmonic distortion, are fine for guitar, and the distortion will be audible only with very high output pickups. Even then, it is minor, and probably less than that introduced by a valve guitar amp. Figure 2 shows the modulator oscillator, which is a conventional opamp feedback circuit. The modulation signal is taken from the capacitor, and is nominally a rounded triangle wave. This is buffered by Q1 to prevent loading of the oscillator. Closing the switch disables the oscillator, and stops the vibrato effect - any tonal variation obtained by the EFFECT control remains. To eliminate this effect, a complete bypass is required - see Figure 4 for an example.
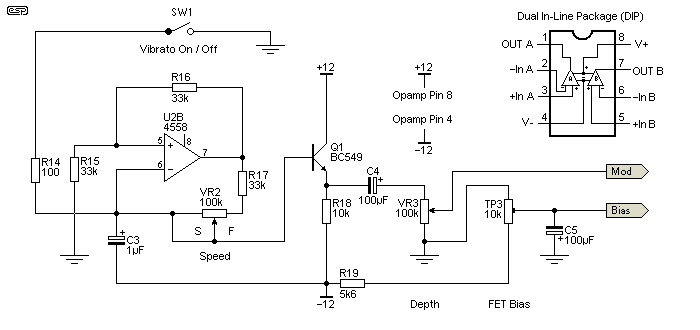
The switch SW1 is used to disable the oscillator. If connected remotely, this must be wired with a shielded lead to prevent extraneous noise disturbing the oscillator circuit. The SPEED control changes the rate from about 3Hz (S) to 13Hz (F). This can be extended, but below 3Hz the effect is not very great, and above 13Hz it becomes a bit silly - by 40Hz, it sounds like a ring-modulator, and generates sum and difference frequencies in the audio range. Although these sound interesting, they are harmonically unrelated (depending on the note played), and are discordant - sometimes revoltingly so! Reduce the value of R17 to 10k if you want to be able to use this effect, which will give a maximum frequency of about 45Hz (the minimum is increased to around 3.5Hz).
The DEPTH control determines the amount of modulation (frequency shift), and is variable from zero to the maximum allowed by the FET gate divider circuits. At the maximum, you will probably find that the vibrato effect becomes a little 'disjointed' - you will either like the effect or not.
If you wanted to make a 'real' phaser (no, not a ray gun  ) then just add another 4 phase shift networks. You should use an opamp instead of Q1 to buffer the oscillator, because the loading will become a bit much with 6 bias networks to feed.
Although the opamps I have specified are basic, they are adequate for the job, and are used in countless guitar pedals and amplifiers. If you want to, substitute TL072 or OPA2134 FET input opamps. The latter are quieter and a far better opamp, but will give a marginal improvement (if any) to sound quality. If lowest noise is an issue, then I suggest that the OPA2134 be used. There are quieter and better opamps, but I shall leave this to the reader to decide. Personally, I wouldn't bother. Most dual opamps use the same pinouts, so the circuit is unchanged.
When building the circuit, make sure that there are no signal leads anywhere near the output of U2B, R15, R16, or R17. The signal here is a square wave, and will make clicking noises in the audio signal. Better (faster) opamps will make this much worse.
If we could get hold of FETs that were matched for gate voltage, setup would be simple, but we can't. TP3 (trimpot 3) is used to set the operating range for both FETs, and TP1 and TP2 set the individual operating point for each. The setup is as follows -
You might want to repeat steps 6 to 9 a couple of times to make sure that the bias point is as good as you can get it. Note that the trimpots are fairly savage, and must be adjusted very slowly, or you might not get the correct operating point. This is unavoidable, since the FETs have a wide variation, with the applied bias ranging typically from -2.8V to about -3.3V, but there could be even wider parameter spread depending on the devices you obtain, and I had to make provision for these.
To ensure that the operating points do not shift, (if you use single turn pots, which are cheap), seal them with clear nail varnish or similar - but NOT on the track surface! The supply also needs to be regulated, but typically a simple zener regulator is sufficient. Figure 3 shows a suitable power supply, and uses a 16V plug-pack type transformer - this give the necessary voltage, and ensures electrical safety.

The power supply circuit can be mounted inside the main case, which is most easily a floor mounted unit, but the entire vibrato unit can be installed in the amplifier chassis if space (and front panel space!) permits. In this case, use the existing preamp supply - as long as it is regulated.
D1 and D2 should be 1N4004 or similar, the zeners must be rated at 1W. C6 and C7 need to be 35V caps, but C8 and C9 can be 16V or 25V units. R20 and R21 can be 1/2W, but 1W components would be preferred. You can use 3-terminal regulators if you want to, but it is not necessary.
In some instances, you might want to bypass the vibrato completely. Depending on the setting of the EFFECT control, there may be some change in tone that are undesirable. Figure 4 shows how this can be done, with a SPDT switch. A complete bypass (removing all circuitry from the signal path) is less desirable, because of changes in the impedance presented to the guitar when the vibrato in or out of circuit.
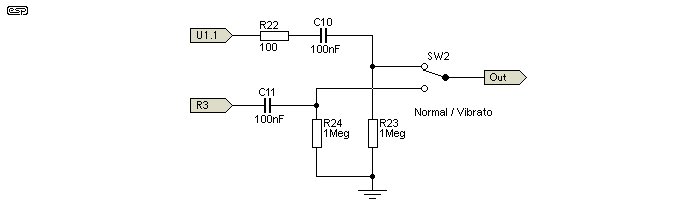
The extra capacitors and resistors are to prevent clicks as the unit is switched in and out of circuit. You might be able to get away without them, but for a few cents, it's not worth it. The point marked U1.1 goes to pin 1 of U1, R3 is disconnected from the jack, and connected to the point marked R3, and the output goes to the jack. The switch is shown in the 'Normal' position.
 Main Index
Projects Index Main Index
Projects Index
|