
|
|
| Elliott Sound Products | Project 182 |
Generating good quality noise has always been a problem. Most test sets that provide a noise stimulus use what's called a 'maximum length sequence' (MLS), also known as a 'pseudo-random binary sequence' (PRBS), or linear feedback shift register (LFSR). This type of noise source uses a (digital) shift register, with feedback that causes the output sequence to change in an apparently random manner. It's actually not random at all, and the sequence will always repeat after a period determined by the length of the shift register.
The algorithms are rooted in complex mathematics, common enough for cryptographers, crypto-analysts and others who love polynomials and similar high level maths functions, but somewhat mysterious to more common folk (including many electronics engineers). By feeding selected shift register outputs back to the input via one or more 'exclusive OR' (XOR) gates, if the right connections are used the result is the somewhat mysterious 'maximum length sequence'. Pseudo-random number generators are common in computing, where they are used for anything from determining the outcome of a game to generating secure passwords. Where a predictable outcome is needed, the shift register is loaded with a 'seed' value (which may be derived from your password or the current date and time).
It goes without saying that I'm not about to launch into a detailed description of the binary sequence, and nor will I attempt to explain the maths. For anyone interested, there are countless resources that do explain the maths behind the MLS, with some even providing a complete binary sequence (for relatively short shift registers) that should keep you entertained for several minutes  . For those unfamiliar with the shift register, it's a type of digital counter, except that the data 'bit' presented to the input is passed sequentially from one 'register' to the next with each clock pulse. An XOR (exclusive OR) gate produces a 'one' at its output, but only if the two inputs are different. If they are both 'high' or both 'low', the output is low (zero).
There are many different arrangements used, and most behave in a similar (but definitely not identical) manner. Feedback can be taken from 2, 4 or more different shift register outputs, and is invariably provided by one or more XOR gates. The shift register is driven by a clock generator (oscillator) which determines the upper frequency limit and the length of time before the sequence repeats.
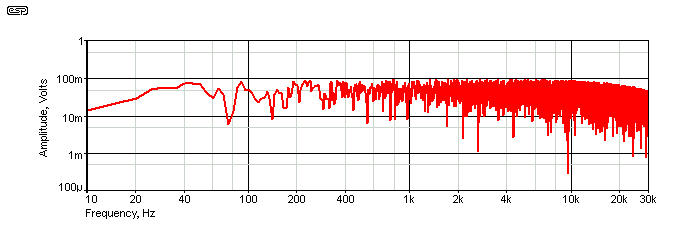
Figure 1 - 23-Bit PRBS Generator Output Spectrum
The output spectrum (plotted from the simulator) is shown above. You can see that there is a very slight rolloff above 10kHz, but that is unlikely to cause a problem in use. Measuring noise levels isn't easy with so much variation, but the simulator tells me that it's around 0.85dB down at 20kHz. The noise 'signature' is decidedly 'white' (equal level across the frequency range), but to be useful it needs to be converted to pink, therefore having equal energy in each octave. Pink noise is the preferred stimulus for most tests that involve broadband noise. Two pink noise filters are described in Project 11, which shows an analogue white noise generator based on a reverse biased base-emitter junction. While the pure analogue source can work very well, it's not predictable and is low amplitude. The digital pseudo-random sequence is 100% predictable, and gives a high level output (around 2V RMS).
Of course, the same functionality can be done fairly easily using a small microcontroller. However, since it has to be programmed to implement the shift register and XOR functions, you need a programmer for the micro you use, or you have to use a µ-controller for which you already have a programmer. The primary disadvantage of this approach is that unless you work out the program yourself, nothing is really learned. For example, if you could simply buy a pre-programmed µ-controller, then you learn exactly nothing new. The benefit of the 'hardware' approach is that you will learn something, and you can even experiment to see (and hear!) the effect of changing the shift register taps.
Another alternative is to record noise, having generated suitable pseudo-random noise using Audacity or similar audio processing software. This is far less convenient than having a dedicated noise source, and isn't helped because you introduce another level of uncertainty - the output stage of the player you use. The noise also won't extend beyond 20kHz unless you encode it at 96kHz, placing further limitations on the playback system you can use. While this is certainly a valid way to generate noise, it's usually not very workshop friendly. Having said that, Audacity does do a fine job of generating a noise signal (either white or pink), so it's certainly a viable option for anyone who doesn't want to play with the hardware. Since the ESP website is all about building things, you know my opinion on this already.
For a DIY version, a 16-bit sequence is (possibly) acceptable for taking measurements. With a periodic length of 65,535 clock cycles (2^16 - 1) and a clock frequency of (say) 65kHz, the pattern will be repeated roughly once per second. While a slower clock extends the cycle time, it also reduces the high frequency energy so the result does not have an acceptably flat spectrum. From tests I've run, it's necessary to ensure that the clock is at least 3 times the highest frequency of interest. For 20kHz, this means 60kHz is required. Unfortunately (due to the laws of mathematics in this case), a 16-bit version becomes over-complicated, and a 15-bit system is easier to build.
Many years ago, National Semiconductor produced the MM5837 - an 8-pin PMOS IC that was a complete digital noise source. It featured reasonably good bandwidth, and no external parts were needed. These ICs are now obsolete (many years ago), but are still available on ebay (of course). It depends on how brave (or lucky) you feel as to whether or not this is a good place to buy them. Some claim to be 'original', but there's no way to verify that. The IC used a 17-bit shift register, so has a sequence length of 131,071 (2^17 -1). Being PMOS, it used a negative supply (VDD shown as negative on the datasheet), but almost everyone solved this by installing it 'upside-down' so it could use a positive supply voltage, connected to what would normally be the ground pin. It could use a supply voltage up to 25V, but the IC worked fine at lower voltages.
The repeating sequence of the MM5837 is audible. I know from personal experience that the IC's sequence is easily detected by ear, and you need a much longer shift register to ensure that the listener cannot detect the cyclic nature of the sound. The application I used the IC for (many years ago) was for a noise source to block out external sounds, intended to help people get to sleep, or stay asleep with outside noises (similar to distant waves breaking on a beach). The noise output was heavily filtered to remove most of the high frequency sounds (which aren't particularly pleasant). However, the IC was never considered to be a 'good' noise source, and better alternatives are easy enough to build.
With a handful of cheap parts you can build your own. 15-bit is (just) sufficient, as the repetition is of no account for test equipment. However, the recommended design uses 23 bits, with taps at the Q18 and Q23 outputs (18 and 23 bits). Most modern test sets (speaker and/ or audio analysers) use a pseudo random sequence to generate noise. While there is a project for a noise generator (see Project 11 - Pink Noise Generator), this uses a reverse biased transistor junction to generate 'true' random white noise, followed by a 3dB/ octave filter to provide 'pink' noise. The same filter can be used with an MLS signal too, but it has a much higher amplitude and requires minimal amplification.
Unfortunately, many of the original 4000-series CMOS ICs are now out of production. The 4006 was an 18-bit shift register which would be ideal for a 17-bit version, but they are now obsolete. As with the MM5837, they are available on ebay, but the same caveats apply here as well. The recommended 4094 is an 8-stage shift register with tri-state outputs, but all 'fancy' features are disabled by pulling pin 1 (strobe) and pin 15 (output enable) high permanently.
The feedback arrangement is important. With an XOR gate, the 'all zeros' state must never exist, because it will stop all output - only zeros will be propagated through the shift register, providing an output of ... zero. If an inverter is used to produce an XNOR (exclusive NOR) gate, then the 'all ones' state is forbidden. It's possible to add some more logic to 'pre-load' the shift register, or a simple start-up circuit can be included to ensure that the shift register does not start with all registers at 'one' or 'zero'. In most cases, this is achieved with a simple RC (resistor-capacitor) circuit that forces the circuit to start. That is the approach taken here, with R1 and C1 ensuring that the 'forbidden' all zeros state can't exist.
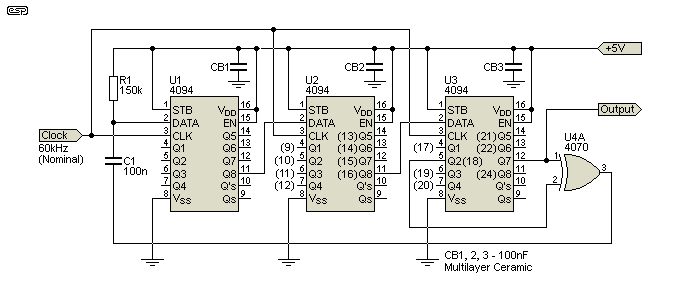
Figure 2 - 23-Bit PRBS Generator Using Common CMOS ICs
The drawing above shows the suggested circuit. It uses three 4094 8-bit shift registers and a 4070 quad XOR gate. One XOR gate is used to generate the feedback, using taps at Q23 and Q18. Q24 isn't used here, because that requires a more complex XOR gate array to get the required number of taps. 15, 17, 18, 20. 21, 22 and 23 stages are preferred, because only two taps are needed to obtain the MLS. There are others that only need two taps of course, and they are shown in the references. Four taps are required with 16, 19 and 24 bit registers (as well as many others, but they are not relevant here).
Many other shift register lengths require four taps (although more can be used in some cases). This is a bit of a mathematical nightmare, but fortunately others have worked it out already [ 2, 4 ]. However, there do appear to be other connections that also work, but if you get it wrong you will not get anything even resembling white noise.
A 23 bit PRBS generator has a sequence length of 8,388,607 clock cycles. With a 60kHz clock, that means the sequence will repeat after 140 seconds. It's doubtful that you need to go that far, but the cost is small (the 4094 ICs are less than $2.00 each from most suppliers). I decided that it was worth the small extra cost to obtain a better noise source, hence the 23 stages. Register lengths of 17, 19 and 21 bits all require the extra 4094, and it would be silly to use shorter sequences once the third IC is added.
If you remove one 4094, that lets you use a shorter sequence. With two shift registers, you can have up to 15 bits, whilst retaining only two taps. A 15-bit PRBS would be tapped at Q14 and Q15, with Q16 unused. The 15-bit version has a cycle count of 32,767, so with a 60kHz clock it will repeat in just over 500 milliseconds. This may be enough for you, and it's easy to modify the drawing shown to get the shorter version. A shift register length of less than 15 bits is not recommended and these aren't shown in the table below. To minimise confusion, the output of the first stage is labelled 'Q1', rather than 'Q0' as shown in many datasheets. Other outputs are also indicated in brackets. Qn is the shift register length, and Qx is the feedback tap.
| Stages | Taps (Qn, Qx) | MLS Length | Repetition, 60kHz Clk |
| 15 | 15, 14 | 32,767 | 546 ms |
| 17 | 17, 14 | 131,071 | 2.28 s |
| 18 | 18, 11 | 262,143 | 4.3 s |
| 20 | 20, 17 | 1,048,575 | 17.5 s |
| 21 | 21, 19 | 2,097,151 | 34.9 s |
| 22 | 22, 21 | 4,194,303 | 70 s (1m 10s) |
| 23 | 23, 18 | 8,388,607 | 140 s (2m 20s) |
| 25 | 25, 22 | 33,554,431 | 559 s (9m 19s) |
| 28 | 28, 25 | 268,435,455 | 4,474 s (1h 14m 33s) |
| 29 | 29, 27 | 536,870,911 | 8,947 s (2h 29m 8s) |
The above table shows the shift register lengths, tapping points, MLS lengths and approximate repetition period (based on a 60kHz clock) for only those sequences that require two taps. Those in between have been left out because they must use four taps, requiring three XOR gates. Shift registers with fewer than 15 bits are not useful because the degree of 'randomness' is insufficient to get a wide-band audio noise signal. Since 8-stage shift registers are suggested, using the optimum length (23 stages) is preferred, requiring three 4094 ICs. You could add another shift register to get longer sequences, but that's not necessary. The optimum length is shown highlighted in light grey. While the longer MLS options look appealing, they aren't needed for testing (nor for most other purposes). The last three shown can be achieved by using four 4094 shift registers. Note that the sequence length does not determine the time needed for the output to start. For the 23 bit version suggested, it takes 23 clock cycles before the output is producing noise - about 383µs with a 60kHz clock.
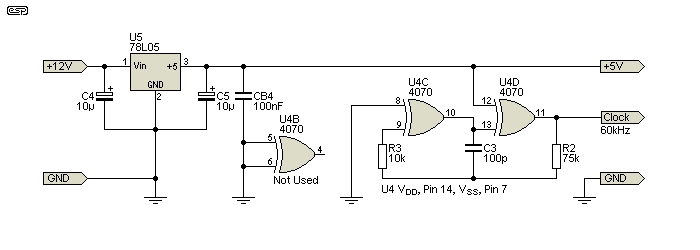
Figure 3 - XOR Based Clock Oscillator & 5V Supply
One of the remaining XOR gates is unused, and the other two are used for the oscillator. CMOS oscillators are not precision circuits in this role, so you will almost certainly have to change the value of the tuning cap and/or resistor (C1 and R2 respectively) to get somewhere between 60 and 70kHz clock frequency. The values shown simulate with a frequency of 64kHz, but reality will be different. If you prefer, the clock frequency can be increased up to around 100kHz. This reduces the high frequency 'droop' above 10kHz, but may also mean that you need a longer measurement time to monitor low frequency performance of the device being tested. Reduce C3 to about 56pF to increase the frequency to ~110kHz (as simulated). The test circuit ran at 61kHz with the values shown, but it may be different depending on the XOR gates you use.
It may be considered easier (and probably more predictable) to use a CMOS Schmitt trigger (e.g. 4584 or similar) as the oscillator, but that adds an extra IC for no good reason. You also end up with three XOR gates and five Schmitt inverters that aren't used. Feel free to do so if you prefer, but it's really not worth the extra IC. The two gate oscillator has one input of one XOR gate tied to +5V so it acts as an inverter, and the other has one input pin connected to ground so it acts as a non-inverting buffer. There are several different topologies for CMOS oscillators, but the one shown is fairly common and it works well enough for the purpose.
The power supply shown has an output of 5V, and requires an input voltage of at least 8V DC. A 'conventional' 78L05 regulator is used instead of an LDO (low dropout) type, because they are less likely to oscillate with standard components. You can use an LDO regulator, but you'll have to ensure that the output bypass capacitor (in particular) complies with the needs of the device you use. See the ESP article about LDO regulators for details. Most readers will be aware that I generally prefer conventional regulators because they are available in through-hole packages and are more tolerant of bypass caps. While the 4000 series CMOS ICs will operate happily at higher voltages (up to 15V), it's better to reduce the voltage with a regulator to ensure that the output is steady (especially important if the noise source is battery operated).
Because most constructors will probably use a mains supply, the easiest (and cheapest) is a simple unit such as P05-Mini (the PCB is available from ESP). If equipped with 12V regulators, it will provide power for the opamps used for the pink noise filter and also the 5V regulator shown above. Current drain for CMOS is low, and the entire circuit should draw no more than 10mA. The circuit shown in Figure 4 is for the P05-Mini, configured with 12V regulators. A small (10VA or so) transformer with one or two 15V windings will power the complete circuit easily.

Figure 4 - Typical Power Supply For Noise Generator And Opamps (P05-Mini)
In most cases, there will be a ±12V supply to power the noise source and opamp filters needed to obtain pink noise. This can use any supply you have available, or you can use P05 (or P05-Mini as shown) to run the opamps. Mains power is perfectly alright, but I do recommend that the transformer used complies with Class II (double insulated) standards so the circuitry doesn't require a connection to mains earth. This can create earth/ ground loops and inject 50/60Hz hum into the circuit.
If battery power is preferred, the unit will run happily with a pair of 9V batteries. Some constructors may wish to contemplate Li-Ion batteries, but the disadvantage is that the charging regime is more complex because a balance charger is absolutely essential for a series battery pack. There are many ways that Li-Ion battery packs can be used, including the common 3s (three cell series) batteries. Another alternative is to use 4 × 18650 cells (18mm diameter × 65mm long), which can be removed and charged in parallel. Chargers and 4-cell holders for these are readily available, and this eliminates the complexities encountered with series charging.
With four Li-Ion cells, the total voltage is (nominally) ±7.2V, which will happily drive an opamp based pink noise filter (as shown below). The 78L05 needs a minimum input of (typically) 6.7V (but it could be up to 7V), so a LDO regulator would be a better proposition. Bear in mind that the positive side of the battery has to supply more current if the digital circuitry is only operated from one supply, so if you use battery power, the digital circuitry should be connected between the positive and negative supplies (including the regulator of course). This keeps the battery drain the same for both polarities.
This is the sort of project that must be built and tested to ensure that everything is as it should be. I was led on a merry chase for a while before I realised that I'd accidentally taken the feedback tap from pin 13 of U3, rather than pin 12. The 'noise' was definitely not white, and it had a repetitive 'beat' and odd sound that was anything but what I expected. If you build one, you have to be vigilant - a bridged track on Veroboard is oh-so-easy, as are tracks that should be cut but have a sliver of copper left (they were mostly easy to find). The oscillator runs at 61kHz with the values shown above.

Figure 5 - Veroboard Prototype Of Digital White Noise Generator
The photo (click on it for a high resolution version - 322 KB) shows the unit I built, and I used sockets to ensure that the ICs weren't damaged by static while building the circuit. The positive supply is the loop on the top right, and negative is the loop at the bottom right. The output loop is hard to see, but it joins U3.12 to U4.1. The circuit is made (almost) to the exact circuits shown above, right down to the pins used for the 4070 quad XOR gate. One difference is that I used a single 33µF bypass capacitor, and fortunately that works well in this layout. Adding individual 100nF bypass caps is irksome with Veroboard unless you pre-plan everything (I almost succeeded ). Note that three of the links are insulated because they run across other links and may otherwise create short-circuits. The output coupling capacitor is not on the Veroboard layout.
I didn't include the 5V regulator on the board, and nor have I (as yet) built up a new pink noise filter. I did use filtering at the output to listen to the bass response, and it cheerfully provides signal down to around 12Hz. The MLS tapping points are critical to the proper operation and to obtain a true maximum length sequence. Any error will cause the sequence to be anything but 'maximum length'. If the output doesn't sound like white noise, then you have made an error. If you don't know what white noise should sound like, un-mute an FM receiver and tune to an unoccupied section of the FM band. That's white noise.
I'd estimate that it will take a reasonably experienced constructor at least a couple of hours to put this together, but in terms of parts cost it's very economical. While the same thing can be done using a PIC (or even an Arduino), that has to be programmed and tested thoroughly, and will ultimately cost a great deal more (and consume more current) than the hardware version. As always, there is nothing quite like making a project using basic principles to learn the processes involved.
The pink noise filter converts the white noise output to pink noise (equal energy in each octave), as needed for audio testing. The filter is the 'improved' version shown in Project 11, but changed slightly to accommodate the much higher noise output from the MLS generator. Any single opamp can be used, but it doesn't need to be a low noise type because it's part of a noise generator. The demands on the opamp are minimal, and a µA741 is quite acceptable. While the datasheet for the 741 doesn't indicate the minimum operating voltage, I know from experience that it's quite happy with a 12V supply (±6V).

Figure 6 - Pink Noise Filter (Close-Spaced Filter Version)
Because the output level from the MLS generator is so high, the filter is configured to have minimal gain, and response below 10Hz is deliberately limited. You can also use the simple filter as shown in Project 11, but for the small increase in complexity the noise response is much flatter. The filter has an almost perfect 3dB/ octave (10dB/ decade) rolloff characteristic, and can produce high quality pink noise. Construction is not critical, and Veroboard is perfectly alright for the filter circuit.
Be careful with the polarity of C2 and C3 if you use polarised electros as coupling capacitor - I've shown them both as bipolar caps for convenience, but polarised caps are smaller and cheaper. If the noise generator and filter operate from a 'normal' mains supply, then C2 will have the positive terminal towards the output from U3 (assuming a single +5V supply for the digital section). The opamp would then run from ±12-15V with its input referenced to ground.
It's very unlikely that PCBs will be available for this project, because the demand will almost certainly not warrant the time and cost to develop the board. Most simple logic circuits are easily built on Veroboard, and while the circuit uses multi-pin ICs, the majority of the 4094 pins remain unused so wiring is fairly simple. You do need to take proper precautions to protect the CMOS ICs from static damage, which can happen even at levels you can't feel. Make sure that you use a personal grounding strap, and try to avoid touching the pins unless you are 'static free'.
I definitely recommend that you experiment with different taps to the shift register. It's not likely that any will be better than those recommended, but it will help you to understand the concept of the maximum length sequence (as opposed to other sequences that are 'sub optimal'). It's possible that some tap combinations may lead to a 'lock-up' condition, in this case, with the shift register loaded with all zeros. That will stop the output, and it will need a power off/on to restart it.
An interesting observation is that the noise signal is exactly the same at every shift register output pin. The circuit shows a 'designated' output point (the final stage of the shift register), but the only difference between the signals at each output pin is a small time-shift (16.67µs for a 60kHz clock), and the entire 'pattern' is simply moved from one shift register stage to the next with each clock pulse. Some 'interesting' sounds can be created by summing two shift register outputs with a pair of 10k resistors. Fun to play with, but not actually useful.
 Main Index
Projects Index
Main Index
Projects Index