
|
|
| Elliott Sound Products | Project 155 |

 Main Index
Projects Index Main Index
Projects Index
|
High pass filters are used to remove low frequencies and pass high frequencies, and are common in mixing consoles. They allow the recording engineer to remove troublesome frequencies below the normal range of the vocalist or instrument being recorded. They are very useful, and the filter is steeper than any tone control. High pass filters can be very simple or quite complex. The version shown here is about midway, but has very good performance.
Low pass filters are less common, but if you ever need one nothing else will do. If the material being recorded has excessive sibilance ('ssss' noise) or other high frequency energy that is undesirable, then a low pass filter will get rid of it far more effectively than tone controls ever can.
The filters shown here both have an opamp as an input buffer, but if the filter can be driven directly from another opamp the buffer isn't needed. The source must be able to drive the relatively low impedance presented by the filter network, so you must use an opamp that can deliver full output into a low impedance.
The pots are linear. Ideally you'd use reverse-log pots, but unless you pay serious money for a true reverse-log taper, they will be worse than useless. Linear pots cause most of the frequency range to be concentrated in the last 50% of travel, but they usually have reasonably good tracking, are readily available and at a reasonable cost.
The circuits shown are expected to be powered from ±15V, although you can also use ±12V with some loss of headroom. The nominal operating level is up to 2V RMS or 4V peak (whichever is the lower). This equates to +8.2dBu or +6dBV, but remember that the high pass filter has gain of a bit over 1.5 (3.8dB), so higher levels may cause clipping. Supplies to the opamps must be bypassed - typically 100nF multilayer ceramic from each supply to GND and between the supply pins, along with 10µF from each supply to ground.
Neither circuit is suitable for microphone levels - you must use a mic preamp in front of the filter(s).
Also, note that these circuits are mono - not stereo. If you wanted to incorporate them into a stereo system you will need two of each circuit, and each channel's frequencies will use separate pots - unless you can get 4-gang pots. They exist, but are uncommon and usually quite expensive.
I used standard 'engineering' terms. High-pass is the same as 'bass-cut', and low-pass is 'treble cut'. These circuits do not provide boost, and are not 'tone' controls. They are used specifically for removing unwanted frequencies, and sometimes for special effects.
The high pass filter is tricky, because a traditional Sallen-Key 12dB/octave filter needs a dual-gang pot with different resistances. These are not available. You could have them specially made but that will be a very expensive exercise indeed. The easy way to get around the problem is to give the filter opamp (U1B) some gain - the optimum is 1.585 (exactly 4dB). There are other topologies that could be used instead of the Sallen-Key, but at the expense of increased complexity and cost.
The amount of gain determines the filter Q, and with the values shown the gain is about 3.8dB. This gives a Q of just under 0.707 which is required for a 'traditional' Butterworth (maximally flat amplitude) filter response. As shown, the response has less than 0.1dB fall before rolloff. To get a perfectly flat response, R6 needs to be 1.715k, but there is no point trying to get it any 'better'. The difference will not be audible.
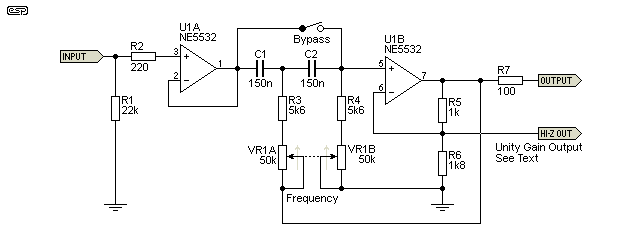
The alternative output can be used if you need the filter to be unity gain, but that must be fed to a high input impedance unity gain buffer. The lowest permissible load impedance is about 10k, but even that will increase the gain and Q slightly. When the Q is increased, you get a small rise in output just before rolloff. Normally, if you use the unity gain output it will be fed directly to the input of an opamp buffer similar to U1A (but without the two resistors - R1 and R2). Remember to include the opamp output resistor (100 ohms) after the buffer.
If you use the unity gain output, be aware that the opamp itself still has gain so the level through the filter has to allow a minimum of 4dB headroom or the filter stage will clip. The bypass switch removes the filter from the circuit completely, but the gain is not changed. You need to be aware that you may hear a very slight 'click' when the switch is operated, because the opamp's input current will be fed either via the resistance of VR1B and R4 or direct, depending on the switch setting. If you want to eliminate the click, use a FET input opamp, such as OPA2134.
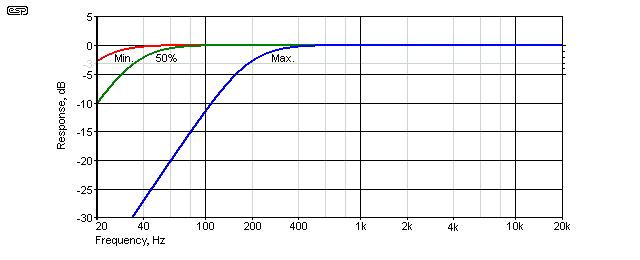
The response shown is normalised to 0dB gain, taken from the unity gain (high-Z) output shown in Figure 1. The -3dB frequencies are 19.5Hz with the pot at maximum resistance, 35Hz with the pot at 50%, and 193Hz at minimum resistance. The range can be changed easily by altering the value of C1 and C2. Double the capacitance halves the frequencies and vice versa. If you want to work out the frequency it's quite easy because the opamp is configured to have gain. Frequency is simply ...
f = 1 / ( 2π × R × C )
With the pots centred for example, the total resistance is 30.6k (25k from the pot plus the fixed 5.6k resistor). This gives a frequency of 34.7Hz - almost exactly as measured in the simulation. The frequency can be worked out for any combination of resistance and capacitance. If the opamp's gain is increased (by adding a load to the Hi-X output for example), you will get a peak before rolloff, and the frequency will change a little. Any external load should be high impedance as noted above. The tuning frequency calculation is a little harder if the opamp is configured for unity gain, and becomes ...
f = 1 / ( 2π × √ ( R1 × C1 × R2 × C2 ))
Unity gain also means different tuning pot values, so a standard dual-gang pot can't be used. Adding just the right amount of gain removes this constraint, and that's why it was done this way.
Low pass filters aren't as common as their high pass brethren, but they can be very useful for cleaning up any signal that has a lot of noise, or if the high frequencies are over-emphasised for some reason. Unlike the high pass filter, we don't need to add gain because the resistors are normally equal, and the capacitors are different for the filter network. A non-inverting buffer provides the feedback, and again the response is Butterworth (Q of 0.707). Use the same formula as shown above to calculate frequency, and note that the value of 'C' is that used for C3 (10nF as shown). If the frequency caps are changed, C1=C2=C3 - all are the same value.

The bypass is arrangement is different. It's highly inadvisable to simply short the frequency-setting resistors, as that would switch C3 directly to the output of U1A. Doing so will cause the opamp to oscillate. The extra resistor (R5) isolates U1A's output from C3 and provides a full bypass of the filter. As with the high pass filter you might hear a slight click when the switch is operated. The solution is the same - use a FET input opamp. The input impedance of this circuit can drop below 1k, so the source (if U1A is not used) needs not only a low output impedance, but the ability to drive a low impedance as well.
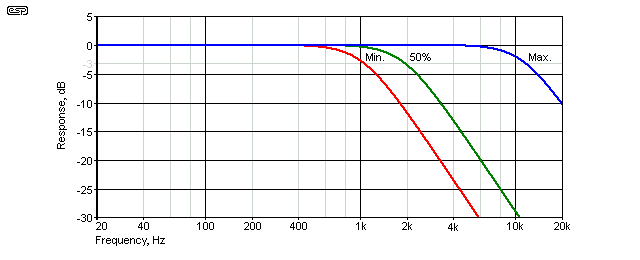
The -3dB frequencies are 1.0kHz with the pot at maximum resistance, 1.9kHz with the pot at 50%, and 11.3kHz at minimum resistance. As with the high-pass circuit, the range can be changed easily by altering the value of C1, C2 and C3. Keep the values equal for all three caps. If all three caps are changed to 1nF, the -3dB frequency is increased by a factor of ten.
You may prefer that the response at maximum frequency be -3dB at (say) 24kHz, allowing for about -1.6dB at 20kHz. For this, all caps would be changed to 4.7nF. The minimum frequency is also increased, and will be raised to 2.18kHz. I leave it to the reader to make the decision as to which range will suit the application.
There will be many applications where both filters are needed. By cascading the two, you get variable frequency high and low pass filtering, so any sound not required can be filtered out. This can be very useful for cleaning up the sound when extraneous noise is a problem. You need the input buffer, and the output buffer is essential if you use the unity gain output from the low-pass filter. Each filter is configured as shown above, but without the input buffer, as that is provided in the diagram below. A buffer isn't required between the high and low-pass sections unless you configure the high-pass filter for unity gain (high output impedance).

If you need both filters, the high-pass filter should come first, followed by the low pass. This reduces any noise created in the HPF. The two filters are independent of each other, and either or both can be in-circuit or bypassed as required.
These simple filters are very useful for removing unwanted energy from a recording (or during recording), and are dramatically better than tone controls for this purpose. Even parametric equalisers can't attenuate below ~12-18dB or so, but both filters have a 12dB/octave rolloff (the same as many loudspeaker crossover networks) and will achieve more than 40dB attenuation at 10Hz (high pass) and 20kHz (low pass).
Whether you use them for serious recording or just build them to play around with is for you to decide, but they are both very useful circuits. A combination of the two (with modified frequency ranges perhaps) is useful for comparative testing of loudspeakers - especially midrange drivers. By varying the frequencies, you can determine the point where distortion becomes a problem, or where cone breakup modes start to cause problems.
As noted earlier, the input buffer may not be needed, but the source must be low impedance (less than 100 ohms) and able to drive a low impedance load of a little less than 1k for the low pass version (the high pass doesn't fall below ~5.6k at any frequency). The input buffer shows a resistor in series with the input (R2 in both circuits). This is only needed if the signal comes from the 'outside world' - anything that isn't in the same enclosure as the filter. It's used to suppress RF interference. The 100 ohm resistor at U1B's output in both circuits is to prevent oscillation if the circuits are connected to the outside world and/or a shielded cable.
| Main Index
Projects Index
|