
|
|
| Elliott Sound Products | Flux Meter |
 Main Index
Clocks Index
Main Index
Clocks Index
A fluxmeter (aka magnetometer or Gaussmeter) is not an essential tool, but is very useful for verifying that a magnet 'recharge' has worked. Not only with increased magnet strength, but for Bulle clocks in particular, you can tell if the magnet has the correct polarity. This project is quite simple to build, and can be made on a piece of Veroboard or similar without any problems.
There are a few magnetometers on the Net, but most are either too simple or too complex. This version is designed to have the right balance, and rather than using an external meter has a traditional analogue meter to show the magnet strength and polarity. Naturally, you can use an external meter if you prefer. This will reduce the overall cost, but personally, I prefer a self-contained unit if possible.
The heart of the flux meter is the Allegro Microsystems UGN3503UA See Note Hall-effect sensor IC, U1. These devices are (were) available for only a few dollars, and are more than sensitive enough for anything we may need to do with clock magnets. They do have one failing, and that's that the maximum flux density is rather limited. A very strong magnet won't cause any damage, but it will cause the Hall sensor to saturate. Once the sensor is saturated, a further increase of magnetic field strength does not cause the output to change proportionally, so a large flux change may only cause a small change of output level.

| Please note that the UGN3503UA Hall sensor is now obsolete, and is not officially available. Some might still be on sale, but you'll need to search for them. It is important that you get a 'ratiometric' sensor rather than a Hall-effect switch. The latter only provides an on/off indication, and is completely useless for a flux meter. Current replacements are the A1324/25/26 which have factory programmed sensitivities of 5.0 mV/ G, 3.125 mV/G, and 2.5 mV/ G, respectively. Another option is the Honeywell SS496A1, which seems readily available and has an output of 3.125mV/ G. The Honeywell SS490 Series (Miniature Ratiometric Linear Sensors) are a lower cost option with similar specifications. |
Some magnets that we might use today (such as neodymium-iron-boron) are more than strong enough to saturate the IC, but this isn't normally a problem. By spacing the sensor a suitable distance from the magnet (with a piece of plastic, wood or brass for example), the flux density is reduced sufficiently to ensure an accurate comparative reading.
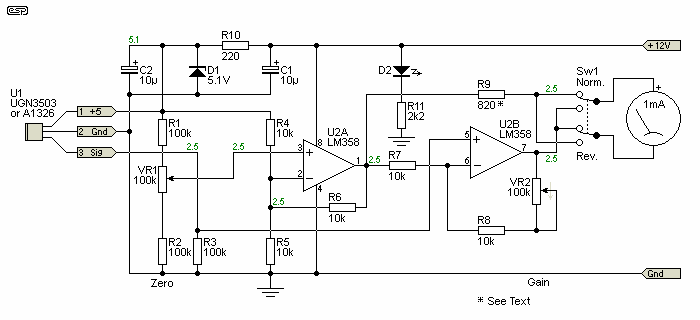
Figure 1 - Magnetometer Schematic
The circuit is quite straightforward. It uses a dual operational amplifier (opamp), and a simple zener diode regulator for the Hall sensor. Layout is not critical, and all parts are low cost. The meter is the most expensive single component. The entire circuit is powered from a 12V power supply - either a small 'laboratory' type or a 12V plug-pack (wall wart) supply is fine. Current consumption is about 35mA, so even the smallest supply you can find is more than adequate.
Numbers in green are the voltages you should measure with no signal - i.e. sensor connected, but well away from any magnets. If the A1326 hall sensor is used, minimum sensitivity will be 5mV/G, because U2 is configured for a minimum gain of 2. Maximum sensitivity is about 30mV/G because the maximum gain is 12 (set by R7, R8 and VR2).

Figure 1A - Hall-Effect Sensor (Typical)
These sensors are tiny, roughly 3 × 4mm excluding the leads, and less than 1mm thick. They need to be treated with some care to ensure that the leads don't flex, as that will cause them to break. Because very high sensitivity isn't needed, the sensor and leads can be wrapped in heatshrink tubing, preferably clear so you can see the orientation of the IC itself. This is required to ensure that the sensor is placed at the same location (and rotation) for each measurement to ensure consistent results.
The Hall sensor is powered from the 5.1V supply created by R10 and D1. The small (typically 1.3mV/G for the UGN3503UA or 2.5mV/G for the A1326) signal is amplified by U2B, to create a usable current through the meter. U2A is used to buffer the zero offset pot VR1 - this is needed because the amplifier stage needs a stable, low impedance reference.
Because the output of the Hall sensor can be either positive or negative with respect to the voltage at U2 pin 1, the switch SW1 is included to allow you to reverse the meter movement's polarity. While you can also flip the sensor IC to do the same thing, it's not always as convenient as a switch. The meter will give a reading of 1mA (full scale) with a total voltage of 1V across the meter and R9 (820 ohms).
Current through R10 is about 32mA. The UGN3503U draws a worst case current of 13mA (9mA for the A1326), and with no magnetic field, the sensor's output will be at around 2.5V above earth (ground). The sensor output typically varies by 1.3mV/G (one Gauss is 100uT - micro Tesla), or 2.5mV/G for the A1326. D2 is a LED to show that power (+12V) is available. The LED and its resistor (R11) are optional but recommended.
The first thing to do is zero the meter. VR1 is used for this. To set zero, the gain control (VR2) should be set to maximum, and VR1 adjusted until the meter reads zero. Operate the Nor./Rev. switch (SW1) to make sure that the meter needle remains at zero for both polarities. Make sure that the meter still shows zero as gain is reduced from maximum. Normally, the zero indication should drift by no more than one small division on the meter scale as the gain is changed.
When the Hall sensor is brought near a magnet, the output voltage will change depending on the field strength and polarity (North or South). Adjust the gain control to obtain a reference reading.
R9 should be selected so that the total resistance of the meter movement and R9 is 1k, so the meter current will be 1mA/V. A typical 1mA movement will have a DC resistance of about 200 ohms, so 820 ohms is a reasonable starting point. This sets the minimum sensitivity such that a field strength of 380 Gauss (200 Gauss for the A1326) will give full scale deflection on the meter.
With the gain set to maximum, a flux density of 65 (33 for A1326) Gauss represents full scale. The gain is therefore variable by a factor of almost 6:1 - this will normally be more than enough for the intended application. It is possible to increase the gain further - there is no theoretical limit. However, the circuit complexity increases dramatically, and setting and maintaining the zero point becomes very difficult.
The hall sensor will give a positive (>2.5V) voltage when a South pole is brought close to the branded face. This is the IC face that has the Allegro logo and part number. When the IC is flipped over or the magnetic polarity is reversed (either, not both), the output will become negative (< 2.5V). Because the amplifier is inverting, this is reversed at the meter. When the meter switch in the Normal position, a North pole applied to the branded face causes the meter reading to increase.
There's nothing difficult about the circuit. The opamp is a very common (and cheap) low power device, and the only thing that may be hard to get is the Hall sensor itself. They should be available from some of the many electronics parts resellers worldwide.
| UGN3503 ELECTRICAL CHARACTERISTICS at TA = +25°C, VCC = 5 V | |||||||
| Characteristic | Symbol | Test Conditions | Limits
| ||||
| Operating Voltage | VCC |
| |||||
| Supply Current | ICC |
| |||||
| Quiescent Output Voltage | VOUT | B = 0 G |
| ||||
| Sensitivity | ΔVOUT | B = 0 G to ±900 G |
| ||||
| Bandwidth (-3 dB) | BW | - |
| ||||
| Broadband Output Noise | Vout | BW = 10 Hz to 10 kHz |
| ||||
| Output Resistance | ROUT | - |
| ||||
The above table shows the electrical characteristics of the Allegro UGN3503 series of linear Hall effect sensors. The A1326 is similar, except maximum current is lower and the output is higher (and has closer tolerance). There are others from other manufacturers, but they seem to be far less commonly available through normal outlets.
| Catalog Listings | SS495A | SS495A1 | SS495A2 |
| Standard | High Accuracy | Basic | |
| Supply Voltage (VDC) | 4.5 to 10.5 | 4.5 to 10.5 | 4.5 to 10.5 |
| Supply Current@25°C (mA) Typ. | 7.0 | 7.0 | 7.0 |
| Max. | 8.7 | 8.7 | 8.7 |
| Output Type (Sink or Source) | Ratiometric | Ratiometric | Ratiometric |
| Output Current (mA) | |||
| Typ. Source Vs>4.5V | 1.5 | 1.5 | 1.5 |
| Min. Source Vs>4.5V | 1.0 | 1.0 | 1.0 |
| Min. Sink Vs>4.5V | 0.6 | 0.6 | 0.6 |
| Min. Sink Vs>5.0V | 1.0 | 1.0 | 1.0 |
| Magnetic Range Typ. | -670 to +670 Gauss (-67 to +67 mT) | ||
| Min. | -600 to +600 Gauss (-60 to +60 mT) | ||
| Output Voltage Span Typ. | 0.2 to (Vs - 0.2) | 0.2 to (Vs - 0.2) | 0.2 to (Vs - 0.2) |
| Min. | 0.4 to (Vs - 0.4) | 0.4 to (Vs - 0.4) | 0.4 to (Vs - 0.4) |
| Null (Output @ 0 Gauss, V) | 2.50 ±0.075 | 2.50 ±0.075 | 2.50 ±0.100 |
| Sensitivity (mV/G) | 3.125 ± 0.125 | 3.125 ±0.094 | 3.125 ±0.156 |
| Linearity, % of Span Typ. | -1.0% | -1.0% | -1.0% |
| Max. | -1.5% | -1.5% | -1.5% |
| Temperature Error | |||
| Null Drift (%/°C) | ±0.06% | ±0.04% | ±0.07% |
| Sensitivity Drift (%/°C) ≥25°C Max. | -0.01%+0.05% | -0.01%+0.05% | -0.02%+0.06% |
The above shows the data for the Honeywell SS496 series, which are current models (as of 2021) and the SS495A1 (high accuracy) version costs about AU$10.00. Any Hall device with similar specifications will work, but it must be 'ratiometric', having a linear output vs. magnetic field strength. Switching types are not even slightly useful in this role.
Note that these devices are normally not calibrated, although the A1324/5/6 are within ±5%. While other fully calibrated Hall sensors may be available from some suppliers, they are usually far more expensive. This is not necessary for testing magnet strength - the most common use will be before/ after comparisons, and a calibrated system is not necessary. If you do get a calibrated version, the 'calibration' usually consists of a graph showing the measured output voltage for a number of known magnet strengths.
If a conductive plate of minimal thickness is subjected to a magnetic field that passes through the plate at right angles, some of the input current is deflected by the magnetic flux, and appears as a voltage differential at the adjacent edges of the plate - see Figure 2. The effect was discovered by Edwin Hall in 1879. Modern Hall effect sensors use a semiconductor (such as 'doped' silicon, where additives are included in trace amounts to adjust the conductivity), and this improves the sensitivity dramatically compared to metallic conductors.
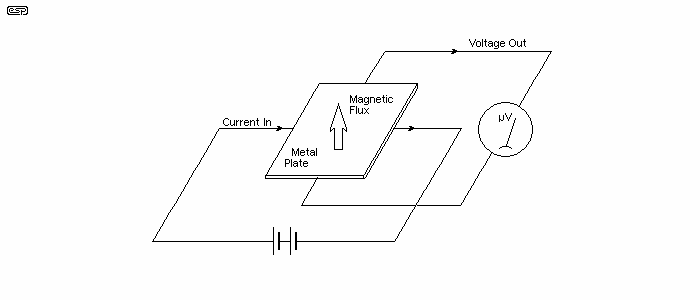
Figure 2 - Hall Sensor Operation
The output voltage and current are directly proportional to flux density, input current and film/plate thickness. When metallic conductors are used, the output voltage is extremely small, typically measured in fractions of a microvolt. They do have one significant advantage over a semiconductor though, in that the saturation flux density is massively higher. A metallic Hall sensor can be expected to remain linear with any magnet that is currently available.
Main Index
Clocks Index