
|
|
| Elliott Sound Products | 1.5V Supply |
 Main Index
Clocks Index
Main Index
Clocks Index
Many clock collectors will have several (or a great many) battery powered clocks in their collections. This is becoming more common because some of the earlier battery clocks are now highly collectable, for example Bulle, Brillé, Eureka, etc. Feeding these clocks with 1.5V cells is a bit of a chore, but also becomes expensive, and there is always the risk that a cell will discharge faster than expected and start to leak inside the clock's battery compartment.
By using a mains supply, battery usage and waste are minimised. Because these clocks are all power misers, the extra on your power bill should go completely unnoticed. A typical Bulle clock draws only about 1.25mA for a few milliseconds for each pendulum swing, and even if you had 20 of them, the total power drain will still be much less than 1.25mA continuous. Most of the others are fairly similar - few electric clocks draw significant current because when they were built batteries were extremely expensive and had very limited capacity. The other advantage of using a mains supply is that the voltage is regulated, and remains within very close tolerance for years on end. Most battery clocks are sensitive to the available voltage, and timekeeping suffers as the cell is slowly discharged. Some are much worse than others in this respect.
The heart of the supply is a 3-terminal variable voltage regulator IC - the LM317. These are readily available for less than $3 from most reasonable electronics suppliers, and have excellent regulation characteristics. The overall system actually becomes a tad more complicated because these ICs are so good. If they had mediocre performance, isolation of the mains regulator could be done with a diode, but a diode would spoil the excellent regulation we have available. Not to worry though, because ancient technology comes to the rescue - in the shape of a relay. 
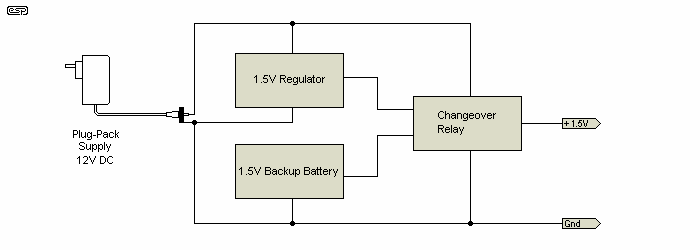
Figure 1 - Basic Scheme Of Supply
Mains power is derived from a regulated switchmode wall supply (wall wart). The reason for the switchmode supply is simple - the latest versions available now have extremely low standby power consumption - often barely enough to even register on your power meter. This DC voltage is then regulated down to 1.5V, and a relay is used to change over from the mains supply to the battery should you have a mains failure. Inside each clock's "fake cell", there is a capacitor that acts just like a battery. This ensures that each clock gets the full 1.5V regardless of lead resistance between the supply and the clock itself. These capacitors are readily available and inexpensive.
The need for a relay is unfortunate because it will consume more power than your entire clock collection, but it's a necessary evil. While other forms of switching could be used (transistors for example), the added complexity is not warranted, and the relay will only consume about 0.5W - hardly enough to send anyone broke. The relay is held in as long as mains power is available, but should the mains fail, the relay drops out and switches in the standby 1.5V cell (or a battery of parallel cells). This provides power until the mains is restored, and the cell probably needs to be replaced once a year (more often if you get a lot of blackouts in your area). The changeover is pretty quick, but even in the event that a clock demanded power right at the instant the relay switches, the capacitor in the fake cell will provide enough energy for a pulse. Make sure that the relay is a sealed type to guard against contact corrosion - most PCB mount relays are completely sealed.
The circuit is straightforward, and because an external power supply is used, there's no mains wiring. The incoming 12V DC connects directly to the relay coil, so if mains power is available, the normally open contacts are closed. This connects the 1.5V output from the regulator to the distribution panel, which facilitates the connections to as many clocks as required. Because capacitors are used in each clock, you can use fairly thin wire so it remains unobtrusive. A much more expensive option is to use a 'super' capacitor for each clock, but at about $6 each, this is not really warranted. Super caps are very high value capacitors, and are typically rated at 1F (one Farad) or more, at 2.5V DC maximum.
The easiest way to connect to the clocks is to make a false cell, using a short length of wooden dowel with a contact at each end. The dowel can be hollowed out to take the capacitor, so reverting to normal operation is as simple as removing the fake cell and replacing it with the real thing. The wires from the supply just connect to a suitable pair of screw terminals mounted on (or in) the dowel. Alternatively, each fake cell can just have a pair of wires that return to a central distribution point (assuming multiple clocks operating from the supply).

Figure 2 - Complete Schematic For Power Supply
The circuit diagram is shown above. D3 is included to prevent an accidental reverse polarity from damaging the regulator or capacitors. If the LED does not come on, the supply is reversed. D1 prevents excess reverse voltage on the LED, which may damage it. Ideally, the backup cell should be a long-life alkaline type, mounted in a suitable single-cell holder. The regulator IC needs no heatsink unless you expect to run perhaps 30 or more clocks from it (or expect sustained short circuits if you use the supply for testing). The relay is a normal single pole, double throw type (SPDT), and the normally closed contact switches the battery through to the clocks when AC is not present. When AC is available, the relay is held in by the 12V DC from the power supply, the backup cell is disconnected, and power now comes from the regulator via the normally open contact.
VR1 allows you to set the voltage - it doesn't need to be adjusted exactly, but having the adjustment available is worthwhile. Normally, this would be set to about 1.6V, which is the normal voltage from a fresh 1.5V cell. Once adjusted, VR1 can be replaced by a fixed resistor of the same value as the pot - or, just use a 33-39 ohm resistor which will be close enough. The idea isn't that the voltage is precise, but is very stable, thus maintaining a consistent pendulum arc from your electro-magnetic clocks.
The LED (D2) is intended to show that power is available, and with the resistor value shown (10k), it needs to be a high brightness type. You can use an ordinary LED and reduce R1 to 2.2k if you prefer. The difference in overall power consumption is negligible.
Wiring is straightforward, and the only slightly tricky bit may be the relay connections. These should be available on-line, or can be checked with a multimeter. Ensure that the two 100µF capacitors are mounted as close as possible to the regulator IC, and keep leads short. The 100µF caps should be rated at 16V or more, and resistors are 0.5W carbon or metal film types. VR1 should ideally be a 10-turn type to make adjustment less critical, but this isn't especially important. Single turn types will work just fine, or just use the suggested 33 or 39 ohm fixed resistor.
There is another really useful application for this supply as well ... it is ideal for testing, especially where you suspect there might be a short circuit within the clock's wiring. Shorting alkaline cells dramatically shortens their life and can create very high currents in the process, the LM317 is short circuit protected and will current limit at about 1.5A - much less than a D cell can provide. While shorts are generally unlikely, you can never be sure what might happen while you are tinkering with an electric clock, and such tinkering is no fun if it's not running. If you plan to use it for testing, add a heatsink to the regulator. This can be an aluminium plate or the side of an aluminium box. The box itself will then be at 1.5V, since the tab on the IC is connected to pin 2. Insulating bushes and washers are available if you prefer the box or panel to be isolated.

Figure 3 - Fake Cell Used in Place of 'Real' Cell
The fake cell can be made from wood or plastic, and can either be hollowed out as shown, or the middle can be drilled out. Metal end caps are used so that the 'cell' makes proper connection inside the holder. Ideally, the end caps should be made from non-tarnishing metal - nickel plated steel or brass, or even gold flashed. Copper, brass or aluminium are not recommended, as they all develop an insulating surface over time. It should be possible to simply remove the end caps from discharged cells and glue these into position after soldering wires onto the inside surface.
The capacitor should be 1,000µF, and rated for either 6.3V or 16V - whatever you can obtain easily. There's plenty of room inside the dummy cell, so size isn't an issue. Make sure that the capacitor's polarity is correct before you solder everything together! If reversed, it will have a very short life, and may leak electrolyte. Fortunately, with only 1.5V, there are few risks or dangers with this arrangement.
It will be necessary to ensure that the clocks powered from the circuit don't make physical contact if they have metal cases. The reason for this is that many clocks use the frame for one connection to the cell holder, but there is no convention that dictates that this should be positive or negative. Some clocks will use the case as the positive return, and others use it for negative. If two opposite clocks touch each other, this will short circuit the supply.
Main Index
Clocks Index