
|
|
| Elliott Sound Products | Soft Clipping |
 Main Index
Articles Index
Main Index
Articles Index
So-called 'soft' clipping is generally attributed to valve (tube) amplifiers, and is thought by some to be the holy grail. There is no doubt that valve amps tend towards having a relatively gradual transition into distortion, and even when clipping there are fewer high frequency harmonics generated. By way of comparison, transistor amps generally use a lot of feedback, and in common with all amps using feedback, the onset of clipping is sudden and 'hard'. Even a valve amp that has a high feedback ratio will produce hard clipping, but they are few and far between, especially for instrument amplifiers.
In general, for anything other than guitar amps, I would not recommend any form of soft clipping. The idea of hi-fi is to minimise distortion, and introducing non-linear elements into the circuit just increases the distortion at lower levels. Intermodulation distortion is the worst, and it comes free with any form of harmonic distortion. For guitar amps, it's almost essential to include a clipping circuit of some kind, as it reduces the need to turn the amp up so loud that no-one else on stage can hear themselves.
Even for hi-fi, there seems to be something appealing about the idea of soft clipping (at least in some circles). Rather than have the amplifier clip any wayward peaks with the traditional square-edged characteristics typical of solid state amplifiers, wouldn't it be nice if they did much the same as a valve amp? A comparison of the two forms of clipping is shown in Figure 1, and you can see that a 'soft' clipper or valve amp overload behaviour is more 'civilised' (if any form of clipping can be considered civilised, that is).
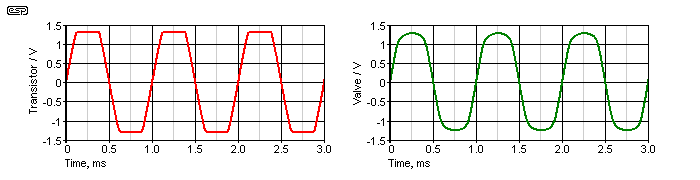
Figure 1 - Comparison of Transistor (Red) and Valve (Green) Clipping
The 'soft' characteristic (Green) shown in Figure 1 has few high order harmonics. The harmonic content is predominantly third harmonic, with a smaller amount of fifth, and lesser amounts of each additional higher odd-order harmonic. Because the waveform is symmetrical, even order harmonics are typically at vanishingly small amplitudes. Figure 2 shows the harmonic structure of each waveform. Note that 'hard' clipping produces high levels of eleventh, fifteenth and nineteenth harmonics compared to the soft clip circuit. However, both signals will sound objectionable with full range music and with the amount of clipping shown.
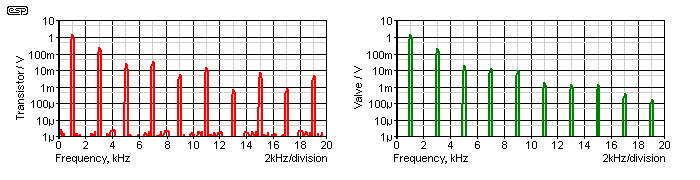
Figure 2 - Spectrum of Transistor (Red) and Valve (Green) Clipping Distortion
The somewhat ragged looking transistor spectrum at low levels may look 'bad', but these signals are well below 5µV, and are more than 110dB below the amplitude of the fundamental. The spectrum only tells part of the story, and the harmonic distortion also needs to be examined. The soft clipped valve-like distortion measures 14.6%, while the transistor circuit gives 17.6% by comparison. In each case, the amplitude of the original (unclipped) waveform was identical, at 2V peak (1.414V RMS). The primary reason for the higher measured distortion of the hard clipped waveform is that the harmonics extend to well over 100kHz at levels exceeding -80dB, while the soft clipped harmonics are below that level by 23kHz.
Unfortunately, at lower levels there will still be some distortion. For any circuit to clip 'softly', it must start to introduce distortion well below the clipping voltage (set by the power amp's supply rail voltage). As discussed in greater detail below, you will end up with 1-2% distortion at around half power (sometimes even less), with the distortion climbing rapidly as the amp delivers more power. This is not hi-fi!
Apart from the obvious solution of using a valve output stage (hardly a simple modification to an existing circuit), the easiest way to make a circuit that clips 'softly' is to use diodes. The above simulations were done using diodes, and reality is very close indeed to what is observed in a simulation. There is nothing new about diode clipping circuits - they have been the mainstay of guitar distortion pedals (fuzz boxes) for many years. The deliberate use of this technique for a hi-fi amplifier is less common, and as will be shown below, this is as it should be.
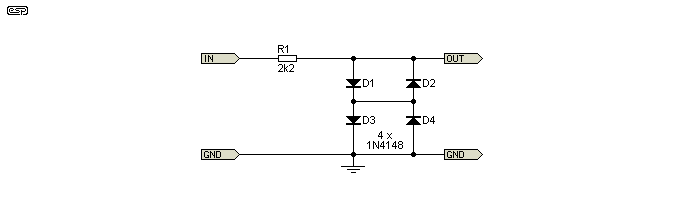
Figure 3 - Basic Soft Clip Circuit
Figure 3 shows the basic schematic of a soft clip circuit. By using diodes, the relatively soft knee of the diode conduction curve provides exactly the waveform that we need. There is an inevitable cost though, and to understand why, we need to examine the conduction characteristics of a diode. It is commonly taken that conventional silicon diodes conduct at 0.65V, although the actual figure varies depending on the type of diode and the current.
The value of R1 is surprisingly very important. If it is too high, there will be considerable distortion at even relatively low levels because of the inherently non-linear resistance of the diodes. If R1 is too small, performance at lower levels is improved, but the source amplifier (preamp, CD player, etc.) may be forced into premature clipping because of the loading. As shown, 2.2k is a reasonable starting value, but if you are willing to include an opamp that can drive low impedances (such as the NE5532 or OPA2134 dual devices), you can reduce R1 to about 680 ohms without having to worry about hard clipping from the preamp. For guitar amps, a higher value is preferable (see below for more details)
In Figure 4, it is obvious that not only do the diodes start to conduct at well below the nominal voltage, but they have significant internal resistance as well. It is these very characteristics that give us a soft clipping waveform, and also give us greatly increased distortion as we approach the clipping voltage. The sharpness (or otherwise) of the clipped waveform depends on the signal source impedance and the diode characteristics, and manipulation of the impedance (but maintaining the same diodes) has a significant effect on the final waveform.
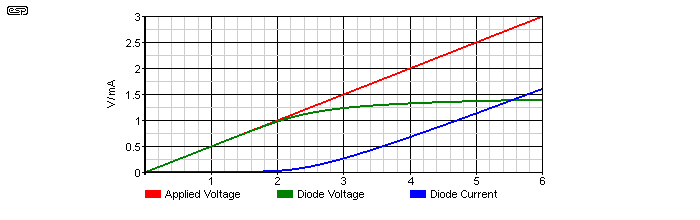
Figure 4 - Diode Conduction Characteristics (Typical of 1N4148)
The supply voltage is applied using a ramp waveform, and the diodes (two in series) are fed using a 1k resistor. As the voltage increases, there is virtually no diode current until the voltage has reached about 1V. At this voltage, diode current starts to flow, and the voltage across the diodes deviates from the applied voltage. As the supply voltage increases further, diode current also increases, and the voltage across the diodes starts to flatten out. You can see that it is not completely flat even at the extremity. The voltage continues to increase at a rate determined by the diode's internal (dynamic) resistance - in the case of the simulated 1N4148 pair used, this can be calculated to be (based on the variation across a defined area of the curve where the curve has flattened out) ...
Voltage change = 3.5mV
Current Change = 21.3uA
R = V / I = 3.5mV / 21.3uA = 112Ω
This is for the pair, so each diode has a dynamic resistance of 56 ohms. Note that you cannot simply use the voltage across the diodes and the current through them to obtain this figure, because of the diode's internal voltage drop. You will get an incorrect figure (that is much too high) if you do that. The point is that the dynamic resistance changes, depending on current. To see this effect properly, Table 1 shows the dynamic resistance (impedance) at each numbered point along the horizontal (X) axis of Figure 4.
| Point | Δ Voltage | Δ Current | Δ Resistance |
| 1 | 50mV | 171nA | 292k |
| 2 | 34mV | 7.7uA | 4.4k |
| 3 | 11.4mV | 18uA | 633 |
| 4 | 5.55mV | 21uA | 264 |
| 5 | 3.50mV | 21.3uA | 164 |
| 6 | 2.44mV | 21.6uA | 112 |
Much as simulations allow the easy determination of things that are very hard to measure, there is nothing like measurement to demonstrate the effects in the real world (as opposed to the cyber-world of the simulator). Accordingly, Table 2 shows a comparison between measured and simulated results, with each using the same basic parameters.
| Vin (RMS) | Vout (RMS) | Measured THD | Simulated THD |
| 1 | 830m | 8.9% | 7.1% |
| 800m | 740m | 4.5% | 3.0% |
| 700m | 670m | 2.2% | 1.46% |
| 600m | 587m | 0.81% | 0.57% |
| 500m | 500m | 0.28% | 0.19% |
| 400m | 400m | 0.076% | 0.06% |
| 300m | 300m | 0.036% | 0.018% |
The simulator under-estimates the distortion, and although it is (probably) more accurate, the measured results are ultimately what really counts. My audio oscillator has a residual distortion of 0.015% at 1kHz, and this needs to be factored in at low measured figures. One thing that is inescapable is that the distortion is increased at all levels. Even reducing the input to 50mV, the simulator still shows a measurable distortion ... although few amplifiers could even hope to get down to the 0.0002% level the simulator indicated.
The value of R1 (as noted above) has a great influence on the circuit's performance. Table 3 shows the simulated distortion levels for a range of voltages and series resistance. Be aware that very few opamps can drive significant levels into low impedances, so this limits the minimum value to around 680 ohms with high drive opamps, and about 1.5k or so with most others.
| Vin (RMS) | 680 Ohms | 1.2k | 2.2k |
| 1 | 4.90% | 5.92% | 7.08% |
| 800m | 1.44% | 2.11% | 3.00% |
| 700m | 0.57% | 0.92% | 1.46% |
| 600m | 0.19% | 0.33% | 0.57% |
| 500m | 0.06% | 0.11% | 0.19% |
| 400m | 0.019% | 0.033% | 0.060% |
| 300m | 0.006% | 0.010% | 0.018% |
From the above, it is readily apparent that low values for R1 will reduce the distortion below the theoretical diode conduction voltage, but this approach loads the source amplifier. In addition, the dynamic resistance of the diodes becomes more invasive, allowing the clipped voltage to reach a higher than expected peak amplitude. For example, with an input of 2V RMS, 2.2k will cause the peak to limit at 1.32V, 1.2k gives 1.37V, and 680 ohms allows the peak to reach 1.41V. I shall leave this decision to anyone who may be interested in experimenting with the technique.
So, if you want to add a soft clipping circuit, you will benefit from lower levels of harsh high-order harmonics at clipping, but at the expense of effective power output and (much) higher than normal distortion at all levels from as low as about 20% of the maximum output voltage.
If a soft clip circuit is incorporated into an amplifier, it must prevent the power amp from clipping at any sensible input level. Figure 5 shows how the level is reduced compared to the input. The red trace is the 2V peak (1.4V RMS) input, and the green trace is the soft-clipped output (1.04V RMS, 1.26V peak). Nearly all preamps will allow more than enough drive if the volume control is set to maximum, and this is what tends to happen at parties (and often with professional equipment as well).
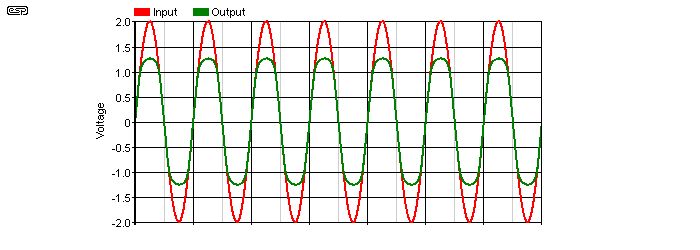
Figure 5 - Clipped Level Vs. Input Voltage
This is essentially exactly the same information as shown in Figure 4, but shows the signal waveform rather than DC conditions. What is not immediately apparent from the waveform is that the distortion with a 1V peak input is higher than expected. Given that we generally consider the forward voltage for a silicon diode to be around 650mV, it may come as a surprise that even with a 1V peak input, the distortion is over 1.5%. Instead of a 1V peak output, it's reduced to 958mV, with an RMS value of 690mV instead of 707mV. Table 1 shows this trend quite clearly.
For the exercise, let's use a 100W (8 ohm) amplifier as our model, and we will apply a soft clipping circuit to it. Using the 4 diode clipper shown in Figure 3, we can do some basic analysis.
We'll allow a maximum input voltage to the clipper of 1.4V RMS (2V peak), after which normal 'hard' clipping will occur in the amplifier itself. A 100W/ 8 ohm amplifier will give 28V RMS (40V peak) at the speaker terminals at full power. With a 2V peak input, we see from the above that the peak output from the clipper will be 1.26V, so the gain needed (after the clipping circuit) is ...
Peak Input Voltage = 2.0
Peak Clipped Input Voltage = 1.26 (from Figure 5)
Gain = VOUT / VIN = 40 / 1.26 = 31.74
The gain needed is achieved (close enough) using a feedback resistor of 30k and a 1k resistor to ground, a gain of 31. So far so good. Now, we need to decide on the maximum distortion figure we are willing to accept at a 'typical' peak output power. 1% is probably about right - certainly higher than we would expect from a transistor amp, but not unreasonable. If you don't want to modify the gain of the power amp, any extra gain needed after the clipping circuit can be provided by a simple opamp stage.
From Table 2 we see that with an input level of 700mV (RMS), distortion is 2.2% (measured) or 1.46% (simulated). The input level obviously needs to be a bit less than this, so 650mV is a good guess. The simulator says that this gives 0.94% which is close enough. The actual amplifier power at 1% distortion is determined by ...
VOUT = VIN * Gain = 650mV * 31 = 20.15V (RMS)
Power = V² / R = 447 / 8 = 56.4W
Oh dear! A perfectly good 100W amp is now downgraded to 56W at 1% distortion, with the distortion rising rapidly above that. Sure, the distortion components will be low order odd harmonics, but intermodulation distortion is increased proportionally as well, and the otherwise distortion free (relatively speaking) amp output cannot be used to its full advantage. Use of a lower value feed resistance (R1) will improve matters, but as noted above won't help as much as we might like.
After all of this, will it sound like a valve amp? Not really. While the distortion characteristics will be similar to a reasonable push-pull valve amp of roughly similar power, the higher than normal output impedance of a valve amp is another factor that gives the 'valve sound'. While this can be included as well, the clipping circuit cannot compensate for the gain variations in an amp configured for high output impedance.
Most traditional soft clipping circuits are as described above, and they are used in most guitar amplifiers. A pair (or several pairs) of diodes, with the signal provided via a feed resistor (R1 in Figure 3). The resistor value is usually an arbitrary value, and is usually somewhere between 1k and 10k. Over the years there have been many different circuits, but most have the same basic problem - the diodes provide little distortion until their threshold is reached, after which they clip fairly brutally. An alternate way to look at the problem is to consider that if the diodes are fed from a high impedance (at least 100k), their characteristics can be exploited more easily.
In particular, it has been shown (above) quite easily that diode conduction starts from a surprisingly low voltage, but the current conducted is also very low (see Table 1 to see the voltage vs. current characteristics). When fed via a high impedance, the small forward leakage current can be used to provide a very gradual onset of distortion. Consider that valves (including output types) are inherently high impedance devices, and coupled with only passable linearity it's no surprise that clipping is a relatively gradual process. Instead of the more typical 1-10k feed resistance to a diode clipper, it's useful to see the results when the resistance is increased to 100k.
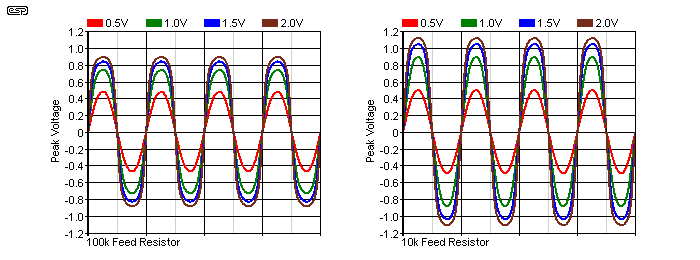
Figure 5 - Clipped Level vs Input Voltage, 100k and 10k Feed Resistance
The difference between high and low feed resistance is illustrated above. The output signal is shown for peak input voltages of 500mV, 1V, 1.5V and 2V in each graph. As you can see, when the feed resistor is 100k, the maximum output level is reduced. Using a 10k feed resistor increases the level, but the overall shape of the waveform is very similar to that using 100k. It's very doubtful if anyone would be able to hear the difference with music. As the resistance is reduced further, there is less effect below the diode conduction voltage.
A high resistance provides the 'softest' clipping, but it creates other problems, not the least of which is noise. High impedance circuits cause more thermal noise in the resistance, and this will add to the overall noise level in an amplifier, and a high impedance also allows the circuit to pick up hum and other noise as well. Whether it causes the noise to become intrusive depends on the signal level.
After much simulating and measuring, it turns out that around 10k is a reasonable compromise. It can be argued that 100k would be better for a guitar amp because it starts to distort at a lower level, the difference will probably not be audible with guitar. 1N4148 diodes are dramatically better than 1N4001 or similar power diodes, because their dynamic impedance is higher.
Using germanium diodes is another way to get a very soft distortion characteristic, but they are no longer easy to get. Being germanium, they are inherently leaky and start conduction at well below 300mV. Most also have a fairly high dynamic impedance, which means they will distort the signal over a wider range than a silicon diode. However, germanium is also sensitive to temperature, and the voltage across the diodes will vary over the normal 'room temperature' range. Schottky diodes also have a low conduction threshold, but their dynamic resistance is too low to be useful.
LEDs (light-emitting diodes) are often claimed to have a soft conduction characteristic that is more suitable than standard diodes, but this will only cause distortion to start at a lower level, and be fairly gross by the time the amp reaches full power. By all means experiment with whatever diodes you have available, but you must remember that any form of soft clipping simply degrades the amplifier's performance. The increased intermodulation distortion cannot be avoided, as it comes free with harmonic distortion!
The effects of the soft clipping circuit can be modified over a wide range, by varying the feed resistance, type of diodes used and the peak levels expected. In general, the result is unlikely to be as hoped for anyway, because occasional transient clipping is usually inaudible. The harmonic and intermodulation distortion that has been added may be very audible with some material, and is unlikely to improve your enjoyment of the music.
Of course, you may find that you like the effect in your hi-fi, although it's doubtful. If you think that you'd like to experiment then you have enough information to make an informed decision as to how to go about it. Clipping circuits (soft or otherwise) are very common in guitar amps, but are far less so in hi-fi - and for good reason.
There is nothing that seems complicated at all in this technique, but as should now be evident, there are actually quite a few things that must be considered. As is so often the case, an apparently simple circuit can be far more complex than anticipated, and it is a matter of juggling the compromises to obtain the results you want - within the limits of the technique.
While it might be relatively easy to incorporate the soft clip function into a DSP that may be providing other functionality (equalisation, crossovers, etc.) and avoid some of the limitations, the definition of a soft clip circuit requires that it should start to distort the signal earlier than expected. In the end, it is probably far easier (and definitely better for hi-fi) to incorporate a clipping indicator so that clipping can be avoided altogether.
Main Index
Articles Index