
|
|
| Elliott Sound Products | AN-002 |
 Main Index
App. Notes Index Main Index
App. Notes Index
|
This app. note is adapted from the AC millivoltmeter described in the project pages, as well as some additional ideas. while none of the information here is original, it is offered as a potentially useful collection of different metering amplifiers. Meter amplifiers are a special variation of the precision rectifiers described in AN-001, and typically they need extended frequency response. Very high linearity is nice to have, but in reality few analogue meter movements will match the accuracy of any of the circuits shown here.
Two of the circuits shown here are peak reading (Figures 2 and 3), but calibrated for RMS. If you need an average reading meter (but still usually calibrated for RMS), see Figures 1 and 4, or you can use diodes in place of the voltage-doubler caps in Figure 2 (C4 and C5). This has been tested in the simulator, and it functions as expected. The disadvantage is that there are two diode voltage drops that the amplifier circuit has to overcome, and this reduces high frequency performance.
The discrete version is shown in Figure 1. This is almost identical to that shown in Project 16, with the addition of an input resistor to ground, and a higher value cap between the FET preamp and the discrete opamp formed by Q2-Q4. This circuit has the advantage of wide frequency response, and the gain is high enough to enable full scale deflection with signals as low as 3mV RMS. Making the circuit less sensitive is quite simple, and more information is given below.
Recommended supply voltage is ±15V, although the circuit works well with ±9V as shown in Project 16.
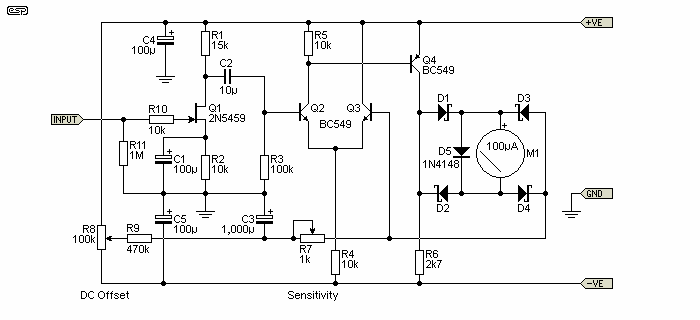
If you cannot obtain the 2N5459 JFET, you can substitute a BF244. Almost any other JFET can be used, provided the source resistor (R2) is changed to suit. Because this resistor sets the bias conditions for the JFET, you may need to experiment a little to get best performance. Ideally, the voltage on the drain should be half the voltage between the source and the positive supply. If the JFET has 2V on the source and you use a 15V supply, the optimum voltage is therefore ...
Vdrain = ((+V - Vsource) / 2) + Vsource = ((15 - 2) / 2) +2 = (13 / 2) + 2 = 8.5V
Although it is possible to improve the circuit in terms of linearity, this is not necessary for metering applications. A small amount of signal distortion will cause a very small overall error - usually better than the accuracy of the meter movement itself.
As shown, the circuit has a -3dB frequency of 1.17Hz, and according to the simulator the upper -3dB frequency is about 1MHz. I tend to think this is rather optimistic, however it is certainly possible with careful layout. It should be possible to get up to 100kHz with a reasonable error margin (about 5%).
The meter movement should ideally be either 50µA or 100µA, however it is possible to use less sensitive movements. I would not recommend anything above 100µA though, because the drive circuit has limited current capability. The maximum with the circuit as shown is capable of an absolute maximum of 300µA output, but this is just below the amplifier's clipping level.
The maximum input level is limited to around 75mV RMS, although you can increase that by removing C1 (which reduces the gain of the JFET amplifier), or if you need even higher input levels the JFET stage can be removed altogether. The absolute maximum recommended input voltage is 2V RMS - if you need it to be less sensitive, it's easy to add a simple attenuator in front of the circuit.
To obtain better performance than the standard circuit, replace D1-D4 with OA91 (or OA95, 1N60, 1N34A etc.) or similar germanium diodes, but BAT43 or similar Schottky diodes are almost as good. These are all faster than 1N4148 silicon diodes, and they also have a lower forward voltage drop. It may appear that this would be of no importance, but the low voltage drop is beneficial. Any speed limitation of the amplifier circuit causes a measurable time delay as the signal goes from one polarity to the other. Lower forward voltage means there is less 'dead time', where no diodes are conducting.
The next circuit is based on one that has been used by Hewlett-Packard (which became Agilent and is now Keysight) in some of their older instruments. It has been modified to use standard E12 value resistors and more readily available transistors. One feature of the circuit is the use of R9, and it is used to partially overcome the forward voltage drop of the diodes to get better linearity with low input voltages, for example at 10% of full-scale. The circuit was designed with germanium diodes, because they are fast, and have a very low forward voltage drop. While it is possible to adjust the value of R9 to enable the use of silicon diodes, this is not really recommended. Schottky diodes are a suitable alternative, however germanium diodes (such as the OA91) are still available if you look around.
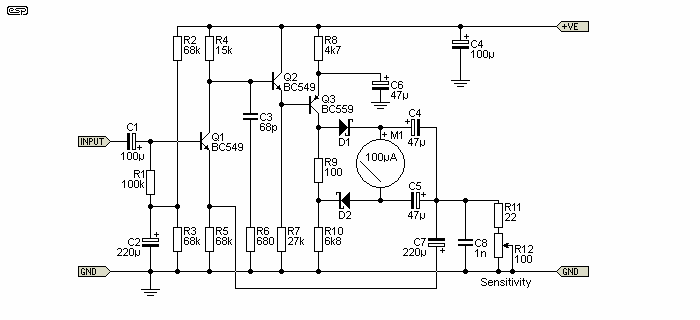
The sensitivity of the meter amp can be such as to obtain FSD (full scale deflection) with an input of 5mV RMS, and as shown the maximum is around 28mV with the sensitivity pot at maximum resistance. This can be changed, but frequency response will almost certainly suffer because of limited open loop gain and insufficient feedback. As shown, if adjusted for 5mV, the response is flat (within 5%) up to around 300kHz.
This circuit doesn't have any particular vices, but it is completely unsuitable for DC operation because it uses only AC feedback. While circuit #1 (above) can be modified to allow DC operation, the DC stability almost certainly will not be good enough for precision work. These two discrete meter amps can be expected to perform well up to at least 100kHz, and with some tweaking can probably exceed that quite easily. The suggested power supply is +15V, although they should work with lower (or higher) voltages if needs be. Some modifications may be required.
Opamps are very convenient, but unfortunately are not always suitable as meter amps. One thing they do offer is simplicity and great flexibility, with potentially much wider input range and the ability to drive less sensitive meter movements. Very fast opamps should be able to give good frequency response, and up to 100kHz is possible with some care, or if the circuit is designed to have a relatively low sensitivity.
While it may appear that the circuit shown below cannot work properly because there is virtually no DC feedback path, it actually functions fine even without R4. The electrolytic capacitors have a very small leakage, and the circuit topology generally means that the bias point of the opamp's output will be well within limits. It may make you feel better if you include R4, and although it really doesn't do a great deal it's preferable to include it.
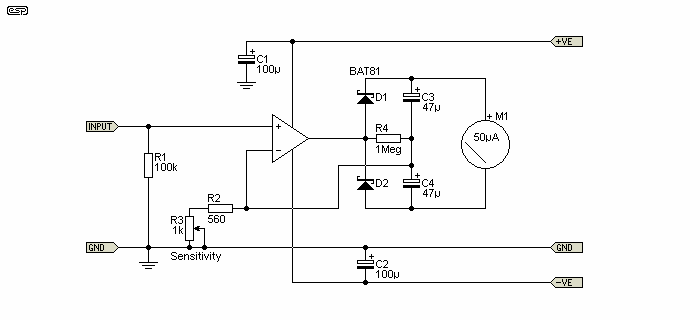
By using low forward voltage diodes (germanium or Schottky), this circuit is capable of very good results, and will be around 0.6dB down at 50kHz (opamp dependent). With small signal silicon diodes (e.g. 1N4148), it is almost worthless if set for high sensitivity. To maintain flat response, it is necessary to keep the gain fairly low, otherwise the internal Miller cap in the opamp will cause premature roll-off of high frequencies. 100mV input sensitivity is about the best you can hope for, and response should extend to 20kHz (-1dB or so). By using an uncompensated opamp, the necessary stability cap becomes an external component, so it can be selected to give the required bandwidth. A TL071 opamp (for example) has 13V/us slew rate, and this is fairly fast ... despite this, it is much too slow to be useful at higher frequencies. Consider the NE5534 with an external compensation cap, as it should be possible to obtain flat response to 100kHz fairly easily.
The issue with opamps in this role is simply one of slew rate - the amplifier must be able to overcome the diode voltage drop as quickly as possible. Ideally, the opamp would offer an infinite slew rate, but such opamps do not exist, so it is necessary to make do with what we have. Interestingly, it used to be possible to get an opamp that would work with 30mV input, driving a 1mA meter movement, at frequencies up to at least 500kHz. The HA2625 (Harris Technology) opamp had 100MHz unity gain bandwidth, 600kHz full-power bandwidth, with very low input current. With extremely low input offset current and 'respectable' offset voltage as well, there's very little available today that can match the (now ancient) HA2625.
The gain of the opamp version is much lower than the discrete versions - about 80mV RMS input for 50µA meter current. This can be varied by changing the value of the sensitivity pot and associated series resistor, but I do not recommend using anything less than about 600 Ohms.
Any additional gain needed may be supplied with a preamplifier circuit, to lift the typical 3mV signal to 100mV. Consider using a JFET in front of any BJT input opamp if high input impedance is needed, otherwise noise will become a problem.
To get a real-life idea of performance, the opamp circuit was built on an opamp test board. This uses LM1458 dual opamps (equivalent to the µA741), and as predicted it was useless with 1N4148 silicon signal diodes. However, using Schottky diodes and set to have FSD at around 1V (using a 250µA meter that I had handy), response was 0.2dB down at about 35kHz - not a bad effort for a very slow opamp. Performance was degraded significantly if sensitivity was increased. Virtually no opamp circuit is likely to be quite as good as discrete for sensitivity, but given the low cost and great simplicity of the opamp approach it is certainly worth considering.
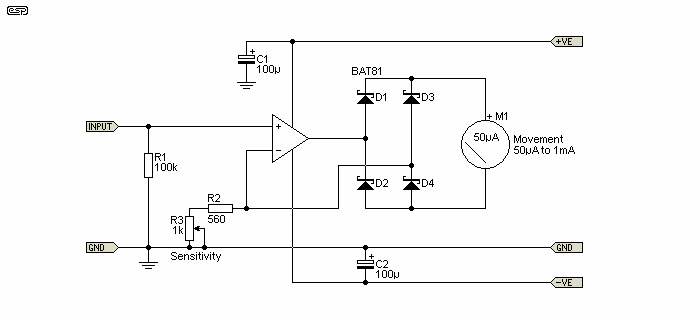
The version shown above is suitable for most 'general purpose' applications, and can drive a meter of up to 1mA coil current. It's suitable for voltages of 100mV or more, and has an upper frequency response of about 10kHz (-0.1dB), depending on the opamp used. Even with 1N4148 diodes, response is respectable, but if higher sensitivity is needed you'll need an amplifier circuit in front to boost the level and/ or a more sensitive meter movement. Unlike the version in Figure 3, there is no capacitance in parallel with the meter, so it is average reading. A cap can be added of course, and if large enough it will convert the meter to peak reading. A lower value can be used to damp the meter if necessary.
There are many examples of meter amps that use a voltage doubler (e.g. Fig. 2 and Fig.3) rather than a bridge rectifier (e.g. Fig. 1 and Fig. 4). There are good reasons for using a doubler, in particular because there's only one diode voltage drop to be overcome rather than two with a bridge. As always with electronic circuitry there's a trade-off (a compromise). The doubler demands twice the output current from the driver circuit, which means the metering amplifier has to provide twice as much gain as a circuit using a bridge rectifier. These are non-linear circuits, and the effort needed to present enough voltage (quickly enough) to overcome the diode forward voltage drop is the biggest limiting factor (this applies to all metering amplifiers).
The current is rarely a problem, because it's usually no more than ±3mA (assuming a 1mA meter movement), but when the gain is doubled, the amplifier's full-power bandwidth is reduced. The bridge rectifier demands a higher slew rate than a doubler for a given maximum frequency. A wide bandwidth opamp with moderate slew rate will work best with a doubler, while a moderate bandwidth opamp with high slew rate is probably better with a bridge. Opamps that use external compensation provide greater flexibility than those that are internally compensated.
To test this hypothesis, I simulated two circuits, with the same sensitivity and the same meter resistance, one using a bridge and the other a doubler. The simulation was based on 4558 opamps (not bad, but far from 'top shelf'). The input was 1V RMS, and both meters were calibrated for ~1mA (there's some variance, as they are tricky to get exact in the simulator). Calibration normally relies on a trimpot. Normally one would choose a very fast opamp, with a full power bandwidth of at least 10MHz (preferably closer to 100MHz) and a slew rate of no less than 20V/µs. There are suitable opamps available, but they aren't cheap.
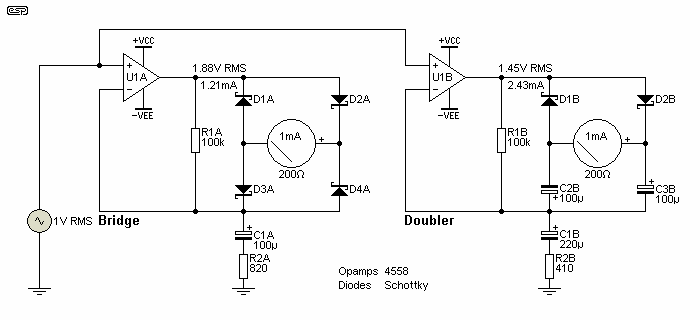
The bridge has lower gain (R2A is 820Ω), but there's more output voltage because there are two diode drops for each polarity. The doubler has to provide twice the current, so R1B is 410Ω. There's no difference between the two at 1kHz, but at 100kHz the bridge will read low by over 10%, vs. about 5% low for the doubler. The opamp has enough bandwidth, but the slew rate is too low to allow the output to overcome the diode forward voltage. With two diodes for each polarity, the bridge rectifier is never quite as good as the doubler, which has only one diode for each polarity.
With a very fast opamp, the difference is academic. Some designers prefer a doubler because the capacitors (C2B, C3B) damp the meter movement so the deflection is smoother than a bridge. A well-damped meter movement won't care either way. While you might think that the doubler must be peak-reading (rather than average-reading), it's not. Both circuits show the average value of the rectified input waveform.
Instrumentation meter amplifiers are a special case of rectifier, and present the designer with a great many sometimes conflicting requirements. Because measurement instruments are expected to perform well below and above the audio frequency range, it becomes a challenge to design a circuit that has sufficient gain and wide enough bandwidth to cover the required frequencies accurately.
Sensitive meters make the design easier, and in nearly all cases the lowest diode voltage drop possible is highly desirable. Metering amplifiers such as those shown in this article are used in a wide variety of test instruments, including AC millivoltmeters, distortion analysers, impedance meters, etc. They are my no means limited to audio usage, and are used in almost every area of electronics and engineering where analogue metering is required.
While most meters are now digital, analogue meters have a special place in test equipment. They are generally easier to read, and you can visually gauge the average when the pointer is fluctuating. This isn't possible with a digital meter unless it's designed to be slow, averaging the waveform before it's displayed.
1 - Hewlett Packard instrumentation manuals (various). 2 - Opamp Datasheets (for the devices mentioned)
| Main Index
App. Notes Index |