
|
|
| Elliott Sound Products | How to Wire a Power Supply |
 Main Index
Articles Index Main Index
Articles Index
|
This article does not attempt to cover general household or commercial wiring practices - only the internal wiring needed for electrical safety and making your power supply work are covered. For detailed information on wiring practices, you must contact your local supply authority/company, or obtain a copy of the wiring rules for your country or locality. I am unable to assist with this, as it is highly country specific, and in many countries is also heavily regulated and/or legislated.
| Warning #1: Household electrical current is extremely dangerous, and it may be illegal (and/ or unlawful) for you to perform your own wiring, even for equipment that connects via a standard wall outlet. If you are unsure of the procedures, terminology or anything else that may cause a potentially fatal error due to oversight or lack of knowledge, you must seek assistance from a qualified electrician. Remember that if someone is killed or injured as a result of your work, you may be held liable and subject to severe criminal and financial penalties. |
Because this topic was raised in a forum post, please take careful note of the following ...
| Warning #2: Never, EVER use a mains connector of any kind for DC. While it might be tempting to use an IEC connector
(for example) for low-voltage DC, doing so is illegal and extremely dangerous. You might know what it's for, but anyone else will assume that it's a mains input (because that's what
mains connectors are for - mains !).
Should a mains lead be plugged into your 'DC connector', the end result will be at best an entirely fried piece of electronic ash. At worst, someone could suffer an electric shock or be killed. YOU could then be charged with manslaughter, because what you have done amounts to wilful disregard for basic electrical safety and is clearly negligent. If the person survives, you can expect to be sued for damages, since the person affected did nothing wrong, but received an electric shock or other injury due to negligence on your part. Depending on the laws where you live, you may be charged with negligent homicide or similar (the legal wording might differ, but the end result won't be good for anyone involved). Mains connections are for mains - nothing else, ever! |
I have been asked many times about PCBs for power supplies for amplifiers. I do not recommend using a printed board for a number of reasons, and these are as follows ...
So, what is the constructor to do? Hard wire the power supply is what. A basic configuration may look like that shown in Fig. 2.1 - this is the schematic for a general purpose supply, suitable for a high-end hi-fi power amplifier. C1 and C2 are optional - they won't make the amplifier sound 'better', but they may reduce conducted emissions somewhat. They are not shown in the physical drawing (Fig. 2.2.1) for clarity.
In most cases I will show a PSU as shown in Fig. 1.2. This can use any transformer (25V secondaries are an example only), regardless of VA rating or construction. Where the physical transformer is different, refer to the next two drawings that show the most common connections. Note that the 'dot' on a winding indicates the start of the winding. This is a long-standing convention.

This is all well and good, but these are the electrical connections, and have no direct relationship to the physical connections needed. For the purposes of the exercise, we shall assume an IEC mains connector, chassis mounted mains fuse, and a power switch mounted on the front panel. It's very common that a schematic will simply show the connections, with no reference to the physical wiring. The two can be very different. In the three drawings, the schematics are drawn to represent the physical connections (at least to a degree), but many are not.

Many of the transformers you can buy today have separate windings, often with two primaries and two secondaries. Primaries and/ or secondaries can be connected in series or parallel. In Fig. 2.2, the primaries are in series to allow for 230V mains, and the secondaries are in series. The junction of the finish of one secondary to the start of the other provides a centre-tap, with a total output of 50V for the example shown. The polarity is important! Almost all transformers have a wiring legend that shows the colours used, and they are always in order - start...finish.
If the secondaries are wired in parallel, you get 25V AC output, but at twice the normal current. This is rarely useful for audio equipment, but is common for industrial supplies, battery chargers and many other places where high current is required.
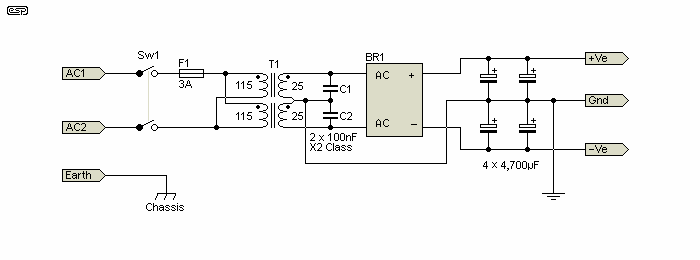
When the primaries are wired in parallel, the transformer can be used with 115-120V mains. Again, the polarity is important. There is nothing even remotely difficult or baffling about the various connection schemes. You must follow the wiring diagram(s) that come with the transformer to ensure that you don't get the polarities wrong. That can result is very high mains current, blown fuses, and the use of copious swearwords.
The diagram in Fig. 2.2.1 shows the most likely physical arrangement of the supply components. If you need to re-arrange the locations, it is a relatively simple matter to move things where you need them, while maintaining the required electrical connections. Some construction articles (and especially kits) will try to enforce a specific layout, but this will not always suit the constructor - especially if s/he happens to have a whole box of 2,200µF capacitors at their disposal (wishful thinking for most  ) where the bill of materials calls for 10,000µF. It's quite easy to fabricate a bracket to hold filter caps in place, and wrapping every second cap with double-sided tape means the structure will stay together very well. Connections for positive, negative and earth (common/ ground) can be made with heavy tinned copper wire or other low resistance connections.
 | It is extremely important that the DC (including earth/ ground) is taken from the capacitors, and not the bridge rectifier or transformer centre tap. If DC is taken from the bridge, it will be noisy, and this can easily get into the amplifier, often seriously degrading the signal to noise ratio - particularly under load! The noise may not be heard directly, but will add unwanted signals to the music which may sound 'hazy' or 'clouded' as a result. |
The 'stylised' drawing below shows how the various components should be connected together. From this, it is possible to extend the basic idea very easily. The diagram assumes that the constructor will use 4 filter caps in a series-parallel arrangement (2 for each supply rail), a 35A chassis mount bridge rectifier, and a toroidal transformer. The colour coded transformer leads are for identification - they are not intended to be taken literally. Refer to the manufacturer's specifications to make sure that you get the correct colours! IEC (European) mains colour coding has been used, and this is now almost a world standard, so should be painless for all. The older standards are also provided below.

Note that I have not shown the required sleeve over all mains connections. This is essential for electrical safety, and usually just means the required heatshrink tubing is placed over the wire(s) before attaching and soldering. Make sure that soldering does not heat the tubing, or it will shrink before it is properly located. To this end, make sure that the tubing can be located at least 25mm (1") and preferably more, back from the solder connection whilst the joint is being soldered.
Rubber boots are available for IEC chassis mount connectors, and large heatshrink can be used to completely encase the fuse holder. Don't forget to feed the wires through the heatshrink or rubber boot before soldering!
As well as proper safeguards against accidental contact with the mains, it is also extremely important to keep mains and low voltage wiring well separated. This means either physical separation, or reinforced insulation between the two sets of wiring. If physical separation is used (and this is the most common and easily achieved), make sure that wherever possible, the minimum distance is 25mm. It should not be possible to squeeze or otherwise coerce the primary (mains) and secondary (low voltage) wires together under any circumstances. All wiring should be secured using cable ties, and suitable chassis anchors may be needed in some cases to ensure that all wiring remains properly separated.
With most toroidals, all leads come out of the over-wrapping in (more or less) the same general area. Normally the insulation provided is sufficient to ensure safety, but some additional heatshrink tubing will not go astray if the leads are close together.
The diagram above doesn't show the details for an optional loop breaker. Full details of this are in the article Earthing Your Hi-Fi. The loop breaker allows the internal electronics to 'float' during normal operation, and it effectively disrupts any earth/ground loop induced hum when two or more pieces of equipment are connected together. It is extremely important that all input and output connectors are isolated from the chassis, and this applies whether the loop breaker is included or not. Be aware that using a 'loop breaker' may not be acceptable in some countries.
The diagrams above show only the basic parts needed. Other components are used routinely for lower noise, capacitor discharge, etc. A diagram of these extras is not needed, but a brief discussion of them is certainly warranted.
Low Value Capacitors
It is very common for people to use 100nF or so polyester, Mylar or polypropylene capacitors in parallel with the filter capacitors. The use of these theoretically ensures that the impedance of the power supply remains low at all frequencies up to several megahertz. In general, they do no harm, but are usually superfluous, meaning than they usually do no good either. While it will cause no problems to use these components at the power supply, most amplifier PCBs will have provision for them on the board. This ensures that lead inductance between the supply and the amplifier is dealt with. Many power amplifiers also have on-board electrolytic caps - effectively in parallel with the main filter caps.
As shown in Fig. 2.1 (etc.), adding caps (X-Class) in parallel with each transformer secondary winding can reduce noise - in particular conducted emissions. This is high frequency noise passed back into the mains via the power lead. In addition, capacitors (typically 100nF) are sometimes used across the bridge rectifier, effectively in parallel with each diode. These help to reduce noise (in particular, conducted emissions), but normally, a properly designed and constructed supply will not require them. However, they do no harm, and may be used if you so desire. Note that if your power supply uses a choke input filter (very uncommon for modern linear supplies), fast diodes must be used - standard speed diodes will overheat and fail. Choke input filters are very uncommon with semiconductor amplifiers, but are seen occasionally with valve amplifiers.
Capacitors may also be used in parallel with the primary winding, again to reduce noise. Use of caps across the mains is covered below, and great care must be used if you decide to do this. Some common practices are extremely dangerous - especially with 220V or greater mains voltages. You can also use an IEC socket with an in-built EMI filter (common-mode choke, plus one or more X-Class capacitors).
It is very common with valve amplifiers to use a 'bleeder' or discharge resistor across the power supply. Although not strictly necessary with low voltage solid state equipment, they don't cause any harm (apart from a small amount of heat and a slight loss of efficiency). A typical value for supply voltages of ±30V to ±60V would be 1k, rated at 5-7W - just make sure they are not mounted close to the filter capacitors (the heat may reduce the capacitor life).
Before discussing the mains, there are several standards of colour coding and nomenclature that need to be covered first. If unsure of any detail, you should seek assistance from a suitably qualified electrical trades person - in some countries it may be illegal to perform any mains wiring unless you are qualified and/or licensed. Make sure that you understand the specific regulations that apply to you - this document is a guideline only, and it is not possible to account for the regulations of all countries.
| Colours | Lead | Also Called | ||
| IEC | US | Old ¹ | ||
| Brown | Black | Red | Active | Line, Hot, Phase |
| Blue | White | Black | Neutral | Return, Cold, Grounded conductor (US) |
| Gr/Ye ² | Green | Green | Earth | Ground, Safety Earth, Earth Ground, Grounding conductor (US) ³ |
¹ The 'Old' standard was used in various countries (including Australia), and some wiring may still use these colours. ² Gr/Ye - Green with Yellow stripe - this is the standard world wide, although it is not so common in the US or Canada at present. ³ There is an important distinction between 'Grounding conductor' (safety earth) and 'Grounded conductor' (Neutral).
These are US (and perhaps Canadian) terms for the conductors and they are not interchangeable, despite the similarity of the names!
The incoming household mains may be connected to an appliance using a fixed lead, but it is far more convenient to use a connector. The European style IEC connector has world-wide approval, and is recommended. Ready made moulded connector style power leads are available from retail outlets, and are safe and durable. Other lead types may also be available in your area. Be careful that the lead you use is legal in your country - for example, many 'specialist' or 'high end' or 'audiophile' leads will be illegal in a great many countries outside the USA - note that this is a simple fact of electrical safety. Indeed, unless they have UL or CSA approval, you may be at risk in the US and Canada as well, especially if there is an insurance claim in the balance. Expect such leads to make no audible difference in a blind test.
If a fixed lead is used, it must be securely clamped at the entry point, and must also be insulated from the chassis with a rubber or plastic grommet. This prevents the lead from damage by metal edges of the entry hole. Cord clamping grommets are available, but be aware that the hole size is critical to the ability of the grommet to clamp the cable securely without damage, and ensure that the lead (replete with grommet) cannot be pulled out.
It is recommended (or required in some areas) that the earth (ground) wire of any fixed mains lead should be longer than the other leads inside the casing to ensure that it is the last to break should the lead clamp fail. This provides some degree of additional safety, but is not infallible. Use of an approved mains connector is by far the safest and most flexible option.
The mains fuse holder must be a safety type, and depending upon where you live this may be a mandatory requirement. The safest is an IEC mains connector with integral fuse holder, as it is impossible to access the fuse while the lead is inserted. Where a separate chassis fuse holder is used, it should be constructed so that it is not possible to contact the fuse until it is completely clear of internal connections. New fuse holders will be designed to meet this requirement, but many older ones will not.
Older style fuse holders allowed physical (finger) contact with a partially withdrawn fuse, which could easily contact an internal conducting part of the holder. The potential for serious injury is quite obvious if power is applied to the unit and the fuse is intact! A safety fuse holder will not allow contact with the fuse until it is withdrawn beyond any internal conducting parts.
There are two schools of thought about the correct placement of a mains fuse. Some consider that it is safer to have the fuse before the switch, in case the switch shorts to chassis. While this may be possible with switches not designed for mains usage (for example mini-toggle types), in general any switch that is designed for switching the mains should be fail-safe. Even if the internal mechanism collapses completely, a mains to chassis short should never happen. That doesn't mean that it can't happen though! Fused IEC sockets have the fuse before the mains switch.
Others think that the switch should isolate the fuse holder, making it less likely that the user may contact live parts as the fuse is withdrawn. Most approved fuse holders available now are already designed to prevent any accidental contact. Use of an IEC socket with integral fuse holder makes the argument irrelevant - they are electrically safe by design because the IEC mains lead must be removed to allow access to the fuse.
The ideal mains switch is a double pole switch, to ensure that both active and neutral leads are disconnected when the power is off. This guards against internal components remaining live due to accidental reversal of the mains leads, either because 2 prong non-polarised mains plugs are used (not recommended), or because of incorrectly wired power outlets or extension leads, for example. These are unfortunately quite common where inexperienced persons have wired the lead, and have not followed the correct colour code.
Single-pole mains switches are far more common though, and in general are perfectly safe. Consider using an IEC connector with both integral fuse and switch.
Any separate switch that is used must be rated for mains usage, and in some countries may also require specific approval to be used for this purpose. Never use mini-toggle switches or similar for mains applications. Even though many claim to be rated for 125V AC or more, they lack the necessary internal and external clearance that is required for mains applications. Because of the small clearances and often flimsy construction, there is an ever-present risk that a fault could cause mains voltages to appear on the external metalwork. If the switch is mounted on an earthed metal panel it might be thought acceptable, but these switches are only appropriate for control or signal voltage switching. The contact assembly is rarely robust enough to withstand the inrush current of even a modest transformer.
The mains safety earth must be connected to a separate bolt, whose sole purpose is to provide a solid earth connection to the equipment chassis. Where there are separate removable panels, it may also be a requirement where you live that these have a wired connection to the main chassis. This prevents any possibility of the removable panel from becoming 'live' should an electrical fault cause the mains to be in contact with the panel - regardless of whether the securing screws are installed or not.
Make sure that if the internal circuitry is earthed to the chassis, that this is done as close to the mains earth point as possible. Separating the two earth connections on a chassis can create an internal earth loop that may cause hum when the equipment is connected to something else.
It is common for many to use a capacitor connected between the active (live) lead and neutral. This can provide some useful attenuation of mains borne noise, and also reduces the diode switching noise fed back into the mains wiring. The capacitor must always be X-Class, and rated for mains AC usage (typically 275V AC) - a DC capacitor will fail sooner or later regardless of rated voltage and should never be used. X-Class capacitors are the only devices that are rated for continuous duty in this role, and may be mandatory in many countries.
In some cases, a capacitor may be used between live or neutral and earth (particularly in the US). This is especially common in some older guitar amplifiers, and the capacitor is switched to either mains supply lead to allow the user to select the lowest noise position. To amplifier service people, these are commonly known as 'death caps', and for a very good reason. Since 630V DC (sometimes only 400V DC) capacitors are generally used, they will fail - especially at 220 or 240 volts AC. DC capacitors are totally unsuited to continuous AC duty - failure is guaranteed at 230V, and the only unanswered question is when. In some cases, a capacitor may be used from both active and neutral to earth. This is an extremely dangerous practice, and is illegal in many countries. Generally, I do not recommend or condone the use of capacitors from any mains connection to safety or chassis earth. Indeed, under some circumstances these caps can cause residual current devices (RCDs - safety switches) to trip. The use of any capacitor between mains and the chassis places the user at risk of electric shock if the chassis is not connected to safety earth.
When an X-Class capacitor is used across the mains, always ensure that it is directly in parallel with the primary winding. If it's separated from the winding by the power switch, it may remain charged to a high voltage under some conditions. Having it before the switch also means that the cap is stressed 24-7, assuming that the equipment is permanently connected to the mains (common for most hi-if equipment).
Unfortunately, the regulators in many countries (Australia and the European Union for example) have decided that the suppression of RF interference is more important than safety. Although this may appear an overreaction on my part, I think that this is a deplorable state of affairs. It used to be that no power supply was allowed to have a capacitor (of any description) bridging the insulation barrier, but without one (or more) most switchmode supplies fail EMI tests.
As a result, almost all modern switchmode supplies (including double-insulated) use 'Y-Class' (supposedly safe under all foreseeable circumstances) capacitors from active and neutral to the output - which may or may not be earthed. These caps are low value (no more than 5nF), but still cause the output to float at half the mains voltage. This practice has already seen the demise of many PC sound card input stages (amongst other things), and will continue to do so. The reasons for this are described in Worldwide Ban Looms for External Transformers.
A few cases of possibly counterfeit Y caps have been reported. Rather than electrically safe under all foreseeable conditions (as required), the fakes are (predictably) intrinsically unsafe. No-one knows how or when they will fail, nor what they do when failure occurs ... rigorous tests are used to verify that a Y-Class cap is up to standard, and it's naive to think that the tests will be applied to fakes. They are counterfeit, and all 'safety' markings are also counterfeit.
Some overseas manufacturers (use your imagination as to which country might be responsible) have even decided not to bother with the nuisance of Y caps, and I have seen standard 1kV ceramics used in this role. This can only be described as very scary - especially since anyone can become an importer these days, and sell on auction sites. Most are completely unaware of mandatory requirements which vary from one country to the next, so no safety tests are performed at all.
These power supplies (all external PSUs in fact) are classified as 'prescribed' or 'declared' articles in Australia, and are subject to mandatory electrical safety testing. Because people implicitly trust the power supply not to kill them (a not unreasonable expectation) it's important to ensure that it won't. The tests are designed to ensure to the best of anyone's ability that no failure can cause the output or any exposed metal to become live, and that the PSU cannot catch on fire, emit smoke, or melt the casing to expose live parts.
I don't know about you, but I don't trust a foreign manufacturer who is desperately trying to sell for the lowest possible price. I know that thermal fuses will be missing (I haven't seen one in any of the cheap supplies), and that shortcuts will be taken. This includes using unapproved (or downright unsafe) parts, very basic circuitry with mediocre performance, and inadequate creepage and clearances between mains (hazardous) voltages and SELV (safety extra low voltage). With many, it's unwise to assume that the transformer has the required level of insulation, including creepage and clearance distances between primary and secondary windings.
Large transformers (and particularly toroidal types) have low winding resistance, and may draw a very high current when turned on. Coupled with an often very large bank of filter capacitors, you may experience 'nuisance' fuse failures, or quite loud mechanical noise when the supply is powered on. Rather than go into details here, see Project 39, which is specifically designed to minimise this problem.
There's also a detailed article on the topic - Inrush Current Mitigation, and a search through the ESP articles will prove worthwhile. It's a surprisingly diverse area of electrical engineering, but most of the material I've shown is dedicated to amplifier power supplies.
Wiring a power supply is generally a fairly simple process, and with care to ensure proper separation of mains ('hazardous') voltages and the DC voltages used by the amplifier/ preamp, etc., you can generally expect no problems. Ensuring safety can be difficult, but provided all mains wiring uses only wire designed for mains usage, safety problems are uncommon. Many commercial products are now double-insulated, but to obtain certification to use the 'double square' logo requires testing by a certified laboratory.
This is not something that hobbyists can afford, and I recommend that all DIY power supplies used an earthed/ grounded chassis. So-called 'Class-0' wiring (no ground, and functional insulation only) is no longer permitted anywhere. Most early US made guitar amps were Class-0, and they must be upgraded to Class-I (using a 3-pin mains plug with earth/ grounding conductor). Always make sure that any accessible mains connections are either sleeved with heatshrink tubing or otherwise protected against accidental contact.
I suggest that prospective power supply builders read Electrical Safety - Requirements And Standards so there can be do doubt about what is (or is not) acceptable when wiring mains powered equipment. Electricity at household mains voltages is hazardous, and if you are careless it can cause serious injury or death.
| Main Index
Articles Index
|
