
|
|
| Elliott Sound Products | Project 27 (Part 2) |
The Project 27 article showed the schematics and wiring of the 100W guitar amp. Here are some pictures of the prototype, so you can see what the various bits look like. Just as a refresher, the internal wiring diagram is shown - you will be able to see how this all goes together in the photos.
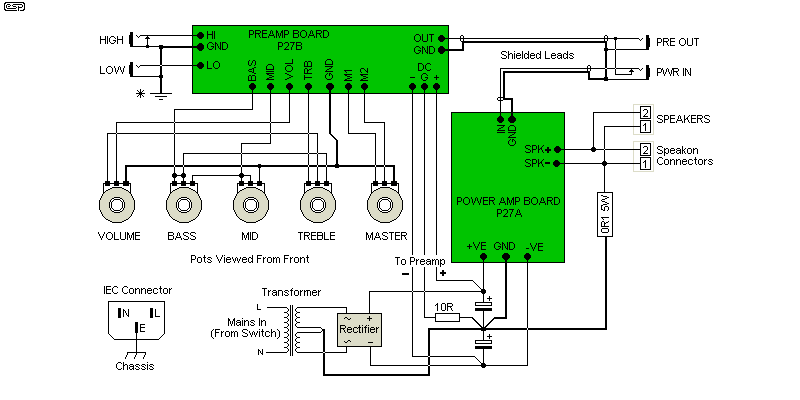
Figure 1B - Internal Wiring
The connections shown are virtually identical to those used in my prototype. Noise is extremely low, and probably could have been lower if I had made the amp a little bigger. All connectors must be fully insulated types, so there is no connection to chassis. This is very important !
The photos below give you some idea what the final unit looks like. Mine is really small, but I suggest that you make yours bigger. The one I made will never have to put up with life on the road, so the metalwork (and cabinet) are cobbled together with whatever I could find in my workshop. It's still very sturdy, but I know from experience just how sturdy a 'live performance' amp needs to be. If it will be damaged by 120kg of other gear sitting on top of it, in a truck, and on a bumpy road (all at the same time), then it probably won't survive.
Make sure that your cabinet does not interfere with air flow around the heatsink. Leaving it sticking out the back (as I did) is probably not ideal, but it must get proper ventilation. The heatsink does not need to be as big as the one I used, but since there is no such thing as a heatsink that is too big, make sure you don't skimp on this very important component.
 |
 |
 |
 |
 |
Click on an image to see a larger image. In order from the top left, you can see the front view, rear view, and an internal view. Note the shield above the preamp. |
The preamp (with the shield removed) and power amp are shown in more detail in the lower two photos.
The photos of the outside are not as clear as they could be - black on black is always a pain to get good resolution.
Note the shielding for the preamp. Shield the inputs with sheet metal or some scrap unetched PCB material, and a similar shield over the preamp helps prevent noise pickup. These are important for lowest noise level and to ensure stability. The preamp has an enormous amount of gain, and internal feedback is highly undesirable. Make certain that the shield does not create a hum loop! If you use PCB material, it can be held in place with pieces of tinned copper wire joined to the ground bus for the pots. Only one point of the shield should be in electrical contact with the bus - I used an engraving tool to make a separate copper 'land' for the second (mechanical only) connection.
The power amp mounts using a couple of pieces of steel as clamps for the transistors. No other mounting is needed, and the amp is extremely solidly mounted by this method. The only steel stock I had on hand was rusty - you can see the pitting in the image. This does not affect anything, but it does look a little grotty (again, I was in a hurry.  )
)
Note that the PCBs you see in the photos are the prototypes. The final boards are similar, but do look slightly different, as I changed some of the locations and made some other mods (these are incorporated in the prototypes by cut tracks and jumpers).
For those who may not wish to build the amp and preamp boards, fully built and tested power amp modules are available (PCBs only - excludes hardware, pots, jacks, heatsink and power supply). These will be supplied with sufficient documentation to make final wiring and assembly a breeze. The preamp is simple, and pre-wired versions of that are not available.
The entire amp as you see it here was built (and documented) in two weekends (allowing time for mowing and other similarly exciting activities), so it can hardly be considered an arduous task to build one. The case was made from MDF (in this instance Melamine coated, but only because I have a whole pile of the stuff). The vinyl is stuck on with PVA wood glue, but (again for longevity and strength) I suggest that you use contact adhesive - the staples that you can see on the inside were to make sure that it didn't move while I did the next bit. If you are more patient than I (or if you use contact adhesive), staples are not needed. I would have used speaker carpet, but didn't have enough left.
The actual details of the chassis I leave to the reader - I certainly don't recommend the method I used. One relatively simple way to do it is to use a 2RU rack case, and install that in an MDF sleeve. The sleeve can be covered with vinyl or carpet - both look good and wear well.
 Main Index
Projects Index
Main Index
Projects Index