

|
| Elliott Sound Products | Project 216 |
Project 124 describes a standard resistive dummy load that can be used for amplifier 'torture tests'. I still use mine regularly, and it has never failed me in over 40 years of operation (it says 30 years in the project article, but that was written twelve years ago). A good dummy load is an essential piece of workshop equipment, but the load described here is more specialised. Most people won't bother, and it's not something I would have considered before now.
Something that I have found over the years is that a resistive dummy load is truly the best and worst for amplifier testing. When driven with music signals in particular, a resistive load will almost always cause the amplifier to run far hotter than a speaker with the same music signal. Unless you've performed many amp tests you likely would not have expected that, and even looking a transistor dissipation you could be forgiven for thinking a resistive load is less stressful.
A standard dummy load fails to test an amplifier's response to reactive loads, and this has led to some seriously flawed designs over the years. A speaker appears inductive below resonance and at high frequencies where the voicecoil's inductance has an effect, and is capacitive above resonance, but before the point where the impedance flattens before rising again (typically around 200Hz). The project shown here is designed to emulate the response of a loudspeaker, having a resonant frequency of 100Hz, but component tolerances mean that it will usually be a little different from the theoretical value. This doesn't matter, because you are looking for a trend, rather than an exact figure. The resonant frequency can be lower than 100Hz, but that means a much larger inductor, making the project uneconomical.
The simulated speaker includes an optional (basic) crossover network and a tweeter, and they can be added if you wish. Since this is for testing, a very simple crossover can be used, and an equivalent circuit for a tweeter is also described if you wanted to go that far. It is also possible to design a circuit that mimics a vented enclosure, but for testing that's not necessary.
The circuit to get the above response is shown next. This is not going to be a cheap exercise, as you need ten 5W resistors (not particularly expensive) and five 100µF, 100V bipolar electrolytic capacitors designed for crossovers (these may cost up to $10.00 each). There are also two inductors, with the 5mH component being fairly large and costly (expect around $30.00 or so, depending on supplier).
An iron core type will usually be the only choice, but it's of no consequence here. We aren't looking for low distortion or perfect response, but the core must not saturate with any likely input voltage. Even the DC resistance isn't a major consideration, as it simply adds to the value of R1 (which can be reduced accordingly).
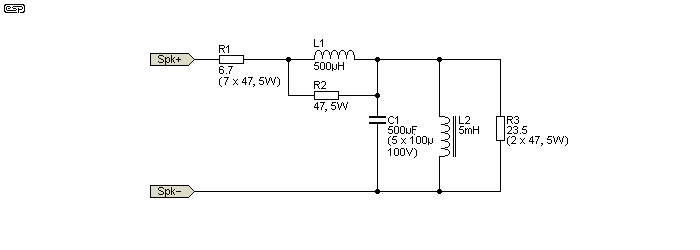
Figure 1 - Simulated Woofer
The speaker's impedance response is shown below. It's what you'd expect to see with a more-or-less typical driver (if there is such a thing), but most importantly it will allow you to see how the varying load impedance affects an amplifier. We always tend to determine output power based on the amplifier's RMS output voltage and the nominal speaker impedance, but the reality if very different. Most speakers (whether individual drivers or a complete system) have an impedance that varies over the frequency range, and the nominal impedance only occurs at a few discrete frequencies within the audio band.
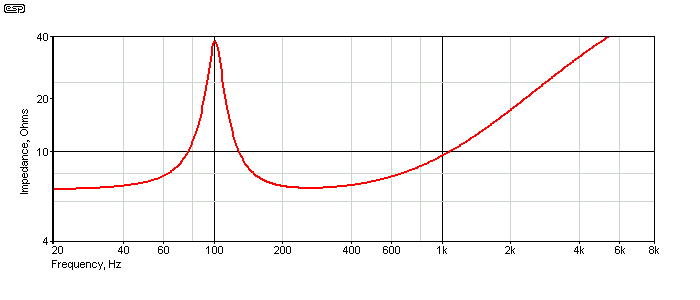
Figure 2 - Woofer Impedance
None of the values is critical. If varied, the resonance and nominal impedance will be changed, but that doesn't matter. This is a test load, designed to allow you to verify amplifier operation into a speaker. There is nothing that requires fidelity as such, but you will find out very quickly if an amplifier has a problem with reactive loads. The impedance is nominally 8Ω, but that only occurs at 60Hz, 150Hz and 700Hz. The minimum impedance is equal to the value of R1, which is the voicecoil resistance. Over the majority of the audio band, the impedance is much higher than the nominal value would suggest.
The addition of a tweeter and crossover network is entirely optional. If you're interested in the subtle interactions of speaker cables and speaker systems you will likely want to add the extras, but they aren't required for most amplifier testing. However, adding the tweeter and crossover does mean that the load is more realistic. Needless to say, it's never going to be possible to match a particular speaker unless the circuit is dedicated to that purpose. Mostly, you are interested in the trend rather than specifics.
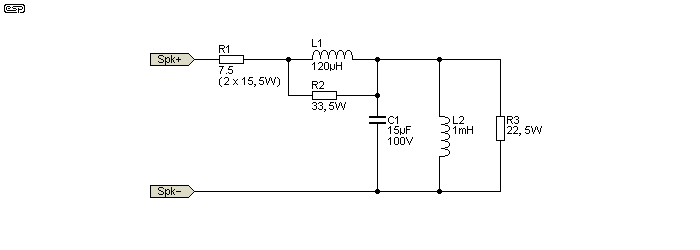
Figure 3 - Simulated Tweeter
The tweeter uses the same circuit, but with different values. The general scheme shown is a fairly good representation of any speaker, with only the values changed to suit. The impedance of the tweeter is shown below. Again, the nominal impedance only occurs at 566Hz, 2.5kHz and 7.8kHz with the circuit shown.
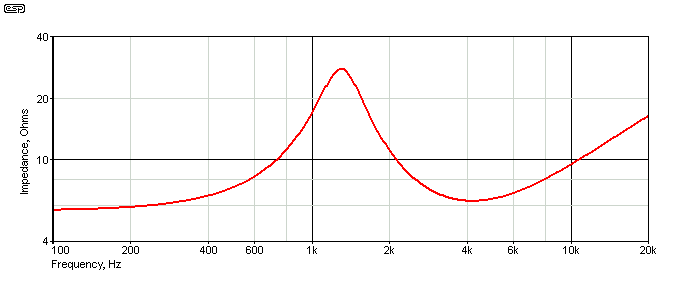
Figure 4 - Tweeter Impedance
If you do include a 'tweeter', you also need a crossover unless you are testing a dedicated tweeter amplifier. The 'tweeter' cannot be damaged by excessive excursion and as it's a dummy load we only need something basic. For the crossover, a 6dB/octave network is fine, and for the example shown below it's set for a crossover frequency of somewhere around 1.5kHz. The crossover components are Lx and Cx, and were selected only because they are standard values. As a crossover, it will work better if converted to a series network, but that's not worthwhile in this application.
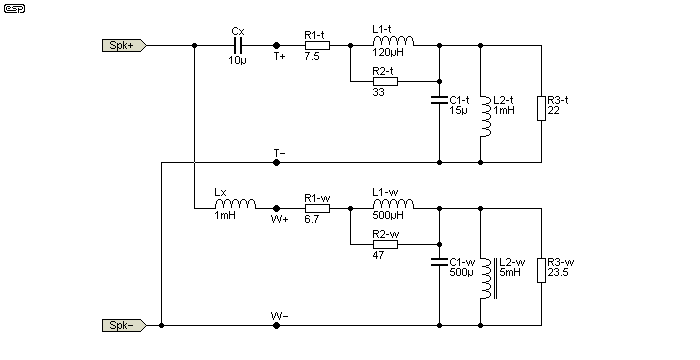
Figure 5 - Woofer, Tweeter And Crossover
With 10µF and 1mH it's more than good enough. As a speaker crossover it would be horrible, but it's ideal in this role because it has more reactance than a 'perfect' network. The impedance and response are shown below. It's still a nominal 8Ω 'system', although the impedance is above 10Ω at a number of frequencies. The system is resistive (having zero reactance) at only a few frequencies, and is reactive (capacitive or inductive) at all others. Almost all loudspeakers with passive crossovers will have similar characteristics.
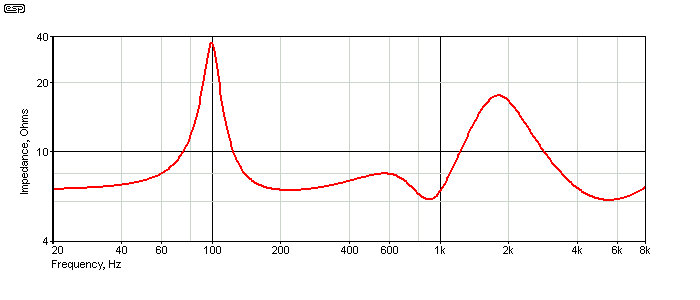
Figure 6 - Complete System Impedance
The impedance of the composite circuit is reasonable, and will give any amplifier a fair workout. While it's certainly possible to make a 'better' crossover, it's simply not necessary. The whole idea of this is to create a load with a variable impedance characteristic. Unfortunately, the simulator doesn't allow me to determine the average impedance, but a rough guess is that it's between 8-10Ω. This would be considered 'normal' for a nominal 8Ω speaker, so it's well within normal limits.
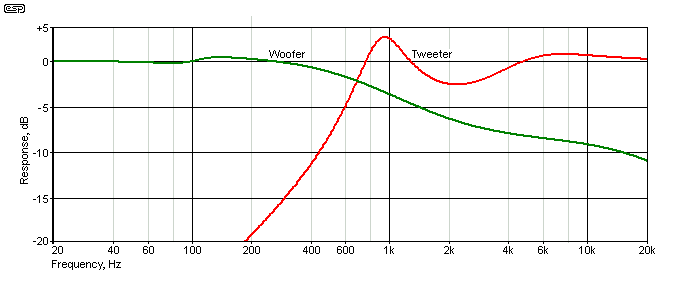
Figure 7 - Response Of Woofer And Tweeter
It's not useful, but the frequency response of the crossover network and the simulated speakers gives you an idea of the frequency distribution. Because there is no impedance correction, the response is awful, but you don't have to listen to it. You can listen to the output from each 'driver' though, and particularly the 'tweeter' output would be useful to listen for any distortion or artifacts created by amplifier protection networks, well before they normally become audible. You will need an attenuator, because the level will be quite high by the time amplifier protection circuits start to intrude.
There are many uses for the circuit apart from testing an amplifier's behaviour with reactive loads. It's an ideal load to use for testing the resistance/ impedance of speaker cables, and would be ideal for anyone who wishes to run tests based on the (often flawed) assumption that they make a difference. The dominant effect is resistance, but snake-oil vendors have managed to convince (presumably more than two) people that their 'patented' and 'special' cable will work wonders. You now have the ability to test that with high-resolution measurements, and at any power level within the capabilities of the load of course.
There's no reason that you can't have the two 'drivers' (woofer and tweeter) and the crossover set up so that each can be used independently.
This is unlikely to be something that very many people will build. It's a fairly expensive exercise, and unless you need to test amplifiers under realistic conditions (but without the noise), most people won't need one. Despite putting this article together, my own test setup includes only the woofer simulator, and I decided against using the crossover and tweeter. For anyone who's curious about the determination of the inductance and capacitance used for the 'speaker', this is shown in the Measuring Loudspeaker Parameters article. The spreadsheet works out the values, and they're also described in the article.
While 8Ω speaker simulators are shown, it's not difficult to reduce that to 4Ω. The main change is to the 'voicecoil' resistance (R1 in each circuit), and optionally reduce the value of R3 as well (this resistance determines the amplitude of the resonant peak). Mostly it doesn't matter too much what you change, but beware of the power dissipation of the resistors and capacitor ripple current. As shown, the circuits will handle programme material (i.e. music) at up to 150W or so. The power distribution of a 2-way system is always a bit of a gamble, but for the designs shown, the split will be around 70% of the power to the woofer, and 30% to the tweeter. A 150W amp with music will likely output up to 50W or so with some (minor) clipping, and the resistors should be able to handle that. You'll need to run your own tests and make adjustments as needed though.
The circuits shown are not intended for very high power, nor are they suited to long-term 'power soak' testing of amplifiers above 50W or so. If that's what you need, use higher power resistors with a heatsink, and optionally add a fan to keep everything cool. The primary purpose of this project is to allow you to run tests with a more-or-less representative speaker load, but without the noise.
 Main Index
 Projects Index