
|
| Elliott Sound Products | Project 19 |
 Main Index Main Index
 Projects Index Projects Index
|
 Please Note: PCBs are available for this project. Click the image for details.
There are many instances where a simple and reliable power amplifier is needed - rear and centre channel speakers for surround-sound, beefing up the PC speakers, etc.
This project (unlike most of the others) is based almost directly on the 'typical application' circuit in the National Semiconductor specification sheet. As it turns out, the typical application circuit is not bad - would I go so far as to say hi-fi in the audiophile sense? Perhaps - with caveats. It has good noise and distortion figures, and is remarkably simple to build if you have the PCB.
Sept 2000
From testing the prototype boards, I was a little more critical of everything. The sound quality is excellent! As long as the protection circuitry is never allowed to operate, the performance is exemplary in all respects.
Feb 2022
Based on comments from a reader, there are many implementations of the LM3886 IC that have been modified to use a DC servo. This is presumably to minimise any DC offset, which is primarily due to the input stage's offset voltage. This is quoted in the datasheet as 1mV (typical) or 10mV (maximum). Provided the IC is not used in fully DC coupled mode (which I never recommend), the output offset will therefore be a maximum of 10mV, but usually less. Even 10mV won't harm any speaker, including the most delicate tweeter, as even 10mV only equates to 20µW into a 5Ω voicecoil.
Project 186 uses an LM3886 (one channel only), and I measured the DC offset at the output at 2.1mV. It's highly likely that a DC servo will make that worse unless a precision opamp is used. You can use something like the OPA134, but that's a rather expensive opamp (cost is about ⅓ that of the LM3886). If you think you need better, the OPA277 will work, but at almost the same cost as the LM3886! This is (I hope obviously) not a viable option as it's silly to spend that to obtain zero tangible benefit.
Some people seem to think that a DC-coupled amplifier with a DC servo has less phase shift than an AC coupled equivalent, but that is simply wrong in all respects. This topic is covered in detail in the article DC Servos - Tips, Traps & Applications. Adding a DC servo adds more parts, but doesn't provide any tangible benefits. In some cases, you'll see additional opamps included in the feedback loop, which provides the opportunity to create further problems.
Now, to be fair, TI (Texas Instruments) does show DC servos in one design, but it uses multiple paralleled amplifiers, which isn't something that most people do. See 'AN-1192 Overture™ Series High Power Solutions SNAA021B' for details. They also point out that the DC servo isn't needed, even if paralleled amplifiers are used, provided DC blocking caps are used. There's a widely-circulated myth that capacitors somehow 'damage' the sound, but basically that's bollocks if they selected properly. All caps used in ESP projects are more than good enough, and if you don't believe me, build Project 'X' (A-B Switch Box).
The latest version of the ESP P19 board (Rev-B) has deleted the connections for a SIM (Sound Impairment Monitor). Much as I like the idea, no-one else seemed to be interested, so the small amount of PCB real estate thus liberated was used to refine the layout and provide space for input (and power) connectors.
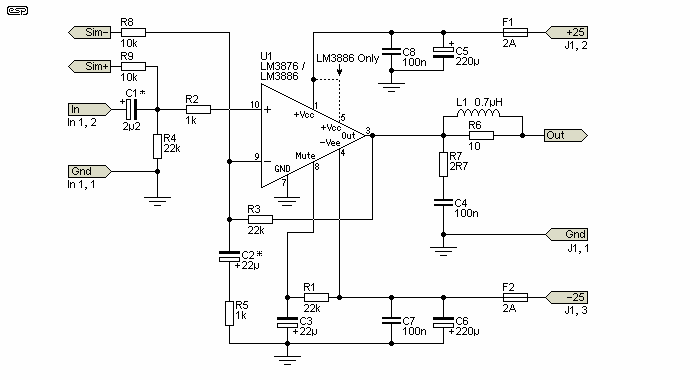
Figure 1 shows the original schematic as shown when this project was originally published. It is almost the same as in the application note (redrawn), polyester bypass capacitors have been added, and the mute circuit has been disabled (this function would more commonly be applied in the preamp, and is not particularly useful anyway IMO).

Figure 1 - LM3876T Power Amplifier Circuit Diagram (Original Version)
Voltage gain is 27dB as shown, but this can be changed by using a different value resistor for the feedback path (R3, currently 22k, between pins 3 and 9). The inductor consists of 10 turns of 0.4mm enamelled copper wire, wound around the body of the 10 Ohm resistor. The insulation must be scraped off each end and the wire is soldered to the ends of the resistor. The PCB version is almost identical to that shown in Figure 1, but the SIM connections have been removed.
The 10 Ohm and 2.7 Ohm resistors must be 1 Watt types, and all others should be 1% metal film (as I always recommend). All electrolytic capacitors should be rated at 50V if at all possible, and the 100nF (0.1µF) caps for the supplies should be as close as possible to the IC to prevent oscillation.
The supply voltage should be no more than ±35 Volts at full load, which will let this amp provide a maximum of 56 Watts (rated minimum output at 25°C). To enable maximum power, it is important to get the lowest possible case to heatsink thermal resistance. This will be achieved by mounting with no insulating mica washer, but be warned that the heatsink will be at the -ve supply voltage and will have to be insulated from the chassis. For more info on reducing thermal resistance, read the article on the design of heatsinks - the same principles can be applied to ICs - even running in parallel. I haven't tried it with this unit, but it is possible by using a low resistance in series with the outputs to balance the load. I have seen it done (very badly), and the results were not pretty.

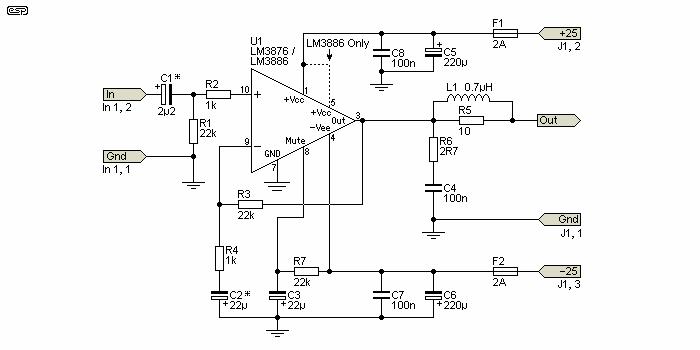
Figure 2 - Revision-B Power Amplifier Circuit Diagram
The schematic for Revision-B boards is shown above. It is almost identical, except the SIM connections have been deleted and a few component designations have been moved around. Like the original, there is excellent on-board decoupling, using a 220µF electrolytic and a 100nF polyester or monolithic ceramic capacitor on each rail. Although C1 and C2 are shown as polarised electrolytic types (but NOT tantalum), you can use bipolar (non-polarised) electros, or you can use a 1µF polyester cap for C1. Smaller values can be used for C1 if the amp is to be used for tweeters (around 100nF is fine). The recommended supply voltage is ±25V, which all but eliminates the likelihood of the protection circuits operating with typical speaker loads.
If the amp is to be used for midrange or tweeter in a biamped or triamped system, C1 may be reduced in value to 100nF (-3dB at 72Hz). For general use, you can use a 1µF polyester, giving a -3dB frequency of 7.2Hz, however bass extension will be better with a higher value as shown. You can use any value up to around 10µF for C1 if you prefer.
The new PCB allows you to operate the amp as dual mono - the PCB track can be split, and each amp is powered from its own supply. While IMO there isn't much point, this also allows the PCB to be cut in half, and each half has its own supply connector. Output connection can be made to PCB pins, or you can use a PCB mount 'spade' (aka quick-connect) lug - the board has provision for this.
Full construction details are available when you purchase the PCBs, and all options are explained in detail.
As you can see, there is provision to use the LM3886 as well. This IC is almost identical, but has a higher specification. There are links on the PCB to connect pins 1 and 5 (these should not be connected for the LM3876). Using the LM3886, the board can be operated in bridge (BTL or bridge tied load) to obtain around 120W into 8 ohms. I suggest that the P87B be used to provide the out-of-phase signals needed for BTL operation. While it is common to run one amp as inverting, this presents a very low impedance to the preamp, and may cause unacceptable loading and possibly distortion. The P87B will drive each amplifier separately, and is the better way to drive the amplifiers.
While parallel operation is often recommended, I absolutely do not recommend that you run the amps in parallel. There are very strict requirements for gain tolerance for parallel operation - typically the amplifiers should be matched to within 0.1% or better over the entire audio bandwidth and beyond. Because of the very low output impedance of the ICs, even a mismatch of 100mV (instantaneous, at any voltage or frequency) will cause large circulating currents through the ICs. While 0.1Ω resistors are usually suggested, a 100mV voltage mismatch (0.15% at a peak voltage of 60V) will cause a circulating current of 0.5A. This causes overheating and will invoke the wrath of the protection circuits. I know this from personal experience working on a 'product' that used LM3886 ICs in parallel - it was a disaster!

Figure 3 - IC Pinouts
Figure 3 shows the pinouts for the LM3876/ 3886, and it should be noted that the pins on this device are staggered to allow adequate sized PCB tracks to be run to the IC pins. The 3886 has (almost) identical pinouts, and will generally be used instead of the 3876 as the latter seems to be obsolete. The only difference in pinouts is that pin 5 must be connected to the +ve supply for the LM3886. Provision for this link is on the PCB.
The PCB for this amp is for a stereo amplifier, is single sided, and supply fuses are located on the PCB. The entire stereo board including four fuses is 115mm x 40mm (i.e. really small). The Revision-B board is exactly the same size, and uses the same spacing between ICs to allow retro-fitting if necessary.

Photo of Completed Amplifier (Without Heatsink)
To reiterate a point I have made elsewhere, never operate this amp without a heatsink - even for testing (this applies to nearly all amplifiers). It will overheat very quickly, and although the internal protection will shut the amp down to protect it from damage, this is not something you want to test for no good reason.

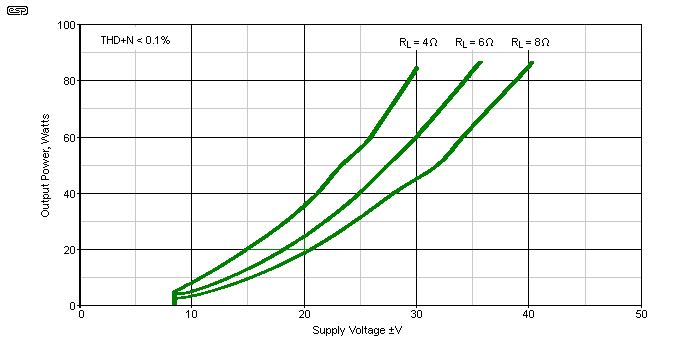
Figure 4 - Output Power Vs. Supply Voltage (±V)
The output power vs. supply voltage graph shown is adapted from the TI datasheet. With most amps with a given supply voltage, you'd expect the output power at 4Ω to be double that at 8Ω, but that depends on the ability of the output stage to get close to the supply rails, regardless of load. The internal circuitry of the LM3886 (or LM3876) limits that somewhat, but you can see that with ±25V, the power is as described here. The absolute maximum supply voltage is ±42V with signal, but I know from personal experience that they will blow up if you go that high. This is why I suggest a maximum of ±35V, but ±25V is a far better option as it ensures that the protection circuitry will not be triggered with any normal load down to 4Ω. Ideally, a ±30V supply would be used, but this can't be obtained from any readily available power transformer (the AC voltage needed is 22-0-22, and while you can get them, they are relatively uncommon). Hammond Manufacturing is one of the few I know of who sells a suitable 22-0-22V transformer.
The sound quality is very good indeed - as I said at the beginning, I would call it audiophile hi-fi, but with caveats. Provided the amp is never allowed to go anywhere near the protection limits it sounds exceptional. This is the rub - because of the comprehensive overload protection (which I don't like much) this amp provides more and nastier artifacts as it clips than a 'normal' amplifier. With the recommended ±25V supplies and a nominal 8 ohm load, you will need a good heatsink to ensure that device temperature is kept below 70°C. This will usually ensure that the protection circuits don't operate even if the amp clips on transients. For 4 ohm loads, I suggest that the supply voltage should not exceed ±25V. ±35V supplies can be used with 8 ohms, but the protection circuits will operate if the load is difficult, or if the amp is allowed to clip. I suggest that ±25V is optimum, and that you don't push your luck with anything higher.
The protection circuitry is called SPiKe™ by National (now TI) - this stands for Self Peak instantaneous Temperature (°Ke) (sic) and will protect the amp from almost anything. Although in theory this is a good thing, it's not so good when the protection circuits operate, so make absolutely sure that the amp is only used in applications where clipping/ overload can never occur, or is relatively lightly loaded.
This might sound like a tall order, but for reasonably sensitive main speakers, rear speakers in a surround system, or to put some serious grunt into those 400W PMPO PC speakers (with the 3W RMS amplifiers - I'm not kidding), this amp is a gem.
It can also be used as a high midrange and/or tweeter amp in a tri-amped system - there are a lot of possibilities, so I will leave it to you to come up with more. Remember that the maximum output power with ±25V is around 32W into a (nominal) 8Ω speaker, or 55W into 4Ω.
You will find many references on the Net that claim that performance is 'improved' by adding an input buffer. Some use a valve (vacuum tube), and this is alleged to make the amp 'better still'. For the most part this is nonsense. Adding a valve can only increase noise and distortion, and any claim that performance is improved should be regarded with great suspicion. I don't know what drives people to make silly suggestions that only make construction more difficult and expensive, but they are everywhere.
References
 Main Index Main Index
 Projects Index Projects Index
|