
|
|
| Elliott Sound Products | Project 135 |
This is one of those projects that came about from a reader's question, and it piqued my curiosity to the extent that I had to see what was available (virtually nothing for DIY) and how much interest exists for something like this. There are many, many questions posed on forum sites, and one schematic pops up a few times. One circuit is from SSL (Solid State Logic) and dates from around 1984 or thereabouts. It uses a now obsolete CMOS Schmitt trigger IC (MC14583) and appears to be wired in such a way as to be as confusing as possible.
Just so you have some idea of what these meters might look like, see the photo below. Ideally, a stereo signal will remain in the green section most of the time - this indicates that the left and right channels are basically in phase. Because the audio content of the two channels can be very different, there will inevitably be times when the correlation of the two channels is less than 'perfect', and this is shown on the meter. If a channel is inverted or a stereo microphone pair has one mic out-of-phase, this will show up with the pointer in the red area.
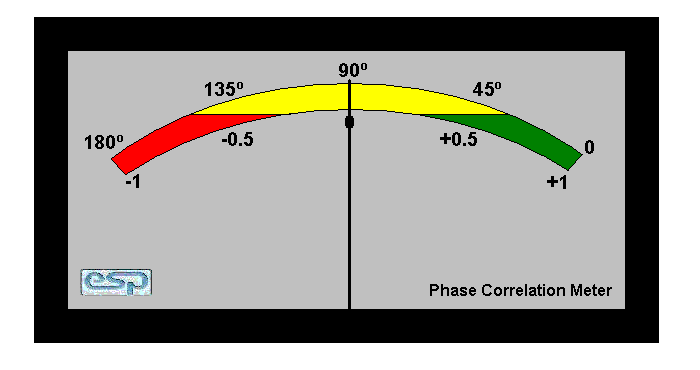
Phase Correlation Meter Face
Not very many mixer manufacturers have even bothered making phase meters, and broadcast studios (FM radio, TV, etc.) most commonly use a 'vector-scope' - essentially a two channel oscilloscope connected in X-Y mode to display a lissajous pattern. One channel (left or right) is fed to one input, and the other to the second input. There appears to be argument amongst studio engineers as to the 'best' display mode. Depending on the way the circuit is set up, the display will change.
The most common display is arranged so that a mono signal - where left and right channels are identical in all respects - will show a vertical line on the oscilloscope display. A mono signal, but with one channel 90° out of phase will display a circle, and if one channel is inverted (180° phase shift), the display is a horizontal line. Most (but not all) vectorscopes show both the amplitude and phase of the signal. The result can be confusing - especially for anyone new to this type of display.
Phase correlation meters are less common, and there is divided opinion about how they should display the results. From information gathered from forum posts, I offer the following information. This is obviously a very personal issue, and there is no hard and fast 'right' or 'wrong' answer ...
Sony (formerly MCI) have a phase meter that cannot actually work as claimed. The scale is apparently marked -180° at the left side, +180° on the right, and zero (in phase) in the middle. Problem is that +180 and -180 are effectively the same thing for a steady tone, so the left and right had extremes of the scale are the same! The meter also responds to amplitude as well as phase, so panning a signal left or right shows a phase change that doesn't exist. Some people think this is completely wrong, and it's very hard to disagree.
Neve and SSL use a different approach. I have no details for the Neve meter, but from what I can gather the SSL meter shows full scale when the signals are in phase - regardless of amplitude (within reason). If the two signals are 90° out of phase, the meter will show half scale, and shows zero (no deflection) if the signals are 180° out of phase.
The meter face shown above is based on a unit that Canford Audio [1] in the UK used to sell, but it's now unavailable. This appears to be about the only stand-alone analogue phase meter that's ever been sold. There are plenty of others, but they are either plugins for digital audio systems or use a LED bar-graph as the display.
Note that these circuits are experimental. The basic principles have been verified by simulation, but that doesn't mean that they are 'tried and true' circuits. Unless you are willing to experiment with the circuitry, I suggest that you don't attempt them. If you do build one and need to make changes to get it to work properly, please let me know so so the circuit(s) can be updated as needed.
The phase meter described here is quite simple, and uses high gain amplifiers and Schmitt triggers to remove any level dependency. The meter responds to phase variations, not amplitude changes. This holds good down to an input voltage of below 50mV - approximately -26dBV. It is assumed that the meter will be operated from a 'line level' signal of at least 1V average level. For a mono signal, the meter will read full scale (maximum correlation), and if the two signals are 180° out of phase it reads zero (no correlation). Real world stereo audio signals will be somewhere in between.
The first stage is an amplifier and clipper. The input signal is heavily clipped, leaving the transitions from positive to negative (and vice versa of course). These transitions contain the data needed to extract the phase information. The heavily clipped waveform from each channel is then applied to a Schmitt trigger (the CMOS 4584 hex Schmitt trigger or 4093 quad Schmitt NAND gate are ideal). These ensure the transitions are fast and reliable. Note that the CMOS ICs require a ±5V supply, so you'll need to add a negative 5V supply to Figure 4.
The processed signals are then simply added together, and if there is any time difference between the signals the summed output will be less than the maximum. The final composite waveform is then rectified. If both signals are identical (mono), the result is a full scale reading on the meter (adjusted by VR1). If the two channels are in anti-phase (180°), the summed signals cancel, there is no voltage to rectify, and the meter reads zero (-1, uncorrelated). In reality, the meter will never read exactly zero because there will be a small amount of offset, and equal and opposite signals will never be perfectly equal and opposite. This small offset is most easily removed using the mechanical zero adjustment on the meter movement.
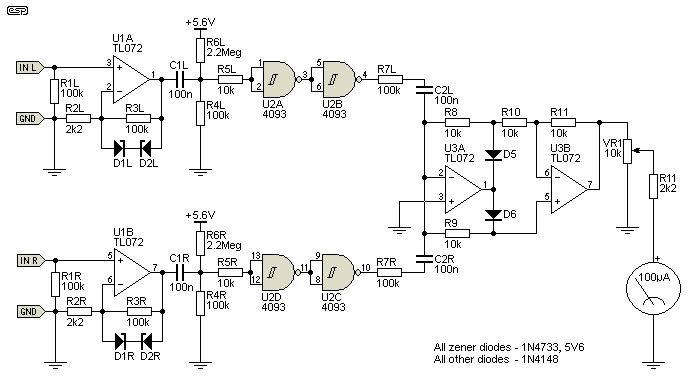
Figure 1 - Phase Correlation Meter Schematic
The circuit is quite simple, and uses cheap and cheerful TL072 opamps. Since none of the circuit is in the signal path there is no reason to use high grade opamps. Great care is needed though - the clipping and Schmitt trigger circuits create a highly distorted signal with very fast rise and fall times, and the high frequency component can easily be picked up by sensitive circuitry. The entire meter should be in its own shielded enclosure, with special care taken to ensure that high frequency noise cannot escape along the input leads. The inputs must be properly shielded to minimise radiated noise. This also applies to the power supply.
The CMOS Schmitt trigger ICs cannot use the full ±15V that's used for the opamps, so it is reduced by two resistors and zener diodes to ±5.6V. This supply is bypassed separately by 100uF caps as shown in the power supply drawing (Figure 4). Note that Figure 4 shows only the positive regulator - the negative supply is provided the same way. Although not shown, a 100nF ceramic cap should be placed as close as possible to the CMOS supply pins. Unused sections (if you use the 4584 hex Schmitt inverter) have their inputs tied to the negative CMOS supply or to another input. It may be necessary to add 100nF ceramic caps across the supply pins of the opamps to reduce very high frequency supply noise that might cause incorrect readings with some source material.

Figure 2 - Phase Correlation Meter Waveform (90° Phase Shift)
The essential waveform for a 90° phase difference between channels is shown above. When the signal is fully coherent (correlated), the output sits at 1.4V DC, with just a small ripple component caused by the finite speed of the full-wave rectifier. If the signals are exactly 180° apart, the output is at zero volts. With 90° phase difference (which is almost completely unaffected by amplitude), the rectified output is a squarewave as shown above, and the average value is 700mV - exactly half the full scale value. It may be necessary to include a small negative current through the meter to allow it to be set to zero - this can be done with a pot and a resistor.
From this, you can easily determine the waveforms for other phase angles. The meter current as shown is 0-100µA, but this is easily changed to suit the movement you have. You will notice that there is no capacitor across the meter - this is deliberate, because if included, the cap will charge to the peak value and the meter will not show the average as is required. Analogue moving coil meters show the average value of any waveform applied, so are perfectly suited to this task. Knowing the available voltage (which may be slightly different from that I have indicated) also allows you to choose the series resistance for the meter movement you wish to use. The values shown will accommodate most commonly available meters.
Please note that this phase meter is experimental, in that I have not built and tested it. It has been simulated though, and it does do what is intended. However, it doesn't replicate the action of a SSL phase correlation meter perfectly. With no signal on either or both channels, the output reading is unpredictable. This can be fixed by applying just enough bias to the Schmitt triggers to ensure that their outputs are positive - this is shown in the circuit diagram. You may need to reduce the value of R6 (L and R) to obtain reliable operation.
Unfortunately I have nothing to compare this meter against - I don't have any phase meters because they are not necessary for circuit design. They are primarily used in mastering and broadcasting studios. The audio signal I have in my workshop is mono, so even running basic real-life tests is irksome.
The next meter is a variation on a design by SSL (Solid State Logic). I've also simulated the SSL version, and although somewhat more complex, the two circuits seem to perform more or less identically. The main difference is that the SSL meter uses a centre-zero meter movement, and these are no longer readily available.
A fully coherent or correlated (in-phase) signal will swing the meter to full scale positive (+1, right of centre), while a fully incoherent (out-of-phase) signal will cause full scale deflection left of centre (-1). Although the original Schmitt trigger IC is no longer available for the SSL meter, a pair of 4584 hex Schmitt inverters or 4093 quad NAND Schmitt trigger ICs will work nicely. The modified SSL schematic is shown in Figure 3, using the 4093 ICs.
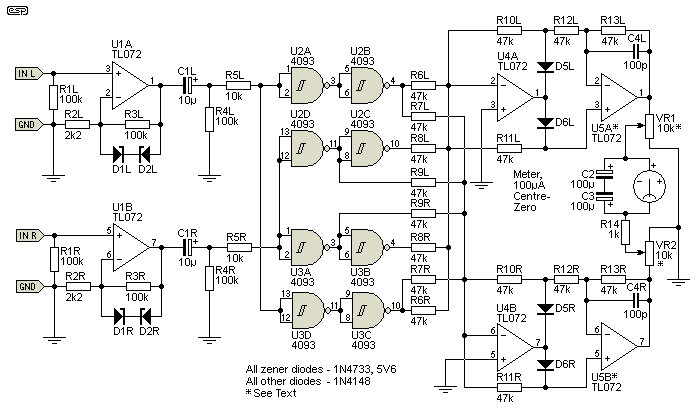
Figure 3 - Modified SSL Phase Correlation Meter
As you can see, it is more complex than the version shown in Figure 1, and there is little real difference in operation. In both cases, a single signal panned fully left or right still reads mid-scale.
There is a difference though, and that's with no input signal at all. The Figure 1 (simple) version shows no signal as correlated (full scale) but the SSL circuit shows no signal as centre scale - according to the simulator and what little info I've been able to find on the Net. In this respect, the SSL based circuit is the more accurate because zero signal is neither correlated or uncorrelated. Zero signal can never be out of phase either, so in this respect the simple version is correct. I shall leave it to the reader to decide.
Of more interest is the behaviour with one channel driven, and zero signal on the other. Both circuits show a single channel as zero (centre scale). The difference is that for the SSL based circuit this means zero current (it uses a centre zero meter) and for the simplified version it provides half current - this also gives a centre scale reading.

Figure 3A - Simplified SSL Phase Correlation Meter
As it turns out, the circuit can be simplified fairly dramatically as shown above. If you look at Figure 3, you'll notice that the CMOS circuits are exactly duplicated. I can only guess at the reason, but I suspect that the original (unbuffered) CMOS ICs used didn't have enough output current, so they were paralleled so the circuit would work properly. With modern buffered CMOS, this is no longer necessary, so the paralleled sections can be reduced to a single IC. You can still use 47k resistors in this version if you prefer - it makes little difference either way.
For both versions of the modified SSL meter, VR1 and VR2 are used to set full scale positive and full scale negative. This information was provided by a reader who built the simplified version. Likewise, it may be necessary to replace U5 with a NE5532, as the TL072 apparently misbehaved in this location. I leave this up to the constructor, and I have no explanation for the misbehaviour.
Upon receiving an email from another constructor, I discovered that there was an error in the circuit. In the interests of full disclosure, the original circuit can be viewed here. With the added capacitors (C2L/ R), the circuit is more sensible. No signal (to either or both inputs) leaves the pointer centred, a mono signal (both channels in the same phase) the pointer shows full correlation (+1). With one signal 90° phase shifted, the pointer returns to centre, and with 180° phase difference it shows no correlation (-1). These changes also simplify the power supply, as only a single 5V supply is required.
While I still haven't built one (because I have no use for it), I was able to get the simulator to run properly. The behaviour is close to identical to the transformer based correlation meter shown further below. As that is a fully passive design, there's almost nothing that can go wrong (famous last words?), and I'm fairly satisfied that the simplified SSL design is now 'gleaming white and free of foulpest'  . (With apologies to the late Spike Milligan.)

Figure 4 - Power Supply Details
The power supply arrangements are shown above. A supply of ±15V is required, and this is given some filtering (to prevent noise getting out of the circuitry and also reduced to +5.6V for the 4584/ 4093B CMOS integrated circuit. The maximum allowable supply voltage is 18V, but it is far more common to reduce this to between 5V and 12V to allow a safety margin. Again, there is filtering to ensure the supply is stable and to reduce noise on the DC.
The same power supply arrangement is used for both SSL-derived circuits as well as that shown in Figure 1.
A reader [3] alerted me to a circuit that was published in the German Electronic magazine 'Praxis Und Hobby', which used a µAA170 LED driver (now obsolete) with 16 LEDs. The circuit shown below can be used with a normal meter (0-1mA moving coil or similar), or a LED meter such as P60.

Figure 5 - 'Ghost' Phase Meter (Modified)
This meter runs from a single 12V DC supply, so no separate regulators (or zeners) are needed for the CMOS IC. In this case, the circuit uses a quad 4070 XOR (eXclusive-OR) gate. In the original, the outputs of U2A and U2B were simply linked together, but this is not recommended with any CMOS devices unless the inputs are paralleled as well. I added an additional gate to invert the signal - as originally designed the output was positive (~12V) with no signal or with 180° out-of-phase signals, and zero with an in-phase or mono signal applied to both channels. While the inversion can also be done using an opamp, the extra gate comes 'free', as it's already included in the package.
* Note that the zeners are 5.1V in this version. This is to limit the output excursion of the TL072 and help prevent the possibility of the 'phase inversion' problem that this IC family suffers. The input signal must be limited to less than ±6V (4V RMS is the suggested maximum) for the same reason. You can use different opamps if it makes you happier (likewise for the other versions, but these opamps are not in the signal path. The TL072 has the advantage of a relatively high slew rate.
The value for VR1 is suitable for a 1mA meter - it can be increased if your meter is more sensitive, but don't use a really insensitive meter, because the output current from CMOS devices is limited. It's generally unwise to try to get more than around 5mA from the output, but you could parallel the last gate with U2C (as shown) to get up to 10mA if needed. The value of C1 will need to be increased for less sensitive movements. You will need to experiment with C1 until the display is steady enough to read easily, because meters usually have very different ballistics from each other. What works for me (if I ever decided to build a phase meter that I'll never use  ) will not necessarily work for you.
The final version was provided by 'T-150' (his preferred 'tag' for open websites) who translated the text from Russian. The schematic has been completely re-drawn, and T-150 said "I'd like to share the only different circuit i found for now, and it's from a Russian university textbook (Radio Broadcasting And Electroacoustics), pages 209-210. It compares L-R signals and is made using a passive 'Hafler matrix' (or what ever it's named), diode bridge rectifiers and a simple integrator."
The auto-translated (with a bit of human assistance) text reads as follows (translated text in italics):
Another type of instrument for assessing stereo balance and compatibility is a stereo correlation meter, consisting of two input transformers, two detectors assembled according to a bridge circuit, an integrating circuit and a pointer indicating device included in the measured circuit according to a balanced circuit.
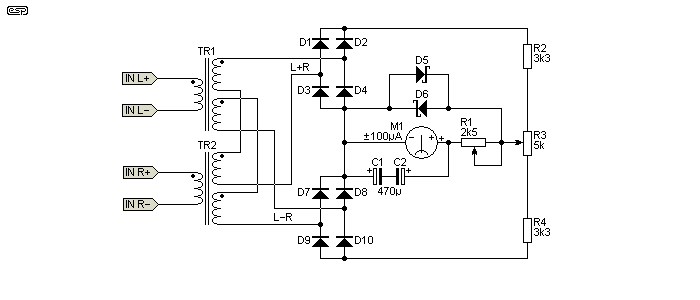
Figure 6 - Schematic Diagram Of A Stereo Correlation Meter.
The signals of the left and right stereo channels are fed to the inputs of the correlation meter. taking into account the phase of switching on the secondary windings of transformers Tr1 and Tr2 at the inputs of bridge rectification circuits, the signals are equal to L+R and L-R, respectively. Rectifiers in relation to the indicating device are included in the opposite direction. Therefore, if the total signal L+R from the upper bridge prevails (the case of monophonic sound transmission), the arrow of the device deviates to the right. When the input signals are turned out of phase, the difference signal prevails - from the lower bridge, the arrow of the device deviates to the left. With a stereo signal, the arrow is in the middle of the scale.
The device is configured as follows. First, the inputs L and R are switched in-phase and a signal of 3.6 V with a frequency of 1 kHz from an audio signal generator is supplied to them. Taking into account the fact that L = R, the total signal will be equal to 2L, and the difference signal to zero. The arrow of the device deviates to the right, using the potentiometer R1 the arrow is set to the extreme position. Then, at one of the inputs, the phase of the signal is reversed. In this case, it turns out that L + R = 0, and L - R = 2L. The arrow of the device deviates to the left, the same deviations of the arrow on both sides are set using the potentiometer R3.
It's a superficially simple circuit, but the transformers will cause problems (as they always do). In this case, they have a dual secondary, and no details are provided in the text or original Russian schematic to indicate the ratios. I would expect them to be 1:1+1 which gives close calibration in the simulator. The meter is a ±100µA (centre zero), which will pose problems because they aren't readily available any more. This circuit has been included because it's very easy to understand, unlike the others shown. Note that D5 and D6 are Schottky diodes (no diode details were provided in the original circuit, but performance is better if all diodes are small signal Schottky types).
Note that it is possible to build a fully electronic version of the above circuit, using opamps to derive L+R and L-R signals. However, because most opamp circuits end up with a ground reference by default, the circuit becomes more complex than it should be. If you were wondering why I didn't include an opamp version, now you know the reason.
The versions shown in Figures 1 and 5 are very easy to calibrate and give the same display. Simply apply a signal to both channels at once, and adjust VR1 to get full scale. If you now disconnect one channel, the meter should read close to half scale. Apply an inverted (180° 'phase shift') version of the signal to one channel, and the original to the other. The meter should read close to zero (-1). Any small variation can safely be ignored. With all of these circuits, the meter should show full scale (in-phase) with zero signal.
The Figure 3 and 4 circuits are simplified from the original, but still use two trimpots for calibration. VR1 is (nominally) the calibration for full scale positive and VR2 is for full scale negative. However, the two trimpots are interactive and you'll need to adjust each in turn several times to get the two extremes right. Although calibration is important, it's not worth the effort to attempt perfect results. When a phase meter is in use, the reading shown is neither steady nor intended for high accuracy measurement. This being the case, small errors are of no consequence.
Otherwise, the calibration process is not hugely different from the Figure 1 and 5 versions. Apply the same signal to both channels, and adjust VR1 until the meter reads full scale to the right (+1). With no signal (short the inputs) the meter should read zero (centre scale) and with one channel inverted adjust VR2 until it reads full scale left (-1). Repeat as needed. Calibration for the Figure 6 version is included in the translated text.
In all cases, small errors can be ignored, because audio phase measurement is far from an exact science in recording or broadcasting studios.
I have no idea how many people will be interested in any of the circuits described in this project, but it was as much an interesting design and analysis exercise as anything else for me. As such, it is worth showing the results and providing information that does not seem to be available elsewhere. The circuits shown are to be considered experimental - I have not built the circuits, and don't know for certain exactly how each will work in reality. The simulator I use is not designed to be able to mix digital and analogue devices in the way they are used (I don't know of any simulator that can handle oddities such as this). As a result, some 'cheating' was necessary - but I am reasonably confident that the circuits will work as intended.
Although the original SSL phase correlation meter is shown on a couple of websites and in a number of forum pages, all such cases are in breach of copyright because proprietary documentation has been published without the owners permission. My drawings are completely new and use readily available CMOS devices rather than rely on obsolete ICs. Although it might be possible to obtain a couple of the originals - with some hassle and likely at some expense - I prefer not to publish circuits that use parts that are hard to get.
Phase meters that use centre-zero meters will almost certainly cause issues with construction, because they are now difficult to obtain.
I hope that a few people get some benefit from this project. I certainly did, because I learned how to make a simple phase meter - something I didn't know before I started  .
.
 Main Index
Projects Index
Main Index
Projects Index