
|
|
| Elliott Sound Products | Project 125 |
 Please Note: PCBs are available for this project. Click the image for details. The PCB is mono, and two are required for stereo!
Introduction
Project 09 has been very popular since it was first introduced, back in 1999. It's still just as valid as it ever was, and is ideal for being incorporated into preamps and power amps. Being 2-way, many people have had to assemble up to 3 boards to get a full 4-way active system operational. Hardly a great chore, but there are very good reasons to have an alternative. The alternative is a 2, 3 or 4-way mono system, designed so that each speaker has its own crossover - just add the amplifiers of your choice. The photo below shows the completed board. Only the muting relays have not been installed, but the board is fully functional, and has been tested. The photo shows the original PCB, but the one you can buy now is almost identical to look at.

Photo of Completed P125 Board
This project is based on the P09 circuit, and is similarly flexible. The difference is that this is a full 4-way crossover, and has optional level controls for each frequency band. Each band can also be trimmed so that a reference setting is available, and it includes a volume control too. For people who wish to make a panel that's a bit out of the ordinary, the board even has provision for LEDs next to each control to backlight the knobs.
It includes muting relays, so opamps that insist on squeaking as the DC voltage falls will be suitably silenced. With on-board regulators, it's ready to be installed into a 4-way active system. It's easily reconfigured as a 3-way or even a 2-way system, and in both cases can have a subwoofer output or a high pass filter to prevent over-excursion of the bass driver.

Figure 1 - LRX424 Block Diagram
The block diagram shows the sections of the crossover. Frequencies can be set as desired for the application, and as noted above it can be configured for anything from 2-way to 4-way. For 2 or 3-way operation, the remaining filter section(s) can be used either as a subwoofer output or a high pass filter for the low frequency output. A 2-way system can have a subwoofer output that includes the final high pass filter. This would normally be tuned to around 25Hz, or other frequency to suit the subwoofer being used.
In a case such as that described above (2-way system with sub), the high output feeds the tweeter amp, hi-mid feeds the woofer amp, low-mid feeds the subwoofer section and the low output is not used. I recommend that all components be installed anyway, because it can always be reconfigured to full 4-way at some later date.
It is also possible to simply sum outputs using 10k resistors. For the 3-way (2-way + sub) described above, the sub crossover frequency is determined normally (typically around 60-80Hz). The hi-mid and lo-mid are then summed, so response extends from the sub frequency right through to the tweeter frequency. Listening tests indicate that the phase shift from the crossover might be audible, but in 99% of cases you probably won't hear it.
The circuit is straightforward, but there are some parts that require explanation - especially the configurations for 2-way and 3-way. The first stage is a balanced input. This can be wired for unbalanced if you prefer, but if used in a speaker box there are good reasons to use a balanced input. Because the interconnects may be fairly long, using balanced a connection helps guard against noise pickup.
The second stage is a simple non-inverting amplifier, and is configured for the gain you need. The default (as shown below) is 6dB, but this can be increased or reduced to suit your application. The gain stage is located after the volume control, so there should be little risk of overload.

Figure 2 - Balanced Input, Volume & Gain Stage
The balanced input stage is normally operated with a gain of 6dB. With this design the gain can be changed by changing R5 and R7. Higher values will increase gain and vice versa. Both resistors must be exactly the same value for good common mode rejection. In general, I don't recommend that these resistors be greater than 22k (gain of about 10dB), as there is too great a risk of input overload with high level signals. A balanced input of 2V RMS will give almost 6.3V RMS with R5/7 at 22k.
Linear pots are recommended throughout for greater predictability. U1B is an amplifier stage, with a gain of 2 (6dB). This drives the filters and is altogether unremarkable.
The filter sections are shown below. These are essentially identical to those used in P09. All filters are 24dB/octave Linkwitz-Riley alignment, and frequency is determined by the resistor and capacitor values. The values marked RH and CH are for the high frequency section, RM and CM are for midrange, and RL and CL are the bass section.
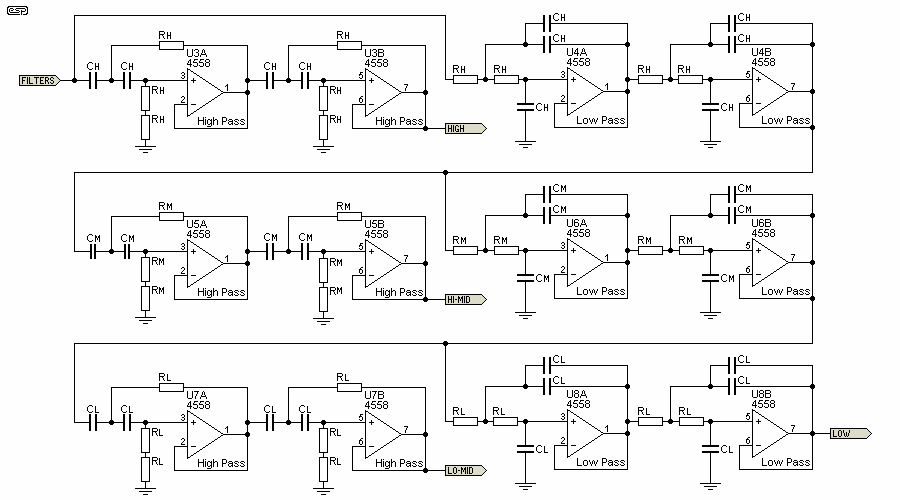
Figure 3 - Filter Sections
The high frequency section is taken off first, because this is the one most likely to be affected by any opamp distortion (which should be negligible however). Of more importance is audible opamp noise. High frequency noise is the most audible, so the fewer opamps adding their contribution the better. The remaining sections are cascaded, and since noise is nowhere as audible at the lower frequencies, this will introduce very little by way of noise or distortion. The opamps all operate as unity gain buffers, so have the maximum possible feedback and distortion that should remain below the threshold of most distortion analysers.

Figure 4 - Presets, Level Controls, Muting & Buffer
The pots marked PS1 (etc) are level presets for each frequency band. These can be set so that it's always easy to return to the calibrated reference setting, simply by returning the frequency band level pots to the maximum position. All individual filter level and preset controls should be linear.
If the level controls are not needed, they may be omitted. The 'top' of the pot is simply jumpered to the wiper. Likewise, if the volume control isn't required, it is jumpered in the same way. If no volume control is used, make sure that the gain is kept low - this should be a maximum of 6dB - just enough to replace the losses at the presets - assuming that they will be operated somewhere near the middle of their range.

Figure 5 - Power Supply, Mute Control & Optional LEDs
The power supply is conventional, and just uses a pair of regulator ICs. Don't attempt to use the low-power regulators, as the current drain is too high. Total current depends on the opamps used, but a safe estimation is perhaps 2mA for each opamp (4mA per DIP8 package). On this basis, there are 10 dual opamps, so current will be up to around 40mA (excluding LEDs if used). If the DC supplies to the PCB are around ±25V (recommended), regulator dissipation will be about 400mW. For reference, the test unit draws 25mA without LEDs.
The mute relay circuit needs some explanation. Q1 is used to detect when there is an appreciable voltage across the negative regulator IC (U12). When the supply voltage is below the regulation threshold, Q1 will be turned off, so the relays are de-energised, muting the output. Once there is ~3V or more across U11, Q1 turns on, activating the relays and removing the short to earth. Normal operation is then enabled. When the power is turned off, Q1 will release the relays as soon as the voltage falls below ~3V. This releases the relays, shorting the signal to earth and preventing any untoward noises from getting through.
Not all opamps need the mute, but if you use TL072 opamps it will be required because they make silly noises as DC supplies fall below about ±6V. I used 4558 opamps for the prototype (similar to the TL072, but with bipolar inputs), and they make no odd noises at all. You can use any dual opamp you like, but you will need to work out (or measure) the current - some (such as the NE5532) draw a lot more current than 'lesser' opamps. You'll also need to check to determine if they make noises when power is removed. If they do, you will need the mute circuit.
The LEDs are optional, and are only needed if you wish to illuminate the panel from behind. Otherwise, they may be omitted. I recommend high brightness LEDs, because they require much less current for the required light level. The more current drawn by the LEDs, the greater the dissipation in U11 and U12 (the regulator ICs). In case you were wondering, the LEDs run from the regulated supplies so that their PCB tracks can't inject any noise into the audio sections.

Figure 6 - Measured Response of Test Crossover
The graph shown above is the measured response of the unit pictured. No attempt was made to select optimum crossover frequencies, and as shown they are set for 62Hz, 300Hz and 2.8kHz. The 300Hz filters are actually a bit too low - these should be raised to about 600Hz which would give less interaction of the filters. Since this unit was built primarily so intending constructors could see the finished board and so I could verify that all construction information is correct, I wasn't too concerned about selecting optimum frequencies.
Construction without the PCB is not really recommended because of the number of devices needed. The final version of the boards is now available. The earlier boards (with mistakes) that I made available for a reduced price sold out very quickly, but the new ones are a stock line. There is one section on the board that is not normally required, and the details are not included in the above diagrams. The construction pages do have the complete circuit though, and it can be included if desired. As always, full construction details are available in the secure section.
Because this is a relatively complex circuit, the PCBs are double sided, with plated-through holes. A single-sided board would require many jumper wires, and would be considerably larger. The PCBs available measure 141 x 70mm.
 Main Index
Projects Index Main Index
Projects Index |