
|
|
| Elliott Sound Products | Project 108 |
The circuit is designed to provide protection to a DIY switching power supply for car amplifiers by shutting down under any or all of the three modes of protection (over voltage, under voltage and over temperature) with minimal components.
It has been made to use as few components as possible and to easily integrate into most switching power supply designs.
The circuit has two versions. The first one uses four opamps and a thermistor as a sensor. Since Rod has mentioned that thermistors may be hard to get, I added another circuit which is virtually similar to the P42 fan controller circuit but with some slight changes. It basically uses a diode's forward voltage drop as an indication of temperature. It has been slightly modified in a way to work with the reference voltage the PWM controller IC which are the commonly used TL494 in my car amp and SG3525 in the P89 circuit.
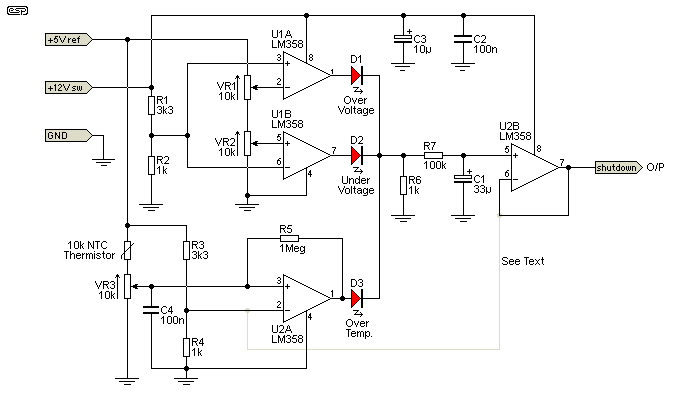
Figure 1 - Schematic of Protection Circuit
The schematic of the basic circuit is shown above. This is the version that uses a 10k (at 25°C) NTC (negative temperature coefficient) thermistor as the temperature sensor. R1 and R2 form a voltage divider from the +12V, this is where the two comparators (U1A and U1B) sense the supply voltage. U1A, VR1 and D1 form the over-voltage protection. U1A outputs a high (+12V) signal through D1 when the voltage is greater than the preset on the trimmer (can be set to any value from 10.75V to 21.5V).
U1B, VR2 and D2 form the low voltage protection, and the output of U1B goes high if the supply voltage goes below the preset voltage (which can be set from 0V to 10.75V).
U2A, the thermistor, R3, R4, R5 and D3 form the over temperature sensor. R3 and R4 set the reference voltage of around 1.2V for U2A. This sets the trigger voltage for the thermistor and VR3 combination to reach when the maximum temperature is reached.
R5 is included in the circuit to provide some hysteresis. That way, when the preset temperature is reached, the amplifier/power supply needs to cool down to a lower temperature than set before going back to normal operation. The thermistor that I used is of unknown specification, but I could measure that it has a DC resistance of around 7.2k at 30°C. I have used another thermistor about 11k at 30°C and the circuit works fine.
Although D1, D2 and D3 are not indicated as anything specific, you can use LEDs so that when any of the modes of protection are encountered, the LEDs provide some visual indication as to what fault is occurring. I suggest to use LEDs as it will make testing and calibration much easier. Note that any colour of LED can be used for the circuit, but if the LED has a rather high forward voltage drop (like blue, white and 'true green' which are about 3.3-3.6V) then output voltage at the voltage follower A4 will be lower. But if you use the comparator version (delayed but output swings from 0-12 or 12-0 instantly, explained below), there is no effect.
R6, R7, C1 and U2B provide the summing so that all three sensors are connected to one shutdown pin of the switching supply oscillator IC. R6 is a pull down resistor and also provides about 12mA current flow across the LEDs. This would also provide enough current so that when using the LEDs, there is enough light output to see when any protection is triggered. R7 and C1 provide some delay to the output which is around 1-2sec. This is intended to prevent false alarms in case of the normal voltage fluctuations on a car supply. As shown, the circuit's output will rise slowly from zero to +12V when triggered, and from +12V to zero when the fault is cleared.
This has been done to provide a soft start for my TL494 based circuit after recovering from any protection.
 | If using a PWM IC with a shutdown pin like that on the SG3525, connect the -ve input of U2B to -ve input of U2A instead of the output of U2B as shown. This will still provide the required delay, but the output will swing instantly from zero to +12V and vice versa. The different modes are needed because of the different operation of the two controller ICs. |
C2 and C3 are for supply bypassing.
Although shown as dual opamps (such as LM358 (preferred), LM1458 or TL072), you should be able to use any ordinary opamps. Use of high speed/wide bandwidth devices is possible but not required. An alternative is the quad 4741 (or any other quad opamp).
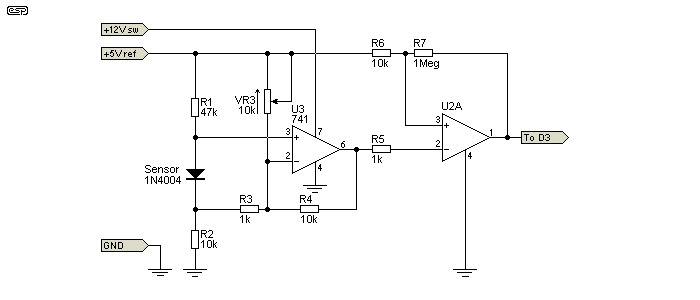
Figure 2 - Alternate Temperature Sensor
The schematic above is quite similar to rod's P42 fan controller. This is needed of you can't acquire a thermistor for the sensor, and it has been slightly modified to suit the 5V reference instead of using a 10V zener and 220Ω resistor for a stable reference voltage. With this circuit, although it shows only one diode connected, you could parallel several more so that when any of the diodes get hot enough, the over temperature is triggered. Adding this circuit to the protector is simple ... eliminate all the components associated with U2A (except for D3) in the schematic shown in Figure 1, and replace with this circuit instead.
Note: I have asked permission from Rod to use his circuit to incorporate a diode as temperature sensor for my circuit.
| If the PWM controller IC you use cannot provide enough output current for the 5V reference (or does not have a 5V reference) that these circuits require, a simple 78L05 regulator can be used. The 78L05 is basically similar to the TO-220 7805 counterpart, but with only 100mA output current capability and a smaller TO-92 case. |
The circuit requires only four connections to a switching supply to operate ... +5v, +12V, GND and output.
+5V is needed as a stable reference voltage for the circuit. +12V must be connected to a switched 12V supply, as this powers the entire circuit. If you tap directly to battery connection, you have the risk of draining the car battery even if the circuit draws only a few mA. GND is connected to the switching supply ground - not the output ground of the amplifier side.
The output is connected to the shutdown pin of SG3525, or the +ve input of any comparator of TL494, while the -ve input (which could be either pin 2 or 15, whichever comparator is used) of the same comparator should be connected to the output (pin 3 of TL494).
For my power supply, the circuit is basically "tapped" into the oscillator. I did not have to cut any tracks, but just soldered all the required connections to the respective IC pins. If you do it this way, do it carefully but quickly to avoid damaging the IC with too much heat.
This is how it was connected to my power supply ...
+5 is connected to pin 14
+12 is connected to pin 12
GND is connected to pin 7
output is connected to pin 1 of TL494
If your oscillator uses a different circuit design, you might have to modify and/or add some components to the protector or the oscillator itself.
Due to the simplicity of the circuit, building it on Veroboard or other prototyping board is possible. Although I did mine on double sided 0.5mm fibreglass PCB (I have a few lying around), it was only 40mm x 50mm in size, which is very small. The use metal film resistors is not required but will not hurt. I used only carbon films on mine as metal films cost 20 times as much as carbon films over here.
[Editor's note: Raymond hails from the Philippines, which also explains the rather higher than normal ambient temperature mentioned above. ESP]
The use of multiturn trimmers is not required but they make setting more accurate and much, easier - especially on the over temperature circuit. Also, multiturn trimmers tend to be more reliable especially in the mobile car environment.
 |
The standard pinout for a dual opamp is shown on the left. If the opamps are installed backwards, they will almost certainly fail,
so be careful. The suggested LM358 opamps are the best for this circuit, but if you prefer to use something different, that choice is yours. |
Setting the correct values or trip points is simple. The high voltage is usually set at or slightly above15V. Run the amp with a variable supply that can power the entire amp (a load is not necessary). Set the output to about 15VDC and turn VR1 until LED1 lights, then back up until it just turns off.
Then increase the supply voltage. The LED must turn on.
The low voltage side is usually set at around <10V, so set your power supply to 10V and turn VR2 until LED2 turns on, then back off VR2 until it just turns off. When you lower the supply voltage to below 10V, LED2 must turn on.
For the temperature sensor, turn VR3 so that LED3 is off. Operate the amp until you reach the maximum operating temperature that you would allow it to run, and turn VR3 until LED3 turns on. Again, slightly back up a bit until the LED turns off again.
During testing, when any of the LEDs turn on, the amplifier PSU should turn off as an indication that the circuit is working and connected properly.
I have been using the prototype of the circuit (thermistor version) for some time now (in my DIY dual P3A car amp) without any problems ever since it was installed. While testing on the bench, all worked perfectly. My power wiring is as follows ...
From car battery to 65A fuse, to 5-6m of 4ga wiring to fuse box which splits to two amps. Then 8ga between fuse box and amps. I played it at high volume but I didn't see the 'low voltage' light turn on which means that I have sufficient wiring and charging system. On the bench, I set thermal protection to about 40°C and let the amp play for a while - it did shut off when it warmed up.
Rod mentioned using a Schmidt (Schmitt for some people) trigger for the over/under voltage comparators. This would improve the fault detecting ability of the circuit but my prototype does not include it. I may incorporate it in my next car amp. You can also change the value of the 1M resistor in the thermal protection to change the difference in temperature between the turn off point and turn on point.
In my present prototype, connections between the protector module and the main PSU board is done via a 4 pin header and plug. That way, when the amp is disassembled for troubleshooting, the protector module (attached to the external case) can be removed but still allow the PSU itself to function normally.
... Just one  - ESP's P42 circuit. thermo fan controller
 Main Index
Projects Index
Main Index
Projects Index